How to Record Movie on Mac

Recording any kind of video, including a movie on your Mac is relatively simple. While there are a lot of third-party tools in the market that can help you record video on your Mac, they may not be necessary. This is because the built-in solutions that you get with macOS are just as good or sometimes even better.
But since we can't deny that sometimes you do need a little extra when recording video, we will share with you a third-party solution that provides additional features and options. But let's begin by looking at the options you have to record the screen on your Mac without needing to install any third-party software.
Way 1. Record Movie on Mac with Photo Booth
Photo Booth is an application on your Mac that you can use to take photos and videos using the iSight camera. Since it comes built into the macOS, it is completely free to use. It is also a simple application that can capture both camera and audio, making it an ideal solution for recording movies on your Mac.
Here's a step-by-step guide on how to use Photo Booth to record a movie on your Mac;

Step 1: Start by opening Photo Booth on your Mac. You can do that by selecting it in the Dock or from the Applications Folder.
Step 2: Once the app is open, you should see three icons in the lower-left corner of the main window. These include the option to take four quick pictures, take a still picture or record a movie clip.
Step 3: Click on the third option and then click on the "Red Camera" to start the recording.
Step 4: When you're done, click on the "Red Camera" again to stop the recording and the movie will be available on your computer.
Way 2. Record Screen Movie on Mac with QuickTime
QuickTime is the second option you have when you want to record a movie on your Mac. Like Photo Booth, QuickTime is completely free to use and has numerous features that allow you to record both the camera and the screen. You can also integrate audio into the recording, allowing you to create a complete and versatile recording.
Here's how you can use QuickTime to record a movie on your Mac;
Step 1: Open the QuickTime Player from the Applications folder which you can find in the Dock or using Finder Window.
Step 2: Once the application is open, click on "File" in the menu bar and then select "New Movie Recording" or "New Screen Recording," depending on the type of recording that you want to make.

New Movie Recording will open the Mac's camera to begin the recording.
New Screen Recording will allow you to record what is happening on the screen. You can choose to record the entire screen or a section of the screen.
Once you have made your selection the QuickTime control panel will appear.
Step 3: To begin the recording, click on the "Record" button.
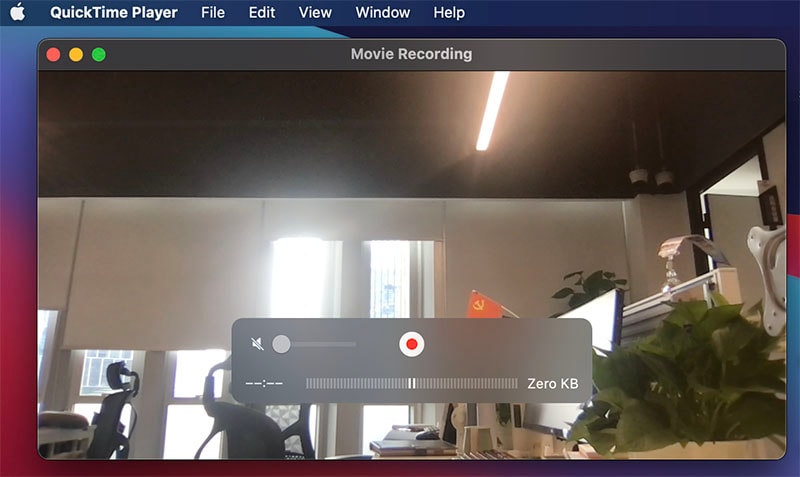
Step 4: Click on the same record button to end the recording.
Way 3. Use the Best Movie Recorder for Mac
QuickTime and Photo Booth are both great tools, but if you want a program that goes the extra mile when it comes to video recording, try Wondershare DemoCreator. This program is the most ideal solution if you want to record a professional movie. This is because it considers all aspects of video recording, allowing you to record using the Mac's camera, the screen and audio all at the same time and in crisp-clear quality. It is the ideal solution for recording high-quality promotional materials, product demos and how-to videos. It also comes with a built -in editor with numerous options to create the perfect video.
The following is a breakdown of some of the program's most notable features;
- It allows you to record crisp clear screen-flow videos for presentations and narration.
- Recording the screen, webcam and audio is only a matter of turning these options on in the settings
- It has a very simple to user interface that makes it one of the simplest video recording programs to use
- It comes with a full editing suite that you can use to edit your videos to perfection
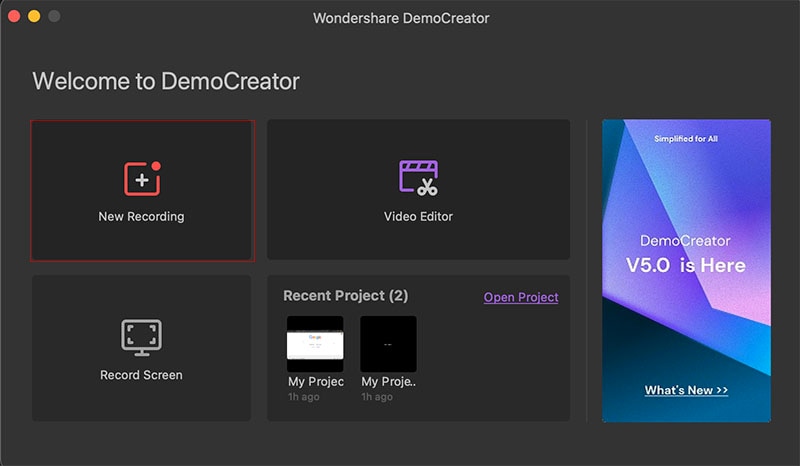
DemoCreator is a very simple tool to use, with an uncomplicated user interface. Follow these simple steps to use it to record a movie on your Mac;
Step 1: Install the Program
To begin, you will need to first of all install the program on your Mac. The official download links can be found on the program's main window. Follow the setup instructions to install the program on to your computer.
 Secure DownloadSecure Download
Step 2: Set up the Program
Once installation is complete, launch DemoCreator on your Mac and then click on "New Recording."
By default, the program is set to record the entire screen. If instead, you would like to record only a section of the screen, click on the dropdown arrow next to "Full Screen" to choose the area you want to use.
Step 3: Choose Input Devices
Then, you need to choose the microphone and camera that you will be using to record the movie.
DemoCreator will use the built-in microphone and the FaceTime camera by default. If you had a different input device in mind, select it from the dropdown menu next to "Recording Device."

To include webcam footage in the recording, select "Camera On" below "Recording Device."
Step 4: Start the Recording
When you are ready, click "Start Capturing" or use the "Shift + CMD +2" keyboard shortcut to begin the recording.
A 30-second countdown will appear on the screen before the recording begins. You can then use the same "Shift + CMD +2" shortcut to finish the recording.
The video will be available in the pre-determined folder and you can open it in DemoCreator to edit it.
With the right tools and processes, recording a movie on your Mac doesn't have to be hard and if you use Photo Booth or QuickTime Player, it doesn't have to cost you a dime. If you are however looking to create highly-engaging videos that are meant for business or promotional purposes, we recommend choosing DemoCreator. With this tool you can easily switch back and forth between screen and camera recording to create seemingly complicated videos in a few simple steps.


