
How to cut a part of a video?

Are you searching for ways of how to cut a part of a video? Video editing is becoming our necessity on a day to day life. This article will talk about how you can cut a part of a video with different software. Video trimming and editing are done mainly by the gamers and the professionals because their work needs the most.However, nowadays, everyone wants to cut a part of the video and share it with their friends, colleagues and post it on their social media.
Hence, if you are having problems trimming the video, we are here to solve your problem by providing various steps of various software. So let's not waste more time and take a look at the steps of how to cut out parts of a video.
Best way to cut a part of a video – Use Wondershare DemoCreator
The popularity of video creating and creation software is increasing rapidly in the time of the technical revolution. It has been observed that a considerable number of applicants are looking to develop their ideas into reality. Every profession now requires excellent development, and video editing has made it possible by Wondershare DemoCreator.
This is the platform that provides excellent opportunities for beginners with no price tag. It offers excellent recording features, and it also allows the users to annotate the content by their editing features. Let's have a look at the steps on how to cut out parts of a video.
Step 1:- Download the software.
If you want to cut out parts of a video, it is essential to download the software on the PC. This software will be available at their official site. So the first thing you will have to do is download the software and then install it on the PC. After that, you can register the DemoCreator according to the requirements.
Step 2:- Create the project.
To start trimming, you will have to create the project by searching the "Files" option in the menu. By following this, you will have to add the audio clip, images, and video to work on it. Next, you will have to select "Important Media Files" from the menu.

Step 3:- Drag and Drop
You can also add various files in Media Library by dragging and dropping the video clips to the preview window and the timeline.
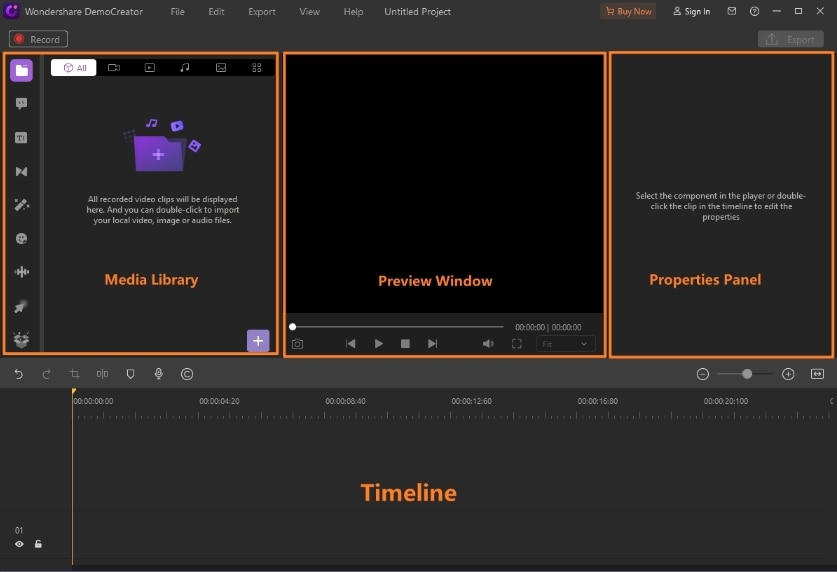
Step 4:- Select the clip.
You can select the clip by hovering your mouse over thumbnails of videos that will show a clear preview of assorted files. Then, you can double-click on the files to play.
Step 5:- Drag out the clip edges
You will need to set the cursor on the edge of a clip for practical and straightforward video trimming after opening the specific clips. You can trim your video by dragging the clips in any direction, which can be achieved by setting up the marker.
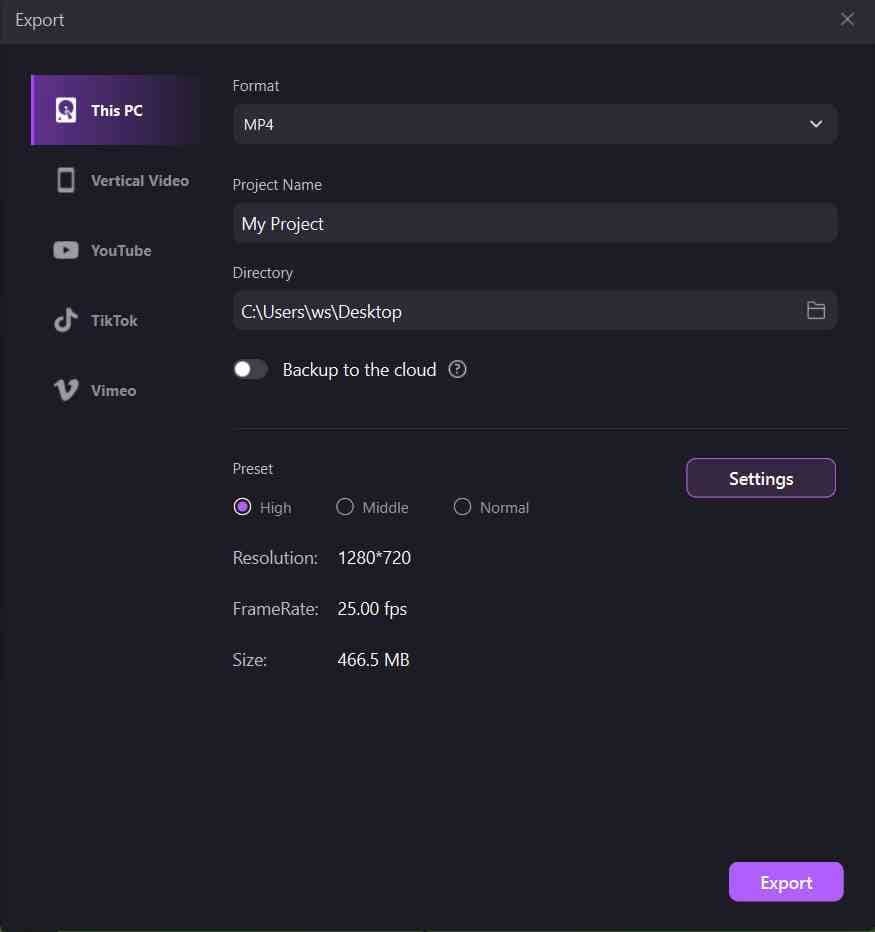
Step 6:- Save the File
After you are done with the trimming, you can now save your file to your desktop. Apart from the settings, you can set your bitrate, frame, resolution, and the other setting in the export window.
Cut a part of the video on Windows - Use Windows 10 Photo App
If you are searching for the software to trim your video in Windows, you choose to go for Windows 10 photo App. You will not have to download any other apps for trimming the video. It comes built-in your computer. It is straightforward to use. By following the instructions below, you can easily cut part of the video. Let's have a look at the steps of how to cut the parts of a video.
- Step 1:- You can give a search "Photo App" in the search bar instead of searching through a long process. After finding the app, launch it.
- Step 2:- Select the folder from which you will want to edit the videos. Then, click on the Edit and Create and then click on the Trim option.
- Step 3:- Drag the right and left buttons along with the progress bar for choosing segments of the video. Everything in two buttons will decide what will be saved to the new project, and everything else will get cut from the videos. The Grey button in the selection can get dragged if you wish to preview the various parts of a video.
- Step 4:- A portion of a file will get trimmed and exported to the file and saved to the exact location as the original with _ trim added to the name and automatically opened.
Cut video parts on Mac – Use QuickTime Player
Are you a Mac user? Does any other highly professional video editing software confuse you? Then, there is a simple option for you to edit the video. QuickTime player is the option to go for. This application is developed by Apple and comes by Default in every Mac device that allows the users to share, edit, record, and play pictures and videos.
If you want to trim your video in QuickTime, Player is very straightforward and allows you to edit the length of the video from any point of the video. There is no need to download QuickTime player because it is already pre-installed. Let's look at the steps of how to cut the parts of a video.
- Step 1:- You can search this application in the search bar, find out in the Dock and then select the "Application" from the left menu toolbar, and then search for QuickTime on the right side of the menu.
- Step2:- Once you have found the QuickTime, launch the application and click on "Open File" in the menu bar. Choose the video from the location of Mac.
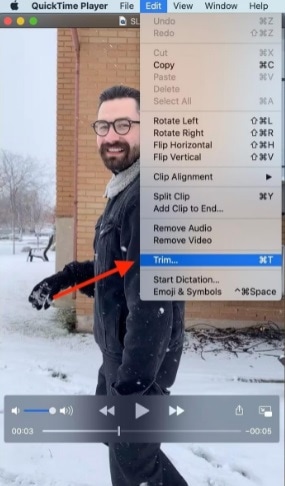
- Step 3:- Keeping your video open, choose the "Edit" option from the menu.
- Step 4:- In the drop menu, choose the "Trim," or you can also hold the "Command" + "T" on the keyboard.
- Step 5:- The yellow trimming bar appears around the video length at the bottom. You will have to deaf the "Handles" for trimming out parts which you will not want. Everything that is inside the yellow part will stay in the video.
- Step 6:- After you are done with the trimming, tap on the "Trim" on the right. You can also preview the video by choosing the play icon at any point in time while editing the process.
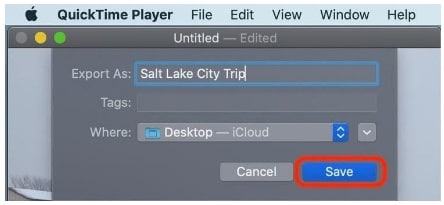
- Step 7:- For saving the edit, click on the "File" and tap on "Save" from the menu bar.
- Step 8:- After saving it, you must trim the video and select the place where you want to save this on the computer, and click on "Save."
How to cut a part of a video online?
The 123Apps is one of the unique websites when you are searching for editing the video and audio files easily and fast. This application is the one-stop solution to video editing and video trimming. All the features of 123Apps are elementary to use. This application's user interface is straightforward to clean with a specific button, making the functionality usable and clear.
It is a free online tool for trimming the video then you can easily trim out the videos. Moreover, by using this tool, you can cut and join many files and even audio files for preparing a fantastic presentation.
How to cut a part of the video iPhone?
Are you searching for trimming and cutting the parts of videos that you have captured on the iPhone? Do you want to eliminate the unwanted portions and make your video more attractive? Well, the iMovie app, which is available to be used on iOS devices, is a straightforward tool. If you want to know how to cut a part of the iPhone video, opt for following the given steps.
- Step 1:- Launch the "iMovie" application on the iPhone.
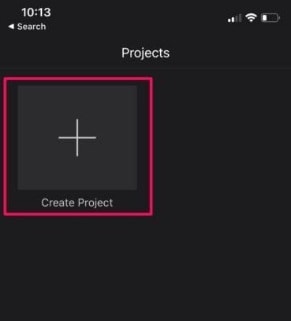
- Step 2:- Tap on the "Create Project" for starting a new project in the application.
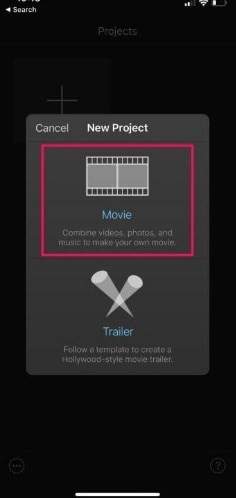
- Step 3:- Select "Movie" while you ask about the project type you wish to create.
- Step 4:- It will help in opening up your device's Photos Library. Then, you will scroll through the videos and choose the specific clip, which you have got to create. After you have done with this, you can click on the "Create Movie" menu.
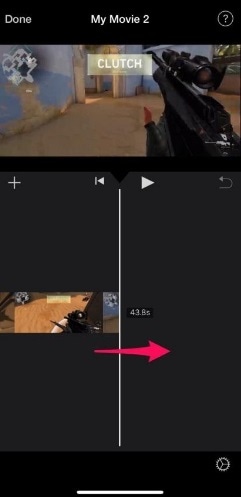
- Step 5:- Video which you have selected will get added to the app timeline. You can place them at the clip end, but you can drag clips to the right and then stop at the exact point where you wish to cut out the videos.
- Step 6:- Click on Timeline for proceeding to the step that is next.
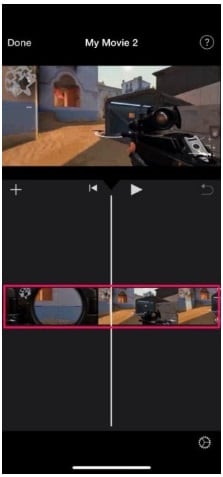
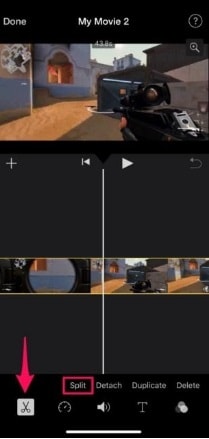
- Step7:- You can opt to access the different tools, which are available in the iMovie now. You must make sure that you can select the cut tool, i.e., indicated with the "Scissor" icon. Then, click on "Split" for cutting the video clips from where you have marked them.
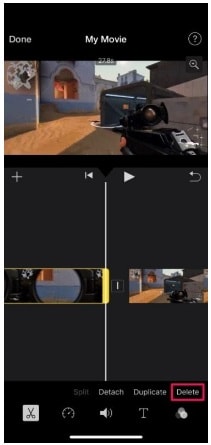
- Step 8: Select all the portions you wish to eliminate from the timeline and tap on the "Delete" to trim the videos.
- Step 9:- The portion that has been deleted will not get visible in the timeline, but if you want to. Make any changes, and then you can click on "Undo" in the timeline. If you make any mistakes, you can repeat these steps to trim and cut the video parts. When you are done with your project, then click on "Done" to save the project.
- Step 10:- Click on "Share" at the bottom, as shown in the photo below.
- Step 11:- Save the video by clicking on "Save Video" in the Photos app.
Conclusion
Here are the steps of cutting the parts of a video on multiple devices and with various applications. If you are a windows user, you can go for Windows 10 photo app, or if you are a Mac user, you can go for QuickTime player. You have all options open with a straightforward user interface.


