- 1. Record your computer screen and webcam simultaneously.
- 2. Allow you to customize screen capture and frame rate .
- 3. Powerful editing tools and effects to enrich your video clips.

How to Add Transitions Effect to Your Movie Maker Film

A transition effect that has been intended to be slow can feel horrendous. When planning an application, an interface, or any sort of organized substance, we should guarantee that clients get where they have come from as they show up at the new page or state. The transition from one screen or gathering of content to one more should feel regular and ought to be tried on gadgets of fluctuating force and speed to get a more extensive perspective on how the progress feels. Excessively quick, and it might seem broken or anxious; excessively sluggish, and it will be disappointing to utilize.
Part1: Why You Will Need to Use Transition Effect to Your Films
Advances take us starting with one state then onto the next constantly, quite often indeed. More often than not, these advances feel imperceptible (as they ought to), and until they are removed, we don't realize they are there. This article examines advances and how all-around planned advances can improve the client's experience by conferring a feeling of control and a simple route. Transitions are normal in the interface plan, as we probably are aware, but at the same time are utilized in films and item plans. In item configuration, advances are set off by contact, development, or actual treatment of the item; in the interface plan, notwithstanding, advances are set off by exploring through the interface of the application or Web content. A transition ought to be intended to give the client a feeling of their virtual position or area inside the interface.
Steps to Add in Movie Maker
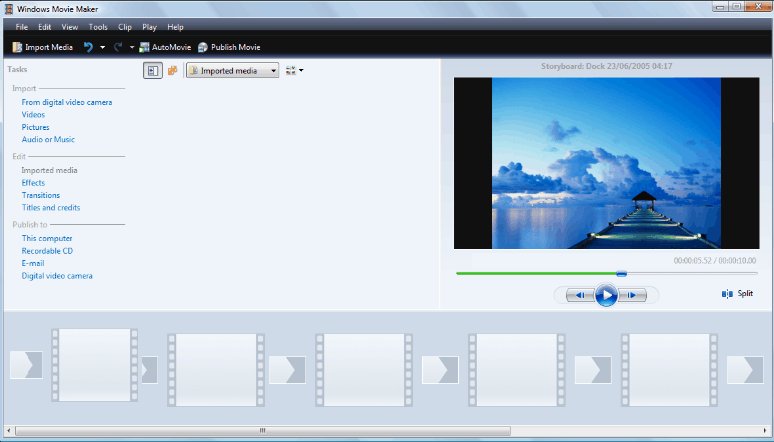
Step 1: Launch Windows Movie Maker
The first step is to launch the software from your Windows start menu as shown here:
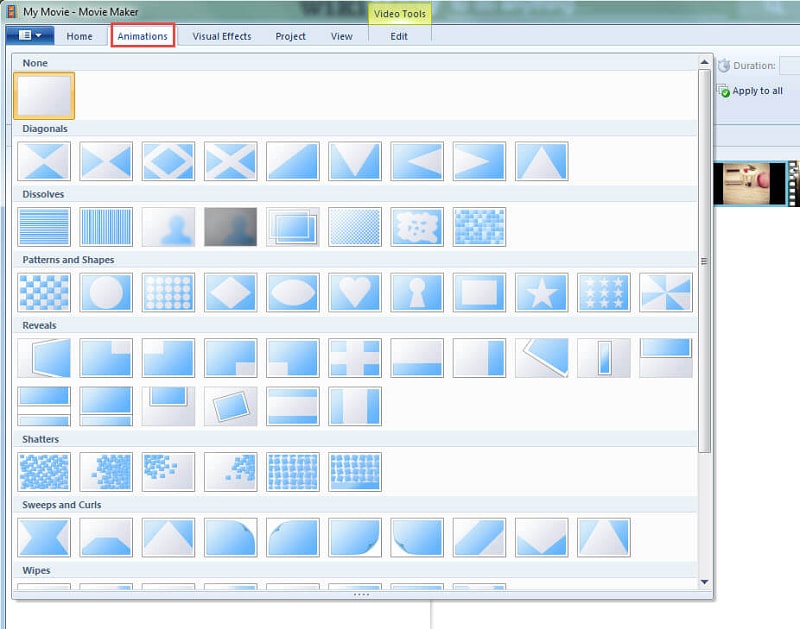
Step 2: Open Animations Menu
In the next step, go for the Animations menu bar and select the transition section from that, as shown here:
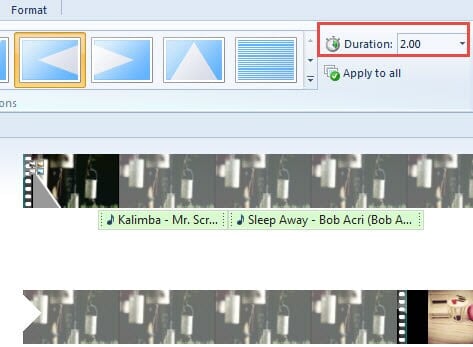
Step 3: Add Transitions
Now, after choosing your desired transition from the list, simply add to the video files and specify the settings of the transition as shown here:
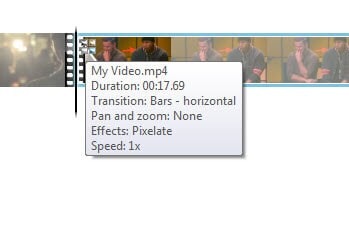
Step 4: Save the File
In the end, go for previewing your file and if it’s okay, directly save the project on the go.
Part2: Step to Apply Transition Effect to Your Film with DemoCreator
Step 1: Select the Transitions Menu
To begin with, applying the transition effect, Launch the DemoCreator application and then refer to the transition menu after importing your video file to the editor and then to the timeline below respectively. After that, select your favorite transition among the list to preview it inside the preview window.
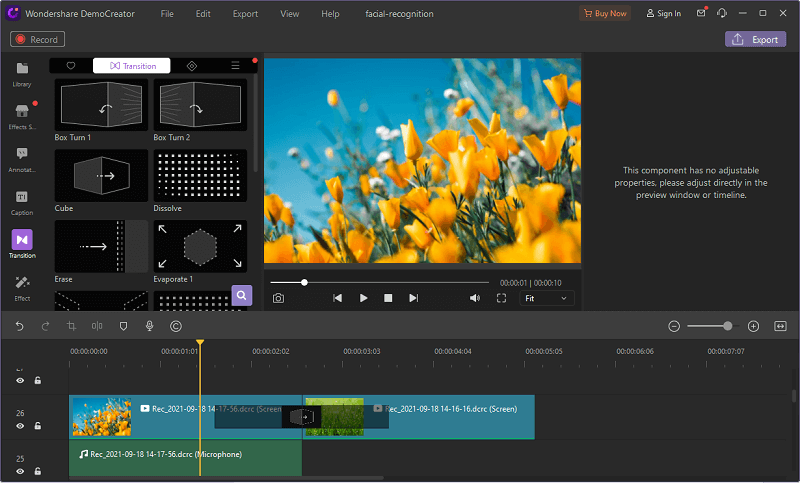
Step 2: Drag your Transition Effect
After you’ve decided to apply your desired transition effect, you need to simply drag and drop it down in the timeline between the clips so you can customize it according to the video clips effectively.
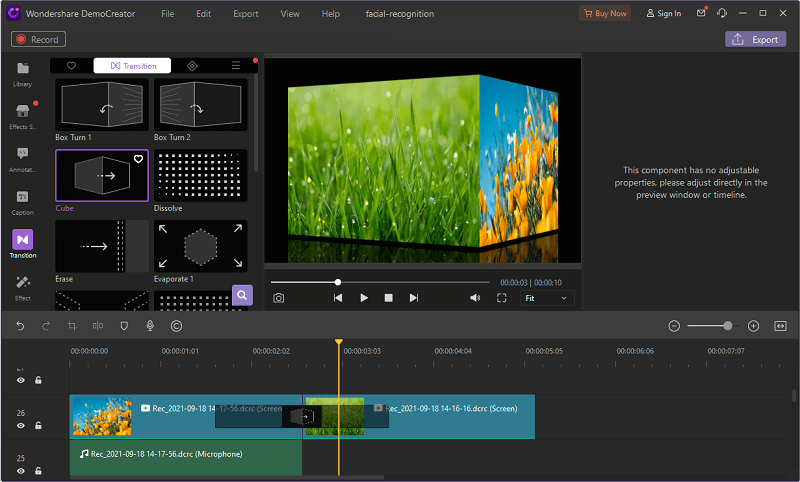
Step 3: Review the Effect
After you’ve added that transition. If you’d like to remain your videos idle and without any transitions. Then you might need to change your transition effects. For that, to erase a transition, you have added to the clasps, you need to choose the added transitions and afterward click the remove button at the furthest left of the transition. Now to preview, simply play your video in the preview window and check it out in real-time.
Step 4: Share or Save Video
Lastly, once done with adding transitions, you now need to save the transition video by hitting the Export window, situated at the top-right corner of the interface, and in this way, you have applied your favorite transition effect according to your video clips with full effectiveness.
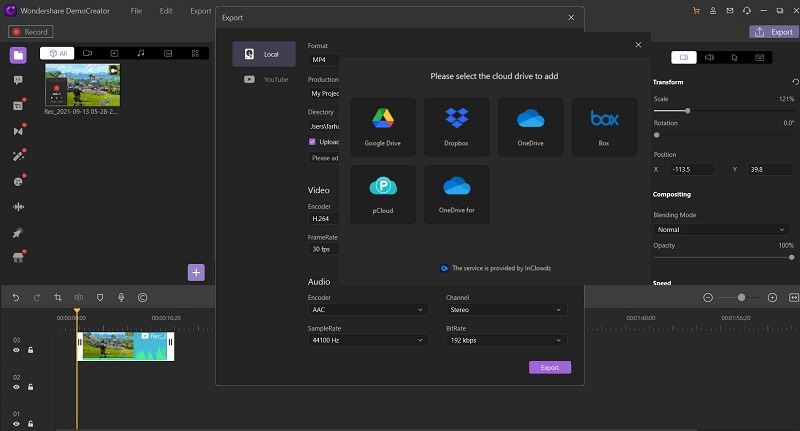
You can also share it across the YouTube platform by hitting the YouTube menu inside the export window.
 Secure DownloadSecure Download
Part3: Top 10 Transition Effects in 2021
The Dissolve
The break-up is a film progress-altering strategy. It gives the impression of one video cut dissolving into the following one that shows up on the screen. Generally, the watcher of the film will not understand it's occurring until it's done, as it's an unpretentious film progress strategy.
The speedy breaks down pass on activity and life, and the slower disintegrates are utilized to make a climate of blurring. The primary video clasp will step by step become lighter and afterward the subsequent clasp will start to blur in and in the long run, come into the center.
The Cutaway
An ordinarily posed inquiry is “What is an alluring transition for your video?” It must be the fundamental cutaway. If you will be, you will as of now be exceptionally acquainted with cutaways as they are a phenomenal method of adding parody to the show.
This sort of film transition sees the movie producer moving the scene to another, and afterward getting once again to the scene that they left. This is an incredible method of adding some fervor into the films, just as changing the speed of the clasp.
Blur to/from Black
Like the cutaway and dissolve transitions, a blur to dark or a blur up from dark is one more approach to show an adjustment of time, area, or subject. In contrast to the breakdown, this does it more emotionally. Blurs to and from the dark are regularly utilized in film trailers. They make tension immediately by blurring all through the dark as opposed to cutting between shots. Then, at that point, when they need to hurry up and show more activity, they begin utilizing faster alters.
The Wipe Transitions
Think about this film's progress as something contrary to what the disintegrate does, because of the way that it catches the consideration of the crowd. It has its sub-transitions as well. There's the iris wipe (the state of a circle), lattice wipe (like shapes), clock wipe (turning the shape in clock hands), heart wipe (the state of a heart), and the imperceptible wipe (the utilization of dividers to cover cut).
The two most usually utilized are the normal wipe and the iris wipe. The regular wipe is really simple, as the point of the transition is to be just about as consistent as workable for the crowd. It will be simpler here to separate the distinctive progress procedures that the wipe can offer. The Star Wars establishment is an extraordinary illustration of the wiped film transition method – and this is the reason you've been sitting tight for to go and yet again watch the motion pictures! The iris wipe is utilized to zero in on the cemental subject while editing out most of the remainder of the casing.
Light Flash
This progress is turning out to be increasingly more well-known as of late. Fundamentally, the light blaze transition rapidly breaks down the screen to white for a small amount of a second so it looks like a camera streak. This impact is somewhat to a greater degree a curiosity contrasted with the blurs and cutaway transitions; however, it has some expert employments.
The significant worry with streak advances is to utilize them with some restraint. However, it is a truly cool impact, it doesn't work in each circumstance. These advances are frequently utilized in wedding recordings. It is a simple method to progress from moving pictures to in any case photography.
The Fade Transitions
This is one of the most widely recognized sorts of transitions in film. It's ordinarily used to imply the start or finishing of a scene. It's a well-known transition strategy for movie producers who are blurring to dark or white. You will most likely perceive this method in many opening groupings of your #1 TV shows.
The L Cut and J Cut Transitions
Both the cuts are famous transitions to use in 2021. How about we start with the L Cut? This sort of film transition strategy is otherwise called a parted alter, and it's a film method that has been around since the simple recording days. Set forth plainly, it's the point at which the sound of the location of a film advances over to the following scene (or shot) despite the reality the sound no longer matches the video. These sorts of alters are extraordinary for depicting transformations between characters.
Now what's the J Cut? All things considered, it's the place where the sound of the scene plays before the comparing shot does. This gives the impact of the visual limping along with the sound. If the camera followed each individual when they were talking it would begin to feel unnatural for the crowd. Though having the option to consider them to be on individuals' countenances as they react genuinely to what the other individual is saying is undeniably more normal (and engaging) to watch.
Match Cut Transitions
With regards to film altering advances, you don't get more innovative than the match cut! An awesome illustration of this film-altering progress is from the film Psycho (1960). During the shower scene, you can see the channel and the water whirling down it, before the shot crossfades to a nearby shot of Marion Crane's eye.
This style of cut can add an upscale edge to your scene and it's an incredible way for you to get your expressive energies pumping. Talking, it's a standard cut yet it stands apart from the others because of how it coordinates with the activities of the two shots. On the off chance that you haven't as of now, proceed to check it out online.
The Particle Wipes Transitions
In case you will utilize a wipe, I propose utilizing a molecule wipe. This is generally something like a lot of shimmers, or air pockets or hearts changing one picture to another. We suggest these because, indeed, contingent upon your undertaking, they can hold reason. you'll need to track down your particular manner to discover these advances helpful. Play around with it a little and sort out what is the best search for you!
Bounce Cut Transitions
The bounce cut transitions are the best way to amaze your viewers. Presently it has the leap cut. This sort of film progress is truly perceptible to your crowd. This makes the clasp seem like it's hopping through time.
To make it you will require a more extended film clasp and afterward to remove key components of it. Then, at that point, simply put the pieces you wish to incorporate once again into your timetable.
The All-in-One Screen Recorder & Video Editor
- Record desktop screen,audio and webcam simultaneously
- Edit videos quickly with a wide range of professional tools
- Built-in plentiful video effects
- Export to MP4, MOV, MKV, GIF and multiple formats
Part 4: Conclusion
Along these lines, that was all that you need to think about film advances! Compelling and effective film advances are essential in movies and recordings, as they can control and change a scene or shot. With regards to altering cuts and transitions, there are a lot of various kinds of film altering software out there. Put the entirety of your newly discovered information under serious scrutiny and take your recording venture to a higher level!


