- 1. Record your computer screen and webcam simultaneously.
- 2. Allow you to customize screen capture and frame rate .
- 3. Powerful editing tools and effects to enrich your video clips.

How to Edit Videos with L-Cuts and J-Cuts

There are a few video-altering procedures each expert has to know. In case you're occupied with video altering or might want to be, then, at that point, two procedures you totally should know are the J-cut and the L-cut. J-cuts and L-cuts get their particular names from the shape they make in your altering project's timetable. Editors utilize these strategies to permit crowds to see the setting of the discourse as opposed to simply the actual exchange. Utilizing a J-cut or an L-cut is tied in with keeping the progression of the alter moving without becoming exhausting. If a J-cut or L-cut is performed appropriately, the crowd won't ever see it occurring. This equivalent hypothesis is truly valid for any altering procedure.
Part1: What's J-cuts and L-cuts Transitions in Video Editing
J-cuts and L-cuts are comparative, yet unique. By definition, J-cuts are scene advances where the sound of the following scene goes before the image change. In an L-cut, the sound extends from the past scene into the accompanying one, despite visual changes. Ponder the movies we watch and the exchange successions inside them. During these successions, the manager isn't continually scaling to and fro to each character as they talk. Doing this would be very diverting. All things considered; an L-cut is utilized. The J-cut is something contrary to the L-cut. With this procedure, the watcher hears the discourse of Character A, yet just sees Character B on screen. From this shot of Character B, the supervisor scales back to Character A. the best ideal opportunity to utilize either method is during a scene with discourse, however, these strategies can likewise prove to be useful during any scene with interfacing activity to a particular sound.
Part2: The Basics of L-Cut and J-Cuts
L and J-cuts are incredible and basic procedures that add layers of profundity and inundation to your film. These two cuts might be straightforward yet fusing them into your altering will further develop it, and make really convincing videos and movies. Utilize these slices to make discussions in your movies smoother and more normal, and make firm advances from one scene to another. Eventually dominating these methods empowers you to push your movies and altering to another level. Indeed, these cuts are fundamental, but at the same time, they're truly significant and accommodating when you need an approach to progress between shots. Truth be told, one of the more normal things you will in general find in recordings altered by amateurs is a ton of hard cuts—cuts that don't utilize any advances.
At the point when motion pictures added sound, not exclusively did the experience of watching films change, editors grew new methods to work with sound and assist with recounting stories in unique and connecting new ways. Probably the soonest procedures created were L-cuts and J-cuts. With L-cuts and J-cuts, editors add interest and surprisingly pressure to exchange scenes, exploiting the capacity of sound to take care of the crowd discourse as opposed to requiring a text card to convey it. Editors were allowed to concentrate any place they needed while the crowd hears the discourse.
 Secure DownloadSecure Download
Part3: How to Create an L-Cut and J-Cut Transitions
In any video editing software that supports the L and J cut transitions, Here are some basic approaches to consider while making J- and L-cuts:
Step 1: Spot two clasps nearby in the Video 1 track. Ensure you have sufficient extra casings accessible to stretch out the sound to make the sound under.
Step 2: Unlink the clasp you need to broaden. Drag the sound for the clasp you need to reach out down to an alternate soundtrack
Step 3: Drag the finish of that sound bite either under the finish of the past cut (J-cut) or under the start of the following clasp (L-cut). Keep in mind, don't slide the sound bite. That will make it viable. Maybe you are broadening the term of that brief snippet by utilizing the Selection device to drag its end.
Step 4: Spot a cross-blur from the main clasp to the second and that’s it. You’ll have your Cuts transition embedded successfully.
The All-in-One Screen Recorder & Video Editor
- Record desktop screen,audio and webcam simultaneously
- Edit videos quickly with a wide range of professional tools
- Built-in plentiful video effects
- Export to MP4, MOV, MKV, GIF and multiple formats
Part4: A Step Further to Cut Transitions with an Easy Editor
DemoCreator is a video application that permits clients to handily embed the L-cut and J-cut transitions as well as alter and share individual, business, and instructive recordings with a beginner-friendly approach. It’s a simple to utilize, reasonable, and flexible platform which you’ll be like to try out. It also enables the clients to make and share well-known recordings. Models incorporate advertisements, work postings, introductions, demo recordings, sound accounts, and websites. You can print your PC screen, webcam, sound framework, and amplifier sound simultaneously. You can pick an enlistment region and set up a post. With this application, in addition to the transition effects of your choice, you can record two recordings while utilizing your PC and audit them later. which you can utilize some other time when altering your show.
What’s more with the DemoCreator, you have various title and credit successions, changes for cuts, and surprisingly supportive instruments for making instructional exercises like Cursor Magnify. Wondershare has limited who this product is for and sharpened it explicitly for their requirements, removing any complexities for the beginner while trying out L and J cuts for the very first time. DemoCreator accompanies a progression of Annotation alternatives, like Captions, Banners, Overlays, Arrows, and more in its annotations menu so you can enhance your recordings. To make your video more dynamic, you can add vivid stickers into the accounts to improve. Here’s how you perform the L and J-cut transitions with this masterpiece software.
Step 1: Import your Videos
You probably have downloaded and installed an all-in-one DemoCreator software for performing this L-cut and J-cut transition. Now, the next thing you need to do is launch it from the Start menu of your PC and you’ll be amazed at the intuitive interface of DemoCreator, like the one here:
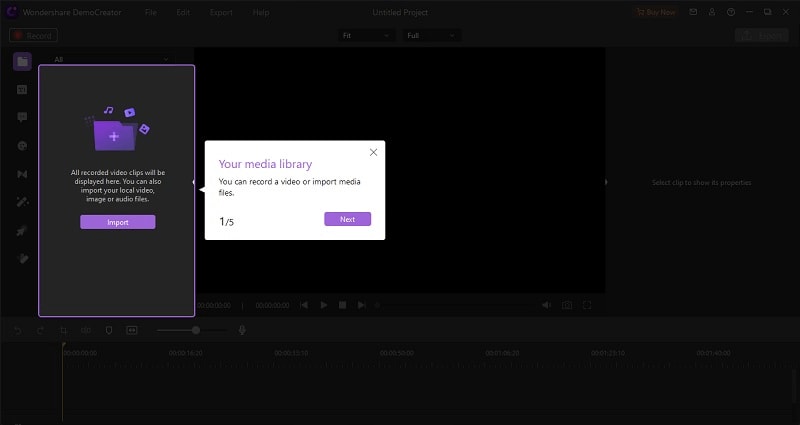
Right after selecting the Editor option, hit the import button is available in front of this software interface and select your favorite file to import right away. Now the best part is, Wondershare DemoCreator is open to numerous file formats to import of your own choice. After you’ve made a selection, proceed with the selection.
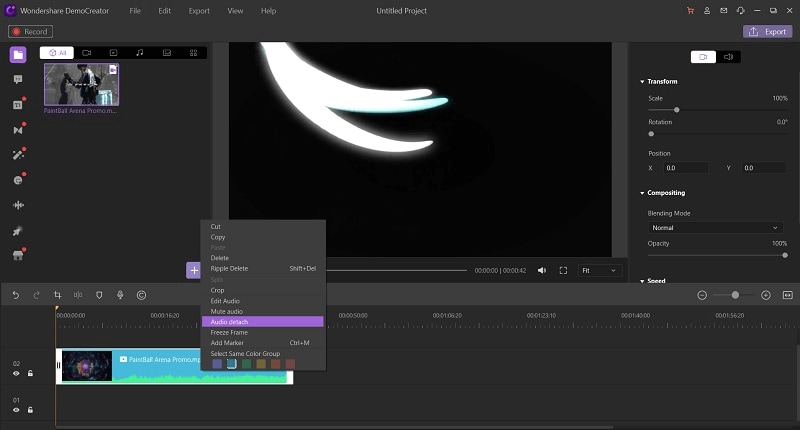
Step 2: Detach Audio
In the next step, go to the Transitions menu and select your favorite Overlay transition from the plethora of available transitions at your end. After you’ve made your selection, now to apply a J-cut to the video file, Detach the audio from the video by right-clicking on the video inside the timeline and selecting Audio Detach as shown below:
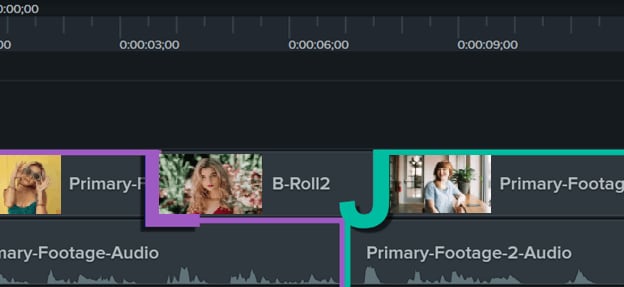
Step 3: Apply J-Cut and L-Cut Transitions
Now, after applying the transition, you can perform the L-cut and J-Cuts. Starting with the J-Cut, simply drag and then overlay your video’s second audio clip a bit and then shrink your second video clip till a point so it becomes in sync with the other. Now, to make another transition cut that is an L-cut, you need to drag and overlay another video clip ahead this time, a little bit, and then simply narrow the third audio clip so it becomes in sync.
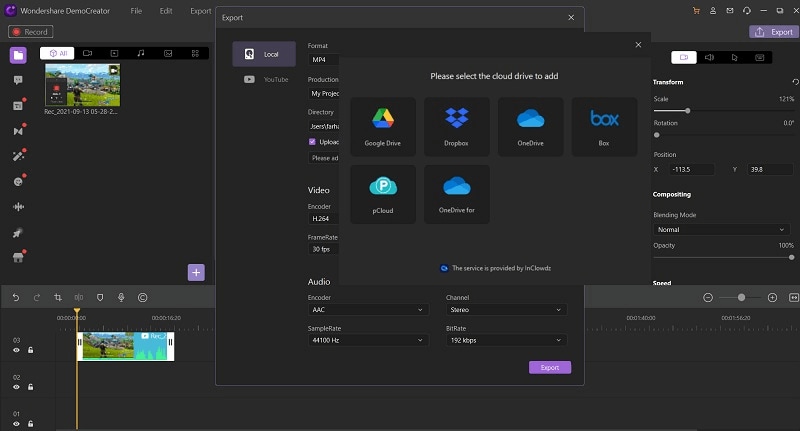
Step 4: Export and Share
After you’re done adding overlay cut transitions i-e J and L-cuts, now is the time to save as well as share directly the edited file by following the export steps below. With DemoCreator, you can also opt for sharing your output file with your specified video format directly to your YouTube channel.
If you want to save to your PC, then customize the output setting and personalize your video output file settings including file name, and hit the save button directly.
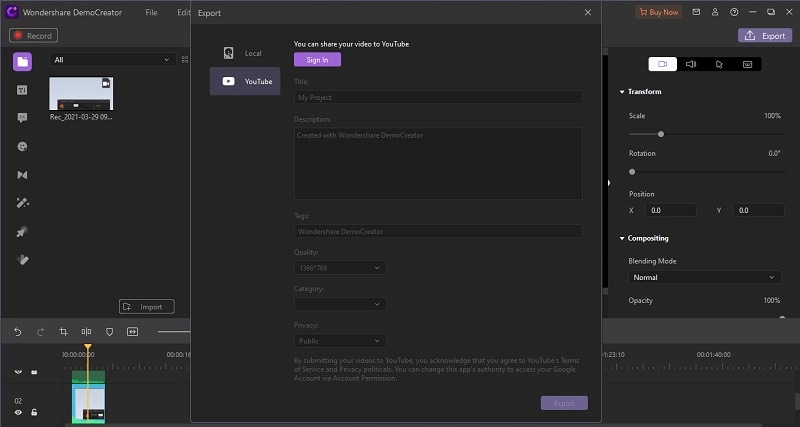
From here, you can also share your edited video file directly to the YouTube platform or even upload your file to viable platforms like OneDrive and Google Drive, hit the sharing option and specify your platform as shown below: