
Wondershare DemoCreator
An essential demo-making tool that helps learners, educators, freelancers, and gamers to take idea-sharing to the next level.

Perhaps you want to create a website demo to use in your website promotion campaign. Whatever is your cause, you need to do it properly for maximum results.
This guide is going to teach you how to record the screens from your website using different screen recorders – purposes of website recording – and tips to create engaging website demo videos.
Let’s get started.
Part1 Why you will need to record screen from your website
Recording screens from your website can be just what you need to prevent vague feedback, reviews, and technical support queries.
There are a number of instances where recording screens from your website beat other ways of conducting a review – providing or collecting feedback – and marketing your website.
Record review
One of the biggest use cases of recording screens from your website is to provide feedback or review to the development team. You can record reviews of the different UI elements (such as buttons, forms, and links) and how well they perform.
Recording a detailed review will give your developer insight into how well you liked the website so they can make changes based on your feedback.
Website promotion campaign
Website recording is a great way to promote your website. Whether you’re a business, a freelancer, or an online store owner, video recordings are great for marketing purposes.
Recording screens from your website is the best way to show off your website and demo your work in action. With so much competition out there, it’s important to ensure your target audience finds it a breeze to use your website. You can record a website screen to show how certain aspects of your website work.
It also ensures that your website stands out from the crowd.
Part2 How to record demo video (tools recommend)
Recording your website screen involves a lot of things, but professional screen recording software sets a strong base. While there are many tools available online, we find the ones detailed below the best among the lot.
Keep reading to see steps by step methods of how to record the screens from your website.
1. DemoCreator
Wondershare DemoCreator is a complete screen recording software where you can record gameplay, screen activities, browser activities, and Window activities.
It also allows you to set up a virtual presenter and create animated explainer videos.
Latest features of Wondershare DemoCreator
Wondershare DemoCreator 6.0 boasts a few latest features that’ll help record demo videos more efficiently.
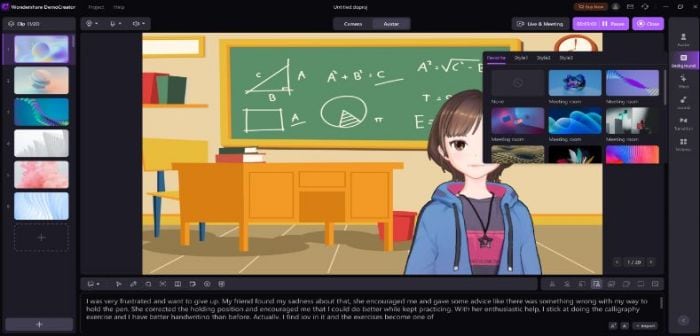
● Virtual Presenter
DemoCreator recently included the Virtual Presenter option in its current version.
With the help of Virtual Presenter, you can turn your facecam recording into a cartoon or avatar that is capable of mimicking your motion and speech. There are many avatars to choose from, both male and female.
There’s a good collection of backgrounds to choose from, depending on the overall theme of the video.
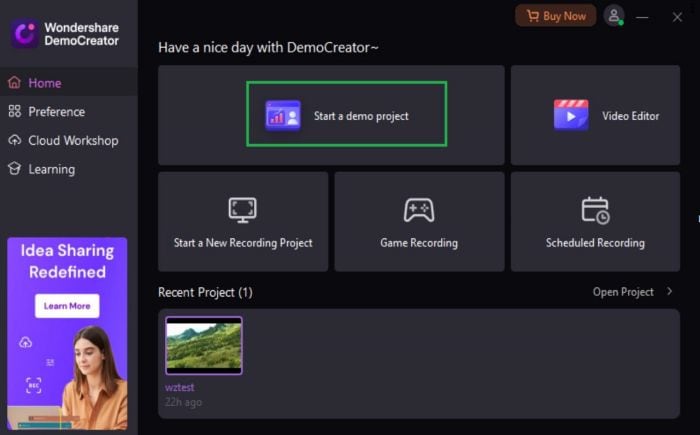
● Start a Demo Project
The all-new Create a Demo Project is purpose-made feature to record demo videos.
 Secure DownloadSecure Download
● Import PPT
The new version of DemoCreator allows you to import PowerPoint presentations and present them through screen recording.
Step1 Launch the software and select recording mode
Firstly, you need to visit the Wondershare DemoCreator website to download it for your computer. After the download, install the software following the default instructions.
Once installed, you need to launch the program. You can see a variety of options available in the interface.
You need to choose “Select a Record Project”, so you can adjust everything according to your requirements.
The “Record Screen” option has some predefined settings to capture the entire screen.
Step2 Adjust the screen size
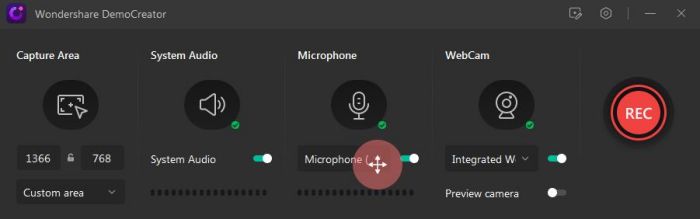
When you click “Start a Record Project”, a small window will appear with a few options. Now, open your website and select the screen capture area. You can do so by exploring the dropdown menu under “Capture Area” and selecting “Custom Area.”
Now, set the dimensions of the screen record area according to your requirements – drag the frame inward or outward from its edges.
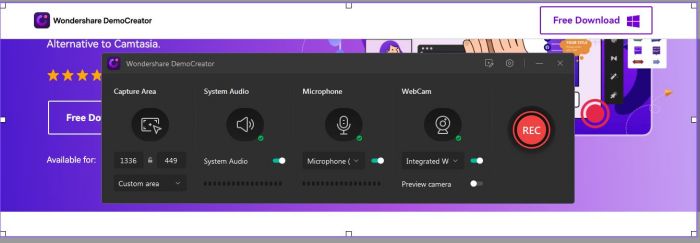
Step3 Set up Audio and Camera Settings
DemoCreator records the system sounds and microphone sound by default. You can choose to disable them using the toggle switch – or select a microphone of your choice.
Also, you can enable WebCam recording to include your facecam video in the recording.
Step4 Start recording
To start screen recording, click the REC button. The recording will begin after a countdown of three seconds. At this point, start explaining or showing whatever you want to show your audience through the demo video.
If you want to pause/resume the recording, you need to press F9 or use the pause button. To stop the screen recording, click the “Stop” button or press F10.
Once you stop the recording, it opens in the DemoCreator editor, where lightweight video editing can be performed.
2. DemoAir
DemoAir is another great tool to record the screens from your website. It’s also developed by Wondershare, the creator of the popular screen recording tool DemoCreator.
Here’s how you can use DemoAir to record your website screen:
Step1 Install & Launch Wondershare DemoAir
The first step is to download and install DemoAir. You can use Google Chrome to visit the official website and click on the “Add to Chrome” button to install this extension to your browser.
You can also explore the Google Chrome web store for DemoAir and install it directly on your browser.
Afterward, launch it from the Extension tab (on the top-right corner).

Step2 Select a Recording Mode
When you launch it, you can select one of the modes to record your desktop, browser, or webcam.
You can also set up the microphone or webcam input – and enable/disable the system audio. Now, go to your website screen you want to record and select the “Current Tab” so it only captures the screen you’re on.
Step3 Start Recording
At this point, you can click on the A “Start Recording” button to start recording. A small control panel appears in the bottom left of the screen. From here, you can pause or stop recording.
Step4 Stop Recording
If you want, you can just click on the DemoAir icon from the extension tab to stop or pause the recording.
3. Loom
Like DemoAir, Loom is available as a downloadable app and Google Chrome extension for screen recording. Its stand-out feature is instant sharing, making it a popular choice among colleagues working on a similar project. With its in-app editing tools, you can add time-stamped questions or emojis.
Here’s how you can record screens from your website using Loom:
Step 1: Install & Launch
You need to install its Google Chrome extension from the Chrome Web Store. Once installed, you can log in with your Google, Slack, or Apple account. Now, find it in the extension tab – pin it, and click on its icon to launch its interface.
Step 2: Select a Recording Mode
Much like DemoAir, you can choose between its Cam Only, Screen Only, and Screen + Cam recording mode. Go to the website screen you want to record and select “Screen Only.”
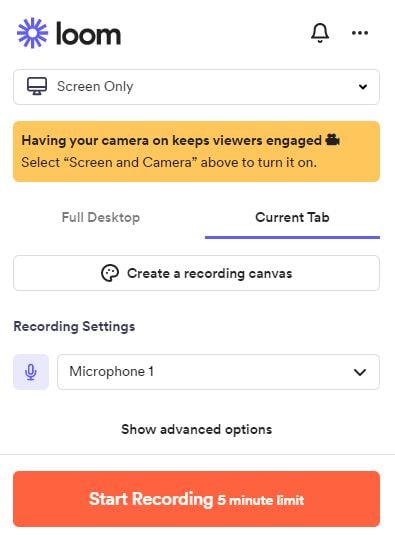
Step 3: Start Recording
Now, hit the “Start Recording” button to start recording and record your demo video.
The Video Control menu appears in the bottom left of the screen. Here, you can use these three buttons: Start/End Recording, Pause Recording, and Delete Recording.
4. Screencastify
When it comes to screen recording tools, Screencastify is a popular name. Just like Loom and DemoAir, Screencastify is also available as a Google Chrome extension. All of the recordings sync with your Google Drive.
Even if you don’t have an internet connection, Screencastify still works great. You can use its mouse, drawing, and highlight tools to make your videos engaging.
Here’s how you can use it to record screens from your website:
Step 1: Install & Launch
You need to install its Google Chrome extension from the Chrome Web Store. Once installed, sign in with your Google account. From the Extensions tab, find and pin Screencastify.
Step 2: Select a Recording Mode
Now, click on the Screencastify icon in the Extensions section, and enable microphone access and camera access in the new window that’ll open in the browser.
You can choose between its Browser Tab, Desktop, and Webcam Only recording mode. Go to the website screen you want to record and select “Browser Tab.”
Step 3: Start Recording
Now, hit the “Record” button to start recording.
A control panel will appear in the bottom left where you can choose options such as Mouse, Pen, Rectangle, Stickers, and Eraser. It lets you draw and annotate.
To stop or pause, use the End Recording and Pause Recording button on the extreme left of the control panel.
5. CloudApp
Least popular among these five – but a great choice to record screens from your website – CloudApp is a downloadable screen recorder. What makes it an interesting choice is additional features such as adding gifs and annotating images.
Here’s how you can use it to record your website:
Step 1: Install & Launch
You need to install its Google Chrome extension from the Chrome Web Store. Now, find the extension in the extension tab – pin it, click on its icon, and hit the “Sign in with Google” button.
Step 2: Select a Recording Mode
Here, you can choose between different recording modes. Go to the website screen you want to record and select “Screen Only.”

Step 3: Start Recording
Now, hit the “Start Recording” button to start recording and record your demo video.
Part3 Tips to record website demo video
Undoubtedly, one of the best ways to explain your website is by having a demo video. It can be a short or long video, but it should be engaging and informative.
Here are a few useful tips for recording an engaging and informative website video that serves the purpose well:
1. Use a purpose-made screen recording software
Screen recording software allows you to record your screen as well as your voice and mouse movements. Some programs even allow you to upload the video directly to YouTube or a website.
Wondershare DemoCreator and Wondershare DemoAir are examples of such screen recorders that allow for high-quality demo videos.
2. Be clear about your goals
Before you start recording, make sure that you know exactly what you want to show in the video.
What content do you want to highlight? Who is this video for? How will it benefit them? The clearer your answers to these questions, the better chances are that your audience will understand what they’re looking at and how they can benefit from it.
3. Use a script
The best way to ensure that your demo video is engaging and easy to follow is to have a script written down beforehand. This will ensure that you don't lose focus as well as ensure that your voice sounds natural and not forced.
4. Keep it short and sweet
Not everyone has a long attention span, so you’d not want your viewers to get bored before they've even gotten through the entire thing. Keep it short, interesting, and engaging by using succinct sentences and high-quality visuals that keep people interested from start to finish.
5. Speak friendly
Speak directly to the viewer as if you were speaking to a friend or family member. This makes viewers feel comfortable with the content they're consuming, which leads them to trust your brand more.
6. Practice and edit
Practice before recording a video so that you won't trip over your words or stumble over any technical difficulties during filming. Editing is also important because it allows you to fix mistakes in post-production so that viewers won't see them when watching your videos online.
Conclusion
That's it! These tools and tips would make it easy to record the screens from your website to record demos or feedback. Now, hopefully you can put these actionable methods and tips to use to make your users' lives easier.
Related FAQs
1. What is closed captioning?
As explained earlier, closed captions in a video can be enabled or disabled as required, and can even be formatted for improved visibility or to match the theme of the video. Closed captions for a video are saved in an independent file, typically with the *.srt extension.
2. How to deal with the auto-caption process failure?
While making auto-captioning, you can try to stop the transaction process if the program fails to recognize it. Then launch and sign in to the software again and check your transaction time.
Secure DownloadSecure Download