- 1. Record your computer screen and webcam simultaneously.
- 2. Allow you to customize screen capture and frame rate .
- 3. Powerful editing tools and effects to enrich your video clips.

How to Use Camtasia 9 to Record Screen and Edit Video

If you are a Youtuber or a professional who constantly needs to produce quality videos, Camtasia is one of the best recording and video editing software to assist you. But, using the latest version of Camtasia might not be as easy as you think and you might need some help understanding the basics of it. Here in this piece, we have tried to cover the basic questions a new user might think of, like How to record screen with Camtasia 9? How to use Camtasia to edit captured video? How to export and share videos in Camtasia? And so on … Also, for your help, we have included some pro tips as well, so that you can get the best out of “Camtasia 9.”
- Part 1: How to Use Camtasia to Record Screen
- Part 2: How to Use Camtasia to Edit Captured Video
- Part 3: How to Use Export and Share Videos in Camtasia
- Part 4: How to Use Camtasia Alternative Filmora Scrn
Part 1: How to Use Camtasia to Record Screen
Okay, let’s start with the very basic feature of Camtasia 9: Recording screen. Below is how you can use Camtasia to record screen:
- Launch Camtasia 9 and click “Record the screen” option.
This step is quite obvious. The first thing you need to do is to launch Camtasia 9 and click on the option “Record the screen” located in the top left corner of the video editor.
- Select the area of the screen you want to record:
With Camtasia 9, you can either record your full screen, or a custom is of your laptop’s screen as well. So, in the first step, you need to select the area you want to record.
Use either the default option of full-screen recording or if you want to record a specific part of your screen, you can select that through the option “Custom” and choose an option according to your requirements.
- Decide whether to record webcam or not:
By default, Camtasia 9, records web camera but you can easily turn off the recording of webcam under the panel “Recorded inputs”. Simply click on the option “Camera” and turning it off.
- Selecting the audio options:
By default, both system audio and microphone audio is recorded when recording screen. However, if you do not want the default settings you can easily change it by clicking the option “Audio”. Also, if you are looking to record any one of the audio (system audio or microphone audio), you can easily to that by expanding the option “Audio”.
- Starting the Recording:
Now, the final step. Hit the button Record and a countdown will appear. After the countdown, the video recording will begin.
For Windows users: To stop the recording after you have finished, just press the stop button or hit “F10” key.
For Mac users: To stop the recording after you have finished, just press the stop button use the keys “Option+ Command+ 2”.
After this, you will get a preview of the recording you made and here, you can either edit the video according to your needs or just save it.
Part 2: How to Use Camtasia to Edit Captured Video
Recording the video is easy, but here comes the hard part- editing the captured video! The videos you create might not be perfect and you may need some basic editing to make it look a bit more professional and so, we have discussed the basic editing below…
The captured video will appear on the campus, and you can preview the video by just hitting the play button to see what changes are required.
1.How to cut or trim the captured video in Camtasia:
If there is an unwanted part of the recorded video and you want to remove it, you can do that by following these steps:
- Find the part of the video you want to trim on the timeline by dragging the “playhead”.
- If the mistake is in the beginning, you can simply remove it by dragging the end of the video in.
- If the mistake is somewhere in the middle, you can remove it by dragging a handle on the “playhead” and click the “Scissor” icon appearing in the timeline.
- Once the media is removed, a stitched line will appear on the timeline. This shows that the media has been removed.
Please note that the edits you make on the timeline will not affect the original video and you can simply start again if you are not satisfied with the edits.
2.Smart-Focus (Zooming in and out)
By default, Camtasia uses a feature called smart-focus to record only the active part of the screen. This means that for example if a notepad and a browser are opened and you are working only on the notepad, then Camtasia will focus only on the notepad.
SmartFocus is a great way to make sure that the viewers only focus on the most important content and not on the sideline. However, if you want to add zoom in animations manually here is how you can do that:
- Select the media through the playhead, in the position you want to add the zoom.
- After selecting the media, click the option “Visual properties”.
- On the tab, click the “Add animation button”- or you can press the key “Z” from the keyboard.
- Use the option of “Scale” to select exactly the part of the video you want to zoom in. Or you can alternatively use Zoom n Pan Option.
3.Splitting the captured video:
Splitting the captured video is a very easy task and if for some reason, you want to split the captured video, you can simply do that selecting the area of the video on the timeline you want to split and then click on the option “Split”.
- Adding annotations.
To add annotations to your recorded video, follow these steps.
- Simply select the annotation you want to add and drag it to the timeline.
- Now, all you need to do is to double click the annotation to edit it. You can add text, resize, or click and drag the annotation according to your needs.
- Also, you can customize the properties of annotation by selecting it. And then adjusting its font, size, color and other properties.
- Adding transitions.
- Selecting the transition you want to apply to your video.
- Dragging it to the timeline where you want the transition to be applied.
- You can also change the duration of transition by clicking and dragging the ends of transition on the timeline.
- If you are not satisfied with the transition, you can simply delete it by selecting it and then press the delete button.
- Adding behavior.
Adding a behavior to the annotation is a very easy task. All you need to do is:
- Select the behavior you want and drag it to the annotation and the behavior will automatically be added.
- You can customize the behavior through the properties panel appearing at the right side of your screen.
Part 3: How to export and share videos in Camtasia
Okay, now that you have edited the video and it’s time for you to save it and then share it!
1.Saving the Video
To export the video in Camtasia, follow the steps written below.
- Click on the option “Produce and Share”.
- Choose the quality and video format according to your needs and then click “Next”.
- Edit the name of your project and select the folder you want your video to be saved in.
- Once all steps are done, click “Finish”, and the video will be saved to your selected location.
2.Exporting the video
If you want to share the video you just created with another Camtasia user, you can simply do that using the following steps:
- Click File.
- Click the option “Export as Zip”
Using this option, your whole project will be zipped into one file so that it can be shared easily.
3. Sharing the video in Camtasia
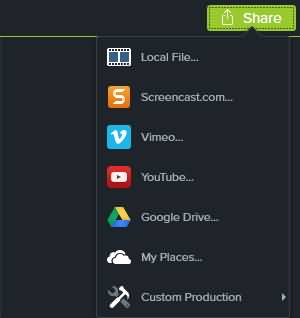
After finishing the video editing in Camtasia, you can save it to your PC or share it to social media platform such YouTube, Vimeo, or Google Drive. Sharing in Camtasia is easy, just click the Share button on the right corner and then select the platform to continue. Follow the instruction on the screen to share your videos.
Part 4: How to Use Camtasia Alternative Filmora Scrn: One Solution to All Your Problems
As you can judge by the above content, it’s not easy to create and edit videos using Camtasia 9 and if you are not a techy, it could be a real pain for you and answer me this, why even use Camtasia when there are better and cheaper options available in the market, right?
Have a look at the amazing features of Filmora SCRN- the best screen recording software.
1. Premium screen recording software
Filmora SCRN is a premium screen recording software. Not only its easy to use, but also tons of premium features such as FPS (15-120), build in tutorial features, option to record either full screen or a small part of it are exemplary.
Here’s how you can make a screen recording with Filmora SCRN.
- Install and launch Filmora scrn.
- Select the option “Get started”.
- Now, select the dimensions of the screen that you want to record. (By defualt, it is set to record the full screen, but you change it by expanding the screen capture menu and selecting the option “Set a custom size later”. Also, you can manually change the frame rate if you want to)
- Now, you need to select the audios that you want to record. By default, Filmora SCRN records both the computer audio (System sounds) and the MIC audio but if you wish to change it, you can do so by clicking on the audio, selecting either capture or Don’t capture, according to your needs.
- Okay, now that you have selected just press the “Capture” button. And a new window will appear. Depending on your requirements, you can now select the area of the screen you want to record by simply dragging the ends of the “Red line”.
- Now you are all set. Just press the record button. And this should start recording.
- Once you are done with the recording, just hit “f10” to stop the recording or you can open the recording tab “Displayed in taskbar on the lower right of your screen” and then hit the stop button.
- Now, once you stop the recording, a preview of your video will appear. If it’s good, just save it using the option “Export to local files”. Here you can select the file location, the format you want the video to be saved in and other advanced settings.
- Once you have selected your desired settings, just click the button “Export”- and the video will be saved in your chosen location.
If you aren’t satisfied with the recording and you want to edit it, export the video to the “Video editor” and start editing with the professional tools of Filmora SCRN.
2. Full editing suite- from basic to advanced editing
Whether you want to do the basic editing, or you are making a video for your brand and needs advanced editing, Filmora SCRN is here to your rescue. A bulk of professional tools ensures that the video is exactly like the way you want it to be! You can add annotations, special effects, behaviours, Cut or trim the video, Zoom in and out and basically everything to ensure that the video meets the voice of your brand!
3. User Friendly
Trust me when I say this, most of the video editing software currently out there are not user-friendly and if you are not a techy it is almost impossible to understand even the basic functions really!
This is why Filmora SCRN is user-friendly, and all the options are right there in front of users organized in a way that you don’t need to spend hours finding your desired feature!
4. Cost effective
Camtasia 9 costs $199 for a single user. DemoCreator, on the contrary, just costs $29.99 for a lifetime. If you are looking for the best yet cost-effective software, DemoCreator is the best choice for you.
So, what are you waiting for? Download the DemoCreator now and start making perfect videos for your brand in the most efficient and easiest way.
 Secure DownloadSecure Download


Other Popular Articles From Wondershare


