- 1. Record your computer screen and webcam simultaneously.
- 2. Allow you to customize screen capture and frame rate .
- 3. Powerful editing tools and effects to enrich your video clips.

How to Record Audio With A Mic For Gameplay Commentary [4 Ways]

With the rise in popularity of gameplay videos on YouTube and other video sharing services, you may find yourself wanting to get in on the action instead of just watching. In order to make a recording to capture your audience’s interest, you’re going to want to set it up so that you can record audio commentary via your microphone during gameplay. It’s actually pretty simple.
To do this you are going to need three or four things, depending on your setup.
You will need the following items when recording the commentary for your gameplay video:
- Headphones
- A microphone
- A sound recording program (if your video recording software cannot capture microphone audio)
- An editing program to bring your audio and video together in post-production. If your video recording software captures them simultaneously, you may not need this.
We recommend you to record your gameplay commentary audio with DemoCreator Screen Recorder Software because of its ability to record high quality and clear audios, no matter it is the system audio or the mic voice. The benefits of using DemoCreator to recording the commentary audio for your gameplay are:
- You can add Markers to some important points
- You can cut off the unwanted commentary and then record your voice over during editing
- You can change the speed of your gameplay commentary and even remove the background noise in the commentary audio with one click.
 Secure DownloadSecure Download
- Part 1. Recording Audio Commentary on Mac
- Part 2. Recording Audio and Gameplay With Fraps
- Part 3. Recording Gameplay with Audio on A Capture Card
Part 1. Recording Audio Commentary on Mac
If your Mac computer came with Quicktime it is very easy to record audio and video at the same time. You Mac probably has a built in microphone, but the quality is not as good as that of an external microphone. When you plug in an external microphone, the operating system will ask you where you want to plug the microphone into. Choose “Mac” on that screen and get your desk organized with any cords tucked away.
You will need to download one additional piece of software in addition to Quicktime. Soundflower for Mac is free, so you may need to download that before you get started
First, open your “Audio Midi Setup” from your “Spotlight” search. On the bottom left corner of the screen, hit the “+” button. Click “Create Aggregated Device,” and then double tap the new device to rename it to whatever you choose. Select the device that you are using as a microphone to check it, and then check “Soundflower (2ch).” Now open your system preferences and change your input to whatever you named your aggregated device. Select “Soundflower (2ch)” as your output device.
Now it is time to launch Soundflower. Open the drop down menu in your toolbar for Soundflower. The icon looks like a flower. Make sure that “built in output” is selected for your output. Now in Quicktime, select “New Video Recording,” and in the dropdown box on the right, select your aggregated recording device. You should now be all set to record your favorite gameplay and audio commentary.
For more detailed steps, check How to use QuickTime to record screen and audio on Mac
Part 2. Recording Audio and Gameplay With Fraps
If you want to record audio and gameplay footage, you may want to consider using Fraps to do so. This allows you to forgo editing your sound clips in. Fraps is pretty simple to use . You need to start off by plugging in your microphone, and you’ll want to make sure that your computer recognizes it as a device.
Step 1: Open Fraps. In the “movie” section you should see a box titled “Record External Input.” Make sure that box is checked.
Step 2: Check to make sure that Fraps recognizes your external audio device. If it doesn’t, you may need to install a driver, or look into the audio settings on your computer.
Step 3: Open your game and get started recording in Fraps.
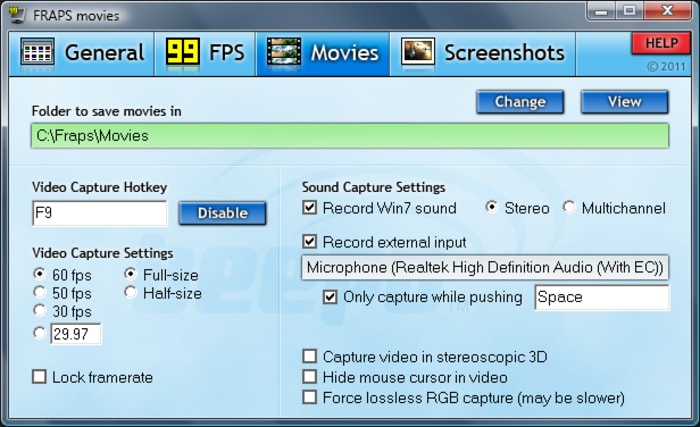
To begin your recording, simply minimize Fraps, open your game, and look for the frame rate overlay. If this is present, it means Fraps is working. If it isn’t you may need to try reopening Fraps. Once you have Fraps running alongside your game, recording is as simple as pressing the hotkey when you are ready. The default hotkey to start and stop recording is F9. If you need this key for your game, you will need to change the hotkey to something different. You can do this by going back into the main Fraps application, on the “Movies” tab, and looking for the “Video Capture Hotkey” field. Simply change it to the button of your choosing and you are good to go.
Your audio will record alongside your video. Not only will it capture your commentary from your microphone, it also captures any audio from your game. If you want to increase or decrease the volume of your voice, you will need to do so in your system settings, as Fraps does not have an option for that.
Don't miss: Fraps Review: Best Game recording software .
Part 3. Recording Gameplay with Audio on A Capture Card
If you are using a video capture card like the Elgato capture card, you can capture high quality audio as well as video during gameplay. It is simple to setup the Elgato capture card to record all sorts of audio during gameplay: in game audio, audio commentary, and even audio from Teamspeak or any other team communication system you might use.
You may also like: The Best Game Capture Cards.
Step 1: open the software that came with your Elgato capture card and make sure it has been updated recently.
Step 2: Click on the icon on the upper right hand corner of the window and check for updates.
In the configuration screen, make sure that it is set to capture HDMI input. Now make sure that the “Live Commentary” input is set to your microphone.
Physically, make sure that your Elgato capture card is connected to your computer using the HDMI input port on the Elgato, and the output on your computer. Plug the USB plug from the Elgato to your computer, and then plug the HDMI out from the Elgato to your monitor. Now, make sure that your headphones are plugged into the microphone output on your monitor. This allows all audio to be recorded while it is also being sent to your headphones, which is a solution not typically achieved. Using this method you will be able to easily capture all audio and video that you are experiencing during your gameplay, along with your own audio commentary.


Other Popular Articles From Wondershare


