Wondershare
DemoCreator
- 1. Record your computer screen and webcam simultaneously.
- 2. Allow you to customize screen capture and frame rate.
- 3. Edit videos with thousands of resources and templates.

How to Record Low File Size and High Quality Gameplay Videos

If you’re a gamer, you’ll want to get the most out of your gaming experience, which is where HQ gameplay videos prove to be so effective. When you’re gaming, you may wish to share your triumphs with the world, or you may wish to help others by creating tutorial videos of the games you are playing. If you’re looking to record low file size gameplay videos, there are numerous different forms of software out there, though for those of you who are on a budget, you may wish to begin with free software.
Best way to record high quality gameplay videos
If you want to record high paced online gameplays, consider DemoCreator recorder software which is a powerful but easy-to-use screen recorder & video editor. Some of its main features include recording high paced games at up to 120 fps, recording screen and webcam simultaneously. Apart from that it's also a handy video editor tool, with which you will be able to do basic editing, add annotations/text/callouts and more. Download the free trial version below.
 Secure DownloadSecure Download
Use Free Recording Software
Open Broadcaster Software (OBS) is a fantastic piece of kit that is simple to use, highly effective at recording low file size gameplay videos, and best of all, it’s free. Here’s a step by step look at how to use OBS software.

Step 1: Install the OBS.
Head over to the OBS site, enter, and then download, before heading over to light works and download in either 64 bit, or 32 bit.
Step 2: Open up OBS, click ‘settings’, and make your way over to ‘encoding’.
For the broadcast setting, head over to file output only, browse to where you would like to add the broadcast, save, and then you can include various hot keys.
Step 3: Set base resolution to the native resolution of the monitor you are using.

Step 4: Set audio to default, and include hot keys for muting and unmuting your mic.
With all these steps completed you can preview your settings by clicking "Preview Stream" to the right of the Scenes box and Sources box. If the recording area is not satisfactory, review the steps again.
Step 5: Click start to begin recording.
Once you have everything ready to go. Click on "Start Recording" above the "Preview Stream" button.
Check out: Open Broadcaster Software Review .
Paid Recording Software
If you wish to enjoy slightly better quality videos, you may wish to use paid software such as Fraps. It can record high paced games at up to 120 fps, recording screen and webcam simultaneously. Apart from that it's also a handy video editor tool, with which you will be able to do basic editing, add annotations/text/callouts and more. Download the free trial version below.
Here’s what you need to do when you use Fraps.
Step 1: Download and install fraps
Step 2: Open up the fraps icon and adjust recording setting
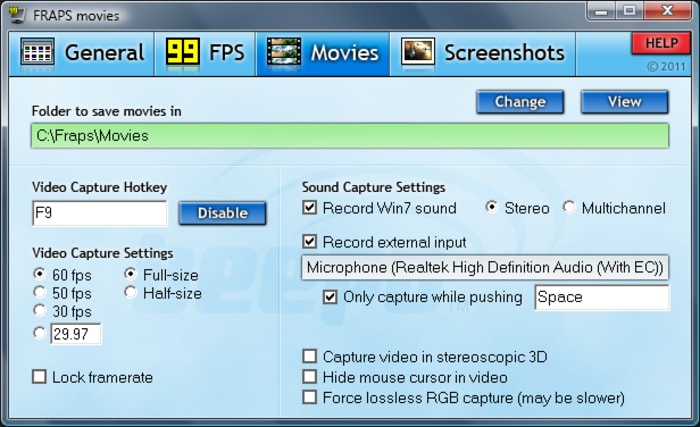
- You can select your various hotkeys for video capture etc
- You may also wish to select the ‘hide mouse cursor in video’ box as well to ensure it doesn’t intrude on your recording
Step 3: Next, click on the game that you wish to record.
- You will know that fraps is running correctly when you can see numbers on the top left of your screen in red, which will display your total frames per second.
- Begin recording via your chosen hotkey and you will see the red numbers turn yellow
- Press the same hotkey to stop the recording at any time, and the FPS numbers will turn red again.
- The video will automatically be saved in the same folder as the one where Fraps was installed.
- Go to the same drive as the Fraps app, go to movies, and there you will have your video.
Use Capture Card
If you wish to use a capture card to record your low file size gaming videos, the AVerMedia capture card device is ideal. Here’s a look at how it works.
Step 1: Begin by taking your AVerMedia device, flipping the switch to the left so that the computer icon is selected.
Step 2: Next, connect a USB cable to the device, by inserting the cable into the appropriate slot. And connect to your computer.
Here there should be a blue light on the front of the device, that will flash continuously until the driver has been installed correctly.
Step 3: Connect the HDMI cable from the desktop to the AVerMedia LGB device.
Step 4: Connect the HDMI from the AVerMedia device to your monitor.
This ensures that gamplay, as well as audio, will be captured in HDMI for better quality.
Step 5: Next, head to PC settings.
- Select system tray, click the playback devices icon, and set AVerMedia_HD as your default playback device.
- Up next, you will need to start RECentral, select ‘capture’ and for detail settings, click on ‘amateur’.
- Set your game platform as current PC.
Step 6: Click on the video source icon and select HDMI as your video input.
For audio input, again select HDMI and check video settings.
Here you can check hotkeys, and select any specific hotkeys if you require. And when selected, click ‘Ready’ and ‘OK’ which will then confirm these settings you have chosen.
Step 7: Start to recording.
To begin recording, press your chosen hotkey, and press again to end the recording.
You are now good to view your video, edit as necessary, and upload.


Other Popular Articles From Wondershare


