
Wondershare DemoCreator
Essential demo-making tool that helps learners, educators, freelancers, and gamers to take idea-sharing to the next level.

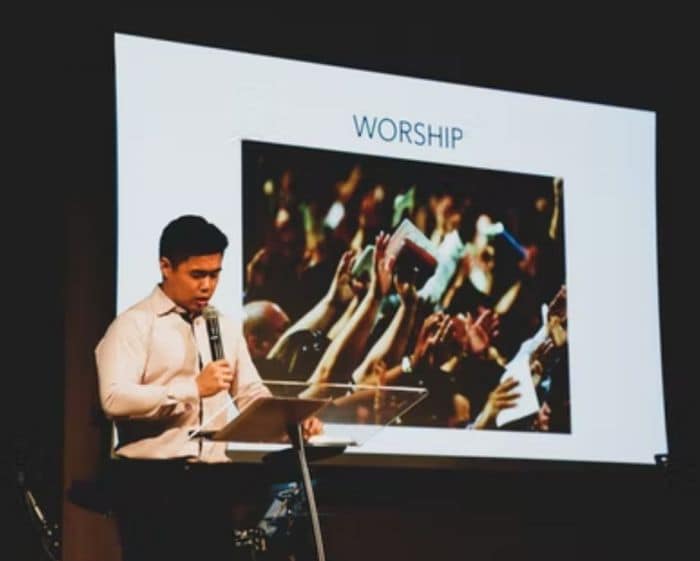
The internet has made it possible for people to work from home. In the last two years, a lot of people started working remotely. With that transition though comes new skills they need to learn. One of these skills that have become necessary in today's online work environment is learning how to prepare and give a virtual speech.
This article is a step-by-step guide on how to write, record, and edit your first remote speech.
Part1 Why will you need to make a virtual speech?
There are a few reasons why you need to learn how to make a good speech. Here is a look at three of these reasons :
● It offers a worldwide reach
A traditional speech comes with two limitations when it comes to audience reach. With a traditional speech, only a few people can attend your speech. Plus, it also limits you to one geographical area.
A virtual speech, on the other hand, has a global reach. Today, the internet is available in every corner of the world. That gives you access to a lot more people and you are not limited to just one geographical area. Anyone with access to the web can attend your speech wherever they live.
● It's less pricey
In addition to reaching a global audience, it is also a lot less expensive. There are a lot of costs involved with a traditional speech. You will need a conference room, expensive hardware, food and drinks, and transportation for you and the attendees. This raises the cost of hosting and delivering a speech significantly.
A virtual speech, on the other hand, is way less expensive. If you are just starting and you are on a budget, you can start with zero dollars. You can use free platforms like Google Hangouts, Facebook, Instagram, or TikTok to host your live speech at no cost.
● It saves time and boosts productivity
A virtual speech saves you a lot of time. With an online speech, it only takes you a few minutes to set up everything and go live.
With a traditional speech, it will take you days to book the conference room and get everything in order. And if you factor in the hours and it would take you and your attendees to travel and commute to the hosting site, that is a lot of time wasted.
A virtual speech is a lot more productive too. With a remote speech, you have everything you need within your hand's reach. This makes it easy for you to share documents with your audience, for example.
Do you want your attendees to look at a file? Or do you want them to take an interactive quiz? No problem, a click of a button and you get that sorted out.
Part2 How to make a virtual speech with DemoCreator?
When preparing your speech, you will need to divide your work into two separate phases, the scripting, and the recording phase.
Below, I will provide you with a step-by-step guide for each one of these phases.
Scripting your speech
When writing your speech, follow these tips:
● Research the topic thoroughly
The first step in preparing your manuscript is thoroughly researching the topic. If the topic you are writing about is something you are familiar with, the research phase will not take you a lot of time. You will already be familiar with what your audience wants to hear.
However, if the topic is new to you, spending a few hours researching it is necessary. If you are tight on time, start by reading summaries of books on the topic. You can also watch videos and lectures related to the topic on YouTube. Blogs and forums are also great resources to deepen your understanding of the topic and the audience you are targeting.
● Write an outline first
Once you are confident you have done enough research and you are familiar with the topic, you are now ready to create a plan for the speech.
Before you start typing your speech, you first need to give it an outline. Your outline is a roadmap for you and your audience. It will help structure your speech in a way that makes it easy for you to deliver it and for the audience to easily understand and retain it.
● Craft the script
It is time to script your speech. By now, you have researched the topic thoroughly. You have also mapped out the content of the presentation. So, writing shouldn't be a challenge.
Start with the body of the speech and not the intro. The intro will take you a lot of time to write, as you want it to be perfect and hook your audience. For each section of the body, produce a few arguments and examples that support your point. Then, write them in an easy-to-understand language. Once you are done writing the body of your speech, summarize your points in a conclusion. For your introduction, think of ways to hook and entice your audience to stick with you to the end.
● Edit the script
Once you finish writing your script, let it sit on your computer for a few hours. Come back at it with a fresh eye. This will help you detect typos and grammatical errors in the manuscript.
To speed up the editing process, you can use an editing program, like Grammarly, or pay a professional editor to look at your speech.
Do not overlook this step. I am sure you will come across a lot of mistakes in the text.
Recording your speech with DemoCreator
To record your speech, you can either record yourself delivering the speech, record your screen or do a combination of the two.
Using the DemoCreator will help you either way. DemoCreator is an easy-to-use video editing software. It allows you to record, edit and polish your virtual speech video.
Here are a few tips to help you use the software to record your speech:
Before we dive into the actual process of recording the speech, you first need to check your hardware. Make sure your mic and webcam are working.
Once that is out of the way, here is how to record your speech using DemoCreator:
● To record your screen, launch the software. Then, click on the "Record Screen" option. After turning on your mic, click on the red "Start" button to start recording your screen.
● To record yourself and the screen, launch the program. Click on the "Screen+Webcam" option. Turn on your mic and webcam. Then, adjust the webcam and the screen sizes. Then, hit the "Start" button to start recording.
● To record a webcam video of yourself giving the speech, launch the program. A small window will pop up. Click on "Capture". Then, click on "Screen" to disable the screen recording. To the right-hand side of the screen, click on the webcam icon to enable the webcam recording.
Once the recording is finished, your video will be saved on your computer and imported directly to the DemoCreator video editor.
Part3 How to edit a virtual speech with DemoCreator?
Editing your speech video is easy. Follow the four steps outlined below to successfully get the job done.
Step1 Import the video to the program
● Launch the software.
● Import your virtual speech video to the DemoCreator’s timeline. To do that, click on the “File” button at the top left corner of the software’s home screen.
● Then, click on “Import Media Files.”
● Select the video you plan to edit and hit “Import.” The video will then be added to the software’s media library. From there, drag it to the timeline box and move on to the next step.

Step2 Split the video and get rid of unwanted clips
Once the video is added to the timeline, it is time to split it into small clips and delete the unwanted ones. This is especially important because, as you go through your speech video, you will come across clips that add no value to the project, instances where the voice is too low, or places where you made mistakes.
There are two ways to split the video into small clips. You can either use the scissors tab from the toolbar at the left of the home screen or follow the method below.
● Place the Play-head over the clip you want to split.
● Then, using your mouse, right-click on the clip.
● After that, select the “Split” option.
Once you split the video into small clips, it is time to delete the unwanted ones. Here is how to delete unwanted clips:
● With your mouse, right-click on the clip you want to get rid of.
● Then, click on “Cut” and the clip will disappear. You can also use the keyboard’s” CTRL” button combined with the “X” button to do the same thing.
Now that you got rid of all the unwanted video footage, it is time to customize it before exporting it.
Step3 Customize your video
Before you export your video, there are a few customizations you could add to your final presentation to make it even more appealing to your audience. The customization process is a bit lengthy. So, please bear with me. Of course, you do not have to add all these customizations to make your video a masterpiece. However, the video transition effects, the auto subtitles, and annotations could be a terrific addition to your project. So, we highly recommend them.
Here is a look at the customizations:
Step4 Try the voice changer feature
If it is your first time giving a virtual speech and you do not feel confident enough to have your voice in the video presentation, you can opt for the Voice Changer functionality in the DemoCreator instead.
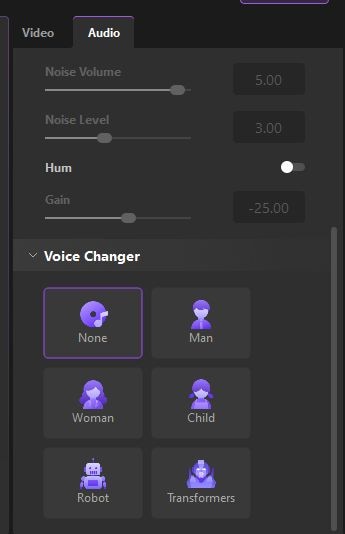
The Voice Changer functionality comes with five different voices– a female, male, child, robot, and a transformers voice.
Here is how to change your voice to one of the five:
First, you need to record a voice-over or import it to the program if you already have it. To record a voice on DemoCreator, do the following :
● Click on “Voice” next to the mic icon, at the top of the video timeline.
● A small window will pop up with a red circular button, click on that red button and the audio will start recording.
To import a voice over to the software instead, do this:
● Click on the purple add button, and select “Import Media Files.”
● Select your audio file and double click on it and it will be imported to the software.
Now that you have your audio file available on the software, here is how to change your voice to a male, female, child, transformers, or robot voice.
● Click on “Audio.” It is located on the right-hand side of the software interface.
● Then, scroll down to the bottom and you will find the five voices under the “Voice Changer” tab.
● Click on the voice of your choice and it will be applied automatically to your audio recording.
Step5 Add manual and auto-captions
On the DemoCreator’s latest version, it is now possible to add automatic captions to your video.
Here is how to auto-subtitle your video:
● Launch the program.
● Select “Edit Video”.
● Click on the purple add button again and select “Import Media Files.”
● Select the video you want to transcribe and hit “Open.”
● Once the video is imported, drag it to the timeline.
● Click on “Captions” at the top of the screen.
● Then, click on the purple button that reads “Start to Record.”
● A window that reads “What is the language of this video?” will appear, with a drop-down menu under it containing over 125 languages. Select the language of the video.
● Then, hit “Ok” and the automatic captions will be added to your video presentation.
In addition to auto-subtitles, you can also add other manual captions, like an intro, a graphic overlay as well as an end credit text. Here is how to go about adding these to your presentation:
● Import the video to the program.
● Select “Captions” at the top.
● Below the “Auto-Caption,” you will find four different options.
● Click on each one of them to find the caption you would like to add to the video. Once you find a caption you like, drag it to the timeline and it will be added to the video.
Step6 Add annotations
Adding annotations to your presentation is another thing you could do on DemoCreator. Here is how to go about adding impressive annotations to your video:
● Click on the “Annotation” tab. It is located on the left side of the home screen.
● A dialogue box with multiple choices will appear. From that window, you can add text, shapes, and the sketching tool to the video.
You can always edit or delete your video annotations from the timeline box. To delete an annotation, you can either right-click on it and hit “Delete” or click on it and press the delete button on the keyboard. To edit an annotation, simply click on it and a dialogue box will pop up on the right-hand side of the screen. It contains all the parameters you need to amend the annotation. Through it, you can edit the text, resize it, color it and bold it…etc. You can also make changes to shapes. You can change their fill color and opacity and a lot more.
Step7 Add stickers
Stickers are rarely used in formal presentations. But if you are giving a virtual speech and plan to use them, here is how to add them to the video:
● The “Sticker” tab is located on the left-hand side of the screen. It is the sixth tab in the toolbar and looks like a painting palette.
● Click on it and you will have access to several types of stickers, like emojis, and educational and gaming stickers.
● Click on the sticker of your choice and it will start downloading.
● Once it is finished downloading, drag it to your video editing timeline.
Step8 Add transition effects
Transitions are also worth a try on DemoCreator. Once your project is added to the software’s timeline box, you can start playing with the video effects that come with DemoCreator. There is no art or science to choosing the right video effect. You will have to play with several of them to find the right one for your project.
Here is how to access the effects:
● The “Transition” tab is located just below the “Sticker” tab on the left Toolbar.
● Once you locate the icon, click on it.
● Then, a window with a list of several effects available for use on the software comes up.
● Scroll down to look at all the effects available.
● Once you find one that suits your project best, click on it, and drag it to the timeline.
● The effect can be added to the beginning, the middle, or the end of the video. To move the effect around on the timeline box, simply click on it and drag it to your desired location.
As you can see, with this software, adding effects to your video is not that complicated. Now that you have your virtual speech polished and customized, the next step is to export it.
Step9 Export your video
Exporting your video is easy and should not take you long. There are two ways to export your video from the software to your computer. You can either click on the “Export” button on the top right-hand side of the software’s home screen or the “Export” tab on the top left-hand side of the screen. You can export your final video in three different formats, MP4, MOV, and MP3.
Conclusion
For your next virtual speech, follow the tips and tricks outlined above. Give your speech a detailed outline. Then, craft a great script. After that, jump on DemoCreator to record, edit, and polish your speech video. And do not forget, before you go live, practice your delivery skills several times to lessen the stage anxiety.
Related FAQs
1. What is closed captioning?
As explained earlier, closed captions in a video can be enabled or disabled as required, and can even be formatted for improved visibility or to match the theme of the video. Closed captions for a video are saved in an independent file, typically with the *.srt extension.
2. How to deal with the auto-caption process failure?
While making auto-captioning, you can try to stop the transaction process if the program fails to recognize it. Then launch and sign in to the software again and check your transaction time.
 Secure DownloadSecure Download