
Wondershare DemoCreator
An essential demo-making tool that helps learners, educators, freelancers, and gamers to take idea-sharing to the next level.

Making a demo video for your website can be a daunting task. If done incorrectly, it could make you look amateur. However, if you decide to hire a professional to do it for you, the costs could be high. So, we decided to create this guide to help people save time and money by creating their own website demo video.
Let’s find out why you need to create website demo videos and how to do it using a professional tool.
Part1 Why you will need to record a website demo video
A demo video is essentially a short video that shows off a product or service with the purpose of convincing viewers to become buyers. It can be as simple as showing off how an app works or explaining how a particular service works.
You can also use it to highlight key features and benefits or even teach users how best to use your product.
It increases conversions
At best, it can help your conversion rate, as they are more likely to be watched than static text and images. This can be an effective sales tool to help you convert leads into customers.
There are many ways that you can use a website demo video as part of your marketing strategy.
Convey complex information in an engaging manner
When people visit your website, they look for information about your products and services so they can make an informed decision on whether they should buy from you.
A website demo video makes this easy by conveying complex information in an engaging manner through visuals and sound effects such as music and voiceovers.
It builds trust with customers
When potential buyers see someone demonstrating how something works, they immediately feel more confident about investing in it. They know that you want them to succeed – and that you take pride in what you do – because it shows in everything you explain in the video.
Reduce customer support calls
If customers have a problem using your site, they will likely call or email you for assistance. They'll probably have specific questions that can be answered by viewing a video demo instead of making numerous phone calls or sending emails back and forth.
This will save both time and money when it comes time to train new employees or hire people who can answer customer service inquiries.
Part2 What kind of website demo video you can make
There are the different types of website demo videos:
1. Tutorial
A website tutorial video is a great way to help your customers learn how to use your site or blog. The best type of video to use is one that can be watched on all devices, including laptops and tablets, so it's accessible wherever your customers are.
A short video can also be embedded in a blog post or social media post, which means you can promote it to your followers at no additional cost.
Website how-to video is a tutorial-style video that targeted a specific feature of your site, what it does, and how to use it.
2. Showcase
A website showcase video is a short, snappy marketing tool that can help you increase sales and conversions. A website showcase video is usually a combination of images, text, and music that gives potential customers an idea of what your business or product is about. You can use this type of video to show off your products, services, and even the people behind them.
3. Animated demo
Animations are a great way to engage your audience and make them feel more comfortable with your product. A website animated demo can make the user experience more rewarding and memorable. It will also help you effectively communicate the key benefits of your product or service.
Animated demos can be used to explain complicated concepts, highlight different features, and even provide guidance for customers through their journey with your site.
4. Promotional demos
These videos focus on your brand and why customers should choose you over the competition. (e.g., what makes you different from other companies selling the same type of product or service).
Part3 How to make a website demo video
Websites are no longer just a medium of information, they are a medium of communication. Every website owner wants visitors to stay on their site, interact with their products and services, and ultimately make purchases.
It is important for businesses to have an effective and efficient tool that you can use to make a website demo video. One such tool is Wondershare DemoCreator.
Wondershare DemoCreator
Wondershare DemoCreator is a powerhouse when it comes to screen recording. It’s the perfect software to record a website demo video of any kind.
It’s ideal for beginners and professionals alike that’s why it is a popular tool used by many people worldwide. You can use it to create a demo video in how-to style, showcase style, or any other type you want.
Wondershare DemoCreator features a screen recorder, animation video maker, and an online screen recorder for your browser.
Latest features added to DemoCreator 6.0
An exciting version of DemoCreator is soon coming out with newer functionalities. It has a purpose-built demo video maker and virtual presenter.
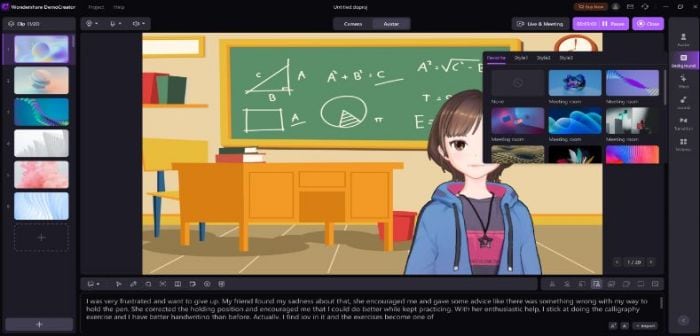
● Virtual Presenter
DemoCreator also jumped on the virtual reality bandwagon and included Virtual Presenter features in its collection.
When you open DemoCreator on your Windows computer, you can select “Virtual Presenter” to turn yourself into an Avatar or Cartoon that mimics your movements and even lip-sync with whatever you speak. There are many avatars to choose from, both male and female.
You can choose one of the backgrounds and apply to your recording.
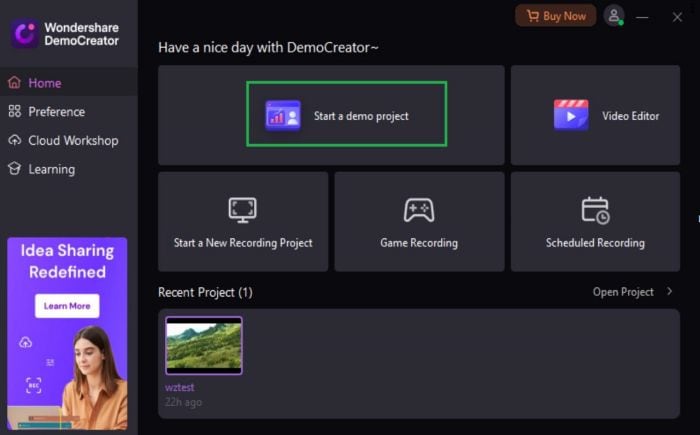
● Start a Demo Project
The all-new Create a Demo Project is purpose-made feature to record demo videos.
 Secure DownloadSecure Download
● Import PPT
The new version of DemoCreator allows you to import PowerPoint presentations and present them through screen recording.
Let’s find out how to make a website demo video using Wondershare DemoCreator.
Record your screen
Step 1: Launch the software and select recording mode
Firstly, you need to visit the Wonderhsare DemoCreator website to download it for your computer. After the download, install the software following the default instructions.
Once installed, you need to launch the program. You can see a variety of options available in the interface.
You need to choose “Select a Demo Project”, so you can adjust everything according to your requirements.
Step 2: Adjust the screen size
When you click “Start a Record Project”, a small window will appear with a few options. Now, open your website and select the screen capture area. You can do so by exploring the dropdown menu under “Capture Area” and selecting “Custom Area.”
Now, set the dimensions of the screen record area according to your requirements – drag the frame inward or outward from its edges.
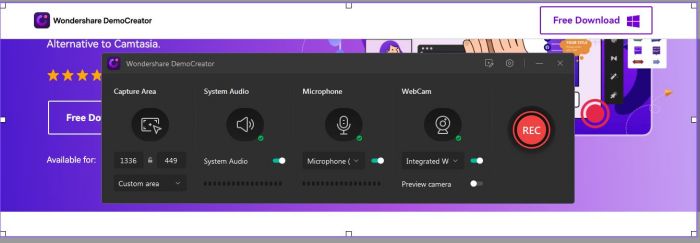
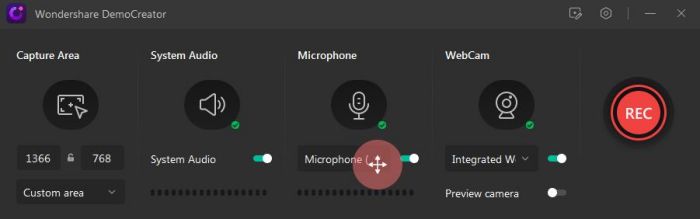
Step 3: Set up Audio and Camera Settings
DemoCreator records the system sounds and microphone sound by default. You can choose to disable them using the toggle switch – or select a microphone of your choice.
Also, you can enable WebCam recording to include your facecam video in the recording.
Step 4: Start recording
To start screen recording, click the REC button. The recording will begin after a countdown of three seconds. At this point, start explaining or showing whatever you want to show your audience through the demo video.
If you want to pause/resume the recording, you need to press F9 or use the pause button. To stop the screen recording, click the “Stop” button or press F10.
Once you stop the recording, it opens in the DemoCreator editor, where lightweight video editing can be performed.
Record the sound
Apart from recording the demo of your website – the activity being performed in the demo – you might need to add sound to the video as well. While you can add music from within the video editor, you might need to add voiceover to explain something happening in the demo video.
DemoCreator allows you to add voiceover to your video.
Adding voiceover to demo videos is a common practice and is something that can be done easily following the below steps:
1. Open the website demo video in DemoCreator’s Video Editor.
2. You can stage the demo video on the timeline by right-clicking on the demo video in the media library and selecting “Add to Timeline.” You can also drag and drop the file to your timeline and later start voice recording to use as voiceover.
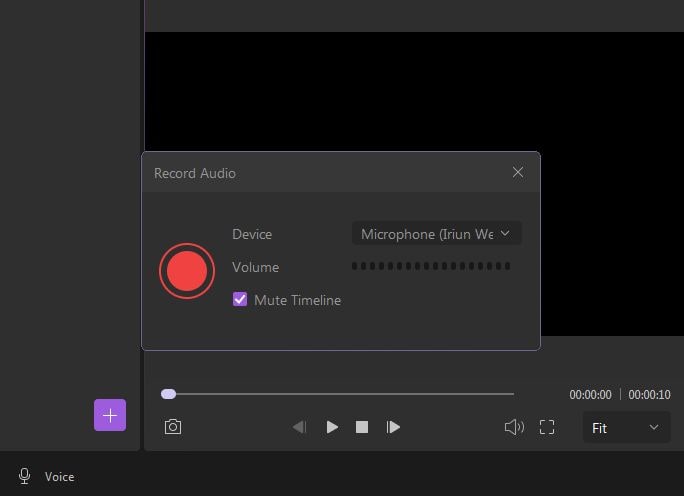
3. Click on the “Voice” button just above the timeline and a “Record Audio” tab will open.
4. You can choose to record your voice with your Computer or Microphone. By default, the voice is recorded with both but you should choose one of them. To change the settings, go to the Audio Setup option and choose the preferred input method.
Video Editing
Demo video is an exceptionally helpful tool for informing an audience or marketing your product or service. The better it’s done, the better results you get. One way to improve its effectiveness is to edit it in a video editor.
Wondershare DemoCreator has a built-in video editor with a range of video editing features. Below are some editing features you can use to make your website demonstration video more appealing and effective.
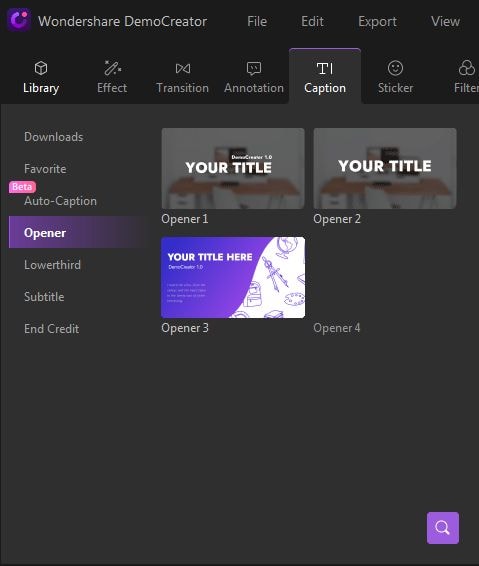
● Add caption
DemoCreator has four types of captions available in its video editor. The four types of caption include Opener, EndCredit, Subtitle, and Lowerthird.
You can use caption templates, which can be accessed from the “Caption” tab.
Select a template from the four types of captions and drag it to the timeline where you want to put it. You can see a preview of the caption template in the preview window. To customize the text, double-click the text area and write the text you want to show.
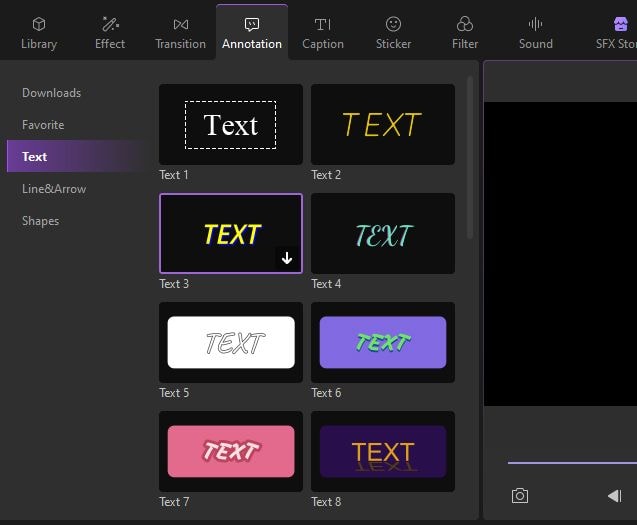
● Add annotation
If you want to point to something specific on the screen, make something easy to understand, or stand out from the rest of the content, annotation is the way to do it. DemoCreator lets you annotate your recording in the editing phase. From the top bar, select the “Annotation” tab and choose one of the many options available in the Annotation panel.
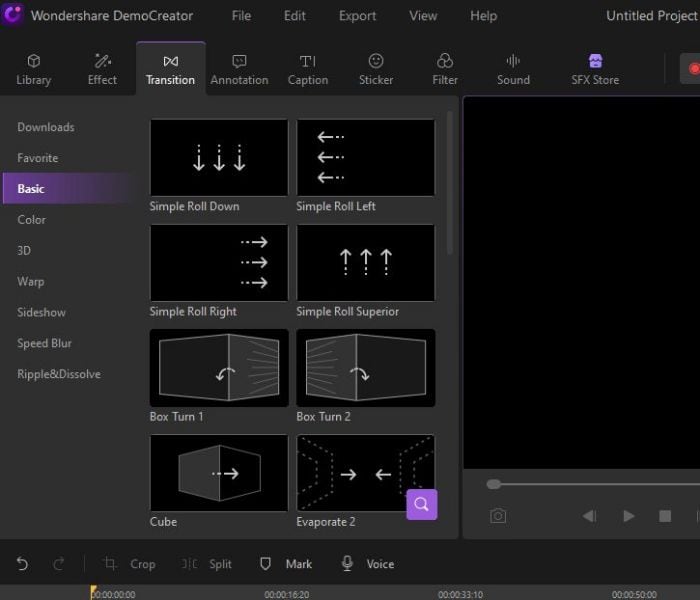
● Add transition
Adding transition to your video can make it more dramatic and interesting. It’ll also help break the demo video into multiple parts so that viewers can understand the steps easily.
From the top bar, click on the “Transition” tab to access a variety of transition styles. Select the one and click on it to apply it to the video.
● Upload to YouTube
DemoCreator allows you to download your video directly to your YouTube channel. So if you want to upload your demo video directly to your YouTube channels, here’s what you need to do:
1. Click the “Export” button.
2. Select YouTube in the Export window.
3. Now, click Sign in to log in to your YouTube account. A new tab will open in the browser where you need to log in to your YouTube account using your Google account.
4. After successfully logging in, come back to the software and fill in video details and click the Export button in the bottom right.

Conclusion
There you have it – all you need to do when making a website demo video is keep the why, who, what and how aspects in mind. By doing so, you will be able to produce a demo that your clients will connect with, which will lead them to the checkout page much more smoothly.
Making website demonstration videos can be an arduous process, especially when they must suit varying needs. That said, creating a website demo is not out of your reach, and we hope this article helps you do it effortlessly.
Related FAQs
1. What is closed captioning?
As explained earlier, closed captions in a video can be enabled or disabled as required, and can even be formatted for improved visibility or to match the theme of the video. Closed captions for a video are saved in an independent file, typically with the *.srt extension.
2. How to deal with the auto-caption process failure?
While making auto-captioning, you can try to stop the transaction process if the program fails to recognize it. Then launch and sign in to the software again and check your transaction time.
Secure DownloadSecure Download

