
Wondershare DemoCreator
Essential demo-making tool that helps learners, educators, freelancers and gamers to take idea-sharing to the next level.

In this time of the pandemic, things that were once done physically, are now being done through online means. Students are taking classes online using Google Meet, Google Classrooms, and other platforms that can be used for education.
Some employees are also doing their jobs at their homes, like teachers, tutors, etc. All of these are done to avoid being infected and infecting others with Covid-19.
Vloggers, professional teachers, and others have also started to build their own sites and channels to reach out to people, whether for educational, work or entertainment purposes.
These people are trying their utmost effort to keep the people interested in their content since people, who are staying in their houses, spend their time on the internet and some get bored easily. They are constantly looking for ways that will enable audiences to feel and acquire new experiences. There are lots of online resources that can be used to keep the feeling of face-to-face experience the same as online experiences. In this article, we are going to talk about Talking Avatars.
In this article

Part1 What is a talking avatar
You may have heard of this before, talking avatars. But what exactly are they? How are they so popular and in-demand among online users, especially video content creators?
Talking avatars are online models that can portray a character and talk like real people. This is a kind of Artificial Intelligence that is being used for various purposes.
A talking avatar can express emotions, speak, and do specific motions according to how you design them to be. These avatars can appear and seem to be like real people. Talking avatars can be used in video content and presentations for almost any purpose.
Using these models can make audiences be engaged and interested in what they are watching and listening to.
Although not all, people are getting pickier and pickier with what they want to engage themselves into. Some now prefer to watch and listen rather than to read. Maybe they find it a hassle or tiring reading something so lengthy, especially if the content of the text is about discussions related to school, work, etc.
Try to imagine. Would you rather read a very long article about history, or would you rather watch and listen to history discussions in interesting and engaging ways of presentation? It could be that some still prefer to read but that is not enough to beat the purpose of the development of Talking Avatars.
Talking Avatars are also useful for people who want to create videos and have discussions online but do not want to show themselves. They won’t have to worry about that anymore, because talking avatars are now available.
Part2 How talking avatar can be used in your video
Talking avatars can be used in your video content creations. How? They add more emphasis to engagement and to how interesting your content is. These factors determine how many people will love and tune in to your content.
With talking avatars, the chances of your content being noticed and liked by netizens will exponentially increase. After all, who likes to watch boring discussions with fewer resources to keep the content entertaining and engaging? These are some of the ways in how and where you can use talking avatars.
Education
If you are an online lecturer, you can help students absorb more knowledge because they tend to remember something more if they enjoyed what they were listening to and watching. I’m pretty sure that their video content is very informative, direct, and above all, interesting and engaging.
That is the key to making effective and engaging videos. Using talking avatars and good video editing is one of these components.
Business and E-commerce
Online businesses are also the trend nowadays. People buy on online shopping platforms such as Amazon, e-bay, etc. However, since people do not have 100% trust in what they purchase, because they can’t see it physically and verify it themself, you need to gain your buyers’ trust to assure them that your products are 100% genuine.
You can do this by conducting online pitching. You can pitch the products you are selling, and talk your way out of untrusting customers. Talking avatars will help you increase the success rate of your online pitching.
Tutorial
Video tutorials are what people rely on these days, especially when your tutorials are about specific software, programs, editing, and other things related to devices. Even this topic, how to make a talking avatar or virtual human, is being taught in videos! You can learn how to much easier if you watch it on videos. However, in-text tutorials can also be beneficial, especially when your connection is not stable and all it can load are articles, no videos.
There are many more ways how and where to use your talking avatars or virtual humans. This just shows the versatility of using this artificial intelligence.
There are many options to choose from in creating videos with talking avatars or virtual humans. DemoCreator is one of these options and is highly recommended. This software is a high-quality screen recorder with complete video editing features.
Part3 How to add a talking avatar to your video with DemoCreator
1. Launch DemoCreator
To start off, you will need to launch and open DemoCreator. DemoCreator is software that is used to make animated videos, screen records, and provide high-quality editing. Creating video presentations with DemoCreation is quite easy and it has a friendly user interface. Let us have a quick walkthrough of how to recreate videos with DemoCreator before using virtual humans.
Video Editing might seem overwhelming at first, especially when you see animated ones that are used for educational purposes. However, we have many features that will help you create videos a lot easier. These features include Stock animation, voiceovers, text and captions, additional effects, and more! So, what is are these features all about and what are their functions?
2. Stock Animation
Stock animation is a set of pre-animated animations. These animations are ready to use for video editing and all that’s left to do is drag and drop them into the timeline bar. This is what is usually used in educational videos. Stock animations are very useful because of their engaging and appealing nature. People who watch videos with stock animations are more engaged and will likely retain the knowledge that was imparted on the video because of the outstanding animations.
Another advantage of stock animations is that it comes with a transparent background. This means that you will be able to choose any background by changing the black background. You can select a podium, classroom, office, etc. You can download these backgrounds that can be found in DemoCreator stickers.
Next, we have an audio or voiceovers feature.
 Secure DownloadSecure Download
3. Voiceovers
Voiceovers are also one of the components of video editing. Video content creators usually have a script ready for them to readily record and incorporate into the video. This is very important, especially since you are using talking avatars.
You won’t have to show yourself or appear in the video if that’s what you prefer, and simply provide the speech for the avatar. To edit audio and voiceover files, use the drag and drop method into the timeline bar. You might want to match and sync your voiceovers and audio with the visuals to make your video look neat and presentable.
This makes communications much more interesting because of the upgraded audio features. You can also give your talking avatar a more customized feel because it can speak your actual voice using the voiceover features. All you have to do is to make sure that your audio recording is clear. And be creative when it comes to using the drag and drop feature so that you can maximize its use and utilize every feature of it.
4. Text and Captions
You can also add Text and Captions to your video presentation. These can be edited by choosing text dialogs, inputting texts, and adding additional effects to make them more engaging and interesting.
Adding texts and captions to your video will keep your audience engaged and interested because some or maybe most people prefer having to watch, listen, and read at the same time. Captions will also help the viewers verify what they are listening to or take down notes while pausing the video.
Some features of DemoCreator can only be available to premium users. You can determine premium elements if you see a crown symbol on the element. However, the free features of DemoCreator are enough for you to create and edit videos.
After launching the software, click on the Virtual Human mode. This mode can be found in the home interface. With that, you can now begin recording and editing your video presentation with the virtual human feature.
The texts and captions can supplement your talking avatar by making it more specific and giving it a more personalized touch. This way, you can better express your opinions and ideas because you can put texts and words around your talking avatar. This creates better communication between yourself and the people around you, but in a more visually appealing way.
Part4 How to Record your presentation with video with DemoCreator and webcam virtual human
From the previous step, you are now in Virtual Human mode. Turn on the webcam in the Virtual Human mode and then select and pick out the virtual character design you would like to use. Talking avatars can mimic everything you do and say by recording yourself with the camera and speaking into the microphone.
These avatars scan and internalize your jaw, eye, and other movements so that it will be able to act like you. Position your camera in a way that it will be able to detect and internalize your actions which the virtual human will mimic.
Try testing a few runs to see if the talking avatar is in sync with your actions. When everything is all set up and good to go, start recording by clicking the red button or pressing the key F9.
To stop recording, press the stop button or press the key F10. Three options will be shown after you stop recording your video presentation.
You can choose FastExport to automatically export your video, Re-record if you want to try recording again, or Open Editor if you wish to make further edits for your video.
Your video presentation could be about anything! You can do tutorials about electronic devices, solve math problems, or discuss anything at all. You can also open a PowerPoint slide and discuss it with the talking avatar or virtual human that you have chosen or, you can record yourself with the talking avatar and then import the PowerPoint file.
Importing a PowerPoint file into your video presentation will be further discussed as we progress into this topic.
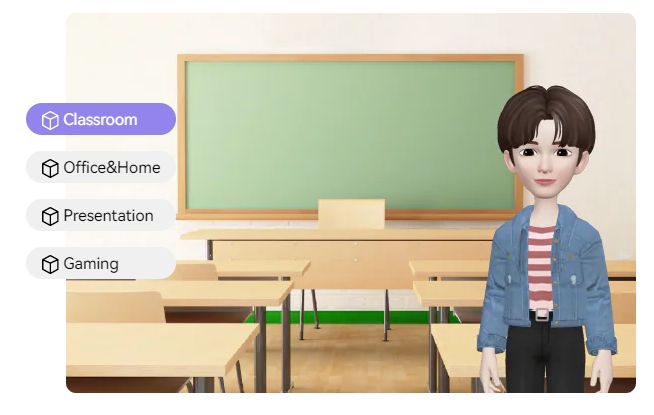
Choose your virtual human and background
There are lots of virtual human designs you can choose from DemoCreator. There are more or less 16 available virtual 3D and 2D human avatars that will mimic you. You can download other avatars to have more options. For virtual backgrounds, there are already common and various backgrounds that are provided. This includes a classroom, meeting, an office environment, and more.
What is great about this is that it just looks like you are really in a specific place. And the background is also looking very realistic. In fact, there are times when people think that you are actually in the beach of somewhere in Los Angeles, just because of your background. When in fact, you are really just inside your room using the features of the meeting background.
Add auto-caption
DemoCreator has an automatic caption or subtitle generator. There is a caption option in the menu bar and by clicking there, you will be able to find the auto subtitle generator. The auto-caption process is done through a speech-to-text process.
After selecting the auto-caption, you can choose from there any language you would like for it to input its text to. DemoCreator has over 125 languages available and these have Google artificial voice recognition that is fast and accurate.
After choosing your preferred language, the subtitle overlay will be visible on the video draft in just a few seconds. Select the track of the caption element to edit the subtitles if there are any errors, as well as its font size, style, and other text options for your caption to make it more engaging and interesting from the audience’s point of view.
Part5 How to import your PowerPoint to DemoCreator video editor to edit
Launch DemoCreator software and select edit video mode. This mode enables you to edit videos and import files. After doing so, click on the plus sign to select files from your device. Select the PowerPoint file you wish to import in the video.
You can view your PowerPoint preview to select the pages you want to include in the video and delete the ones you exclude. Simply drag the element into the timeline and your PowerPoint is ready to edit with DemoCreator.
How to add captions, annotation, audio, and more
DemoCreator has many editing features. Adding captions, annotation, audio, effects, and more are one of the many features this software provides.
Caption Effects
In DemoCreator, there are four types of effects. This includes titles, subtitles, ending credits, and subtitles. Click on the caption effect to add a title for your video presentation. Select the effects that you wish to use and drag them to the timeline bar. Double click the element and use the setting panel of the annotation feature.
You can customize and adjust the font sizes of your caption, as well as the alignments. After customizing your caption, you can adjust the duration of your annotation. To adjust the duration, simply drag the edges of the element in the timeline to the left or the right.
You can repeat these steps in adding and setting up more captions to your video presentation. Annotation Stickers and Cursor Effects are used in PowerPoint recording.
Annotation
Similar to captions, Annotation has also four types of effects available in DemoCreator. First, you have a dialog arrows sketch. To use the effect, use the same process of dragging and dropping the element into the timeline. Next are sticker effects. Sticker effects can make your video presentation more presentable, appealing, and engaging. These stickers have various categories. This includes stickers for education, gaming, emoticons, gestures, and media effects. This makes it easier for you to choose the kind of stickers that you need and want because there are a lot of options available. All these are made possible thanks to the customization features of this software. Not only does this make easier for you to create the exact and specific look of your talking avatar, but this also makes the process of creating one much more fun and lively.
Transitions
There are 13 main and popular transition effects in DemoCreator. Transition effects are used when you wish to connect two or more different videos. This is utilized to promote smoother and neater transitions in between these connected and jointed video clips.
Montages and Cursor Effects
The montage feature has 3 effects, the cinema, green screen, and mosaic effects. Again, to use the desired montage feature effect, drag and drop the element to the timeline bar to edit the effect.
Cursor effects are very important as well, especially if your video presentation contains a cursor. It will add emphasis to the cursor which will make it a lot more convenient for your audiences. Cursor effects in DemoCreator include highlights, clicking sound effects, and rings. Drag and drop the cursor effect you wish to use to the timeline bar. You can adjust the opacity of the cursor effect to your liking.
Audio Effects
Adding audio effects enhances your video presentation a lot. There are many instances in your video where you have to add an audio effect to make it a realistic experience for your audience. Some of these instances may be an incoming phone call, thunder, page-turning, typing, and more!
To apply an audio effect, drag and drop the element to the timeline and you can edit your audio effect from there. You can adjust the volume and speed according to your preference. Audio effects should sync perfectly to your video presentation to make it natural, not awkward and weird.
Conclusion
So, that’s basically everything you need to know in learning how to make a talking avatar. As far as what you have read, talking avatars are very important in the field of technology, especially since most activities now are done through online ways.
This is a very nice way to communicate with other people, but in a more visually appealing way. Not to mention the fact that you can create a more entertaining and accurate reflection of yourself without having to do a lot of preparation when it comes to using makeup on your face and preparing physically for a video preparation.
Knowing how to make a talking avatar is all about creating a new way of communicating with other people in this increasingly digitized world. Note that we are all visual beings, which is why we prefer to always see things in a visual perspective.
You have discovered that you can now make video content without appearing in your video yourself! Surely, you would be delighted and motivated to make videos now, that is if you are the introverted type who does not want any direct interaction with the audience. Talking avatars and Virtual Human has your back.
Related FAQs
1. What is closed captioning?
As explained earlier, closed captions in a video can be enabled or disabled as required, and can even be formatted for improved visibility or to match the theme of the video. Closed captions for a video are saved in an independent file, typically with the *.srt extension.
2. How to deal with the auto-caption process failure?
While making auto-captioning, you can try to stop the transaction process if the program fails to recognize it. Then launch and sign in to the software again and check your transaction time.
Secure DownloadSecure Download

