
Action! Review: Best Gaming & Desktop Recorder

The Action! game recorder is the most popular gameplay recording and general screen recording software on the market. It allows for real-time recording and streaming, all in high definition. Action! allows users to record smooth, high framerate videos of any desktop and action, add audio commentary, and even create easy to follow tutorials with no hassle. With an intuitive user interface, and integration with popular streaming services, Action! is one of the most user-friendly screen recorders available.
1. Technical Specifications
| Tech Spec | |
| supported OS | Windows Vista, Windows 7, Windows 8, Windows 8.1, and Windows 10 |
| Output formats | AVI 2.0 (FICV) |
| MP4 (AVC or /) | |
| video frame rate | 15, 20, 24, 25, 30, 50, 60, 120(AVI) |
| Video resolution | Single Display - up to 4K (3840x2160) |
| NVIDIA 3D Vision, AMD Eyefinity - up to 8192x8192 (AVI) | |
| up to 4K (3840x2160) (MP4) with Intel® Quick Sync Video, NVIDIA NVENC, and AMD APP | |
| up to 4K (3840x2160) (MP4) with software video encoding | |
Action! is compatible with Windows Vista, 7, 8, 8.1, and Windows 10, making it available for a vast majority of gamers and other performance users. Videos recorded with Action! are saved as either AVI 2.0 or MP4. This means users get the best of both worlds: smaller file size and better quality. On a single display, Action! can record video in any quality all the way up to 4K. Three-dimensional gameplay, however, can be recorded in AVI format up to 8192x8192, surpassing most modern video recording qualities. When recording AVI formatted video, Action! can capture up to 120 frames per second. In the higher quality MP4 format, Action! can record up to 60 frames per second.
2. Key Features
Action! is packed with features. It uses your GPU in the most optimal way to ensure smooth high definition gameplay recording and can display both your current and average frame rate during gameplay to save your benchmark results.
Action! Maybe gamer-centric, but it hasn't left other users behind. With high definition, smooth recording of any action taken on-screen, this powerful program can help any user record high-quality tutorials with ease. Even if you switch windows, Action! will continue to record in one solid clip. You can also add live microphone audio commentary for total ease of use.
1 Live-Streaming
Action! is also very adept at live streaming, and is integrated with popular streaming services like Twitch, Facebook Live, YouTube, and Hitbox. If you aren't live streaming, but would like to share your clips, Action! has several predefined profiles that allow you to simply hit a button and instantly export your clips to the format that will work for your media platform of choice.
2 Add Webcam
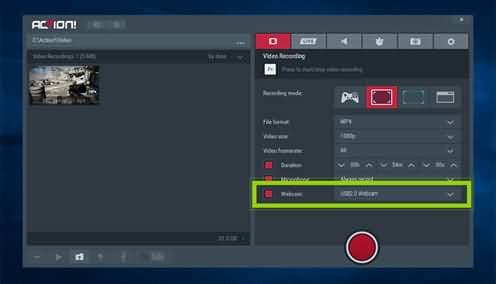
A common feature of the most popular live streams is the inclusion of webcam footage of the player in a small corner. Action! can handle this with ease, allowing you to simply select your webcam, and the position you want it to be on your stream, and start recording. Paired with this is Action!'s chroma key option, which allows you to change any solid colored background to the background of your choosing, while you are streaming.
3 High Resolution
Action! Also supports high-resolution video recording. You can capture video in qualities ranging from 2K to 4K in either AVI or MP4 formats, and up to 8K with NVIDIA 3D Vision or AMD Eyefinity setups in AVI format.
4 Time-Shift
If you’ve ever made an epic move in a game, and regretted not having recorded it, Action! has the solution. With Action! Time-Shift, you ensure that you never lose any of that incredible gameplay action. Simply configure it before using to your desired video size and frame rate, and hit the appropriate hotkey up to ten minutes after your epic move.
5 Audio Recording
Unlike some of its competitors, Action! allows you to record anything you hear, including game sounds, background music, and your own voice, and mix it right into your live stream or recording. You can also capture multiple screenshots, and create smooth, high-quality slow-motion effects for a more entertaining and original video presentation.
6 Pros and Cons
| Pros | Cons |
| Friendly user interface | Can’t set the custom frame rate |
| Powerful editing and audio options, with a separate channel for microphones | Cannot adjust the video bitrates within the software |
| Supports live streaming and benchmarking and screenshots capture | Not 100% free – with the 30days free trial |
| Webcam support and microphone commentary | - |
| Supports HD recording | - |
| Videos can be recorded 20 times smaller | - |
| Low CPU usage | - |
Every software package has its pros and cons, and Action! is no different. As mentioned above, Action! features HD recording and a friendly user interface. It also has powerful editing and audio options and uses a convenient separate channel for microphones. The benchmarking support is one area where this software really stands out, as that is not a feature that is widely available elsewhere. The live streaming support and ability to capture screenshots, on the other hand, are available with many other software packages, but nonetheless, this is an important feature for any software of this type to have. With its ability to implement webcam video into streaming video, and implement microphone commentary, Action! really stands out, but one of the best features of Action! is its ability to maintain relatively low CPU usage and record videos in files that are up to 20 times smaller than average.
There are, of course, some places where Action! just doesn’t hit the mark. Unlike a few other popular video capturing and streaming applications, Action! is not free. There is a 30-day free trial, but after this period you will need to pay $29.95 for the home version or $49.95 for the commercial version. You also cannot set a custom frame rate or adjust the video bitrates in the Action! Software.
3. How to Use
As previously mentioned, Action! is relatively simple to use. Here are a few pointers to get you started off on the right foot.
1 Gameplay Recording
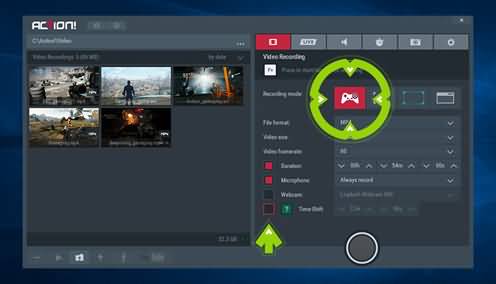
The “Games and Applications” recording mode is made for capturing video from any DirectX 9/10/11 or OpenGL game or application. To get started, switch the recording mode to “Games and Applications,” and then run your game. The Action! HUD will display in the top right corner of your game. The blue color of the frame rate numbers indicates that the game is active and Action! is ready to record.
The default hotkey for beginning gameplay recording is F9. Hit that as soon as you are ready to record, and play as you normally would. You can tell that the game is being recorded because of the HUD changes. When you are ready to stop recording, hit F9 again. Your recording will end, and the HUD will return to its regular state. If you do not want the HUD to be displayed in your recordings, make sure to go into the Action! HUD options and select “Do not record HUD in games and applications.” To play back videos that you have recorded, you can use Action!’s internal player to select the gameplay recording. For more playback options, consider downloading Splash, also made by Mirillis. With Splash, you gain access to powerful features like SmartSeek, DetailBoost, LightBoost, and AudioBoost.
2 Live Streaming
Live streaming is become increasingly popular, and can even earn you some money. Essentially, you can broadcast your gameplay as it happens on services like Twitch or YouTube. Live streaming is easy with Action!
3 Starting Out
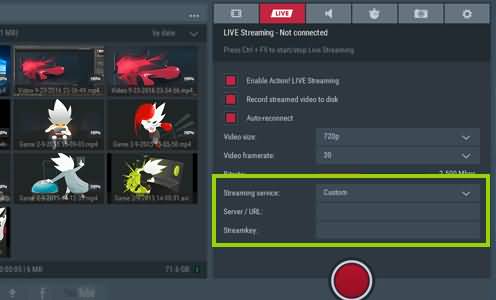
To live stream on Twitch, run Action! and select the “Live Streaming” tab, and then select “Enable Live Streaming.” Adjust your video size, framerate, and bitrate settings to match the capabilities of your internet speed and computer processing power. If you experience any issues with the performance you will need to reduce your video size and frame rate or bitrate.
4 On Twitch
After taking the above steps, select “Twitch.tv” from the “streaming service” dropdown menu. You will need to already have a Twitch account to continue, so if you do not you will need to direct your browser to Twitch.tv and create an account. Once you have an account, you can click “Login with Twitch” in Action!. Enter your Twitch login information in the resulting window. Set the Action! recording mode to either “Games and Applications” or “Active Screen.” Either of these will work for live streaming games. Now you are ready to launch your game. You should see the Action! HUD in the top right corner. Press Ctrl and F9 to begin broadcasting, and when you are done, press Ctrl and F9 again to end your broadcast. The HUD will change to reflect whether or not you are broadcasting.
If you had any issues logging into Twitch from Action! you can always try an alternate way. Instead of choosing Twitch.tv in the streaming service selection menu, choose “Custom.” Find out which Twitch RTMP URL is available and copy and paste it into the “Server/URL” field. Then, direct your browser to Twitch.tv to generate a stream key, and copy and paste that key into the “Stream Key” field in Action!. You should be all set to stream!
5 On YouTube
After following the “Starting Out” instructions above, to stream to YouTube from the “Streaming Service” dropdown in Action!. Click “Login with Google,” and use your Google information to log in to YouTube. If you’d like to change your video from the public to private, be sure to do this in the “Privacy” drop-down box in Action!. Select your preferred recording mode, and load your game. Just like streaming with Twitch, use the Ctrl and F9 keys to start and stop streaming.
6 Exporting and Uploading
If you want to share your video recordings, you will need to export and upload them to YouTube or some other video hosting website. To do this, select the thumbnail of your recording in Action!. Then, click the YouTube button. This will bring up the export window, where you will need to login to your Google account. You will then be prompted to choose which of your YouTube accounts you would like to upload the video to, if you have more than one. From here, press next, enter a title, description, category, and adjust privacy settings to your liking. Then, click start. Action! will begin by exporting and converting your video to MP4 for quicker uploading. Once the video is done being exported, Action! will automatically upload your recording to YouTube. After the video has completed its upload, check out your video by clicking the “Open in Browser” button.
4. Comparison
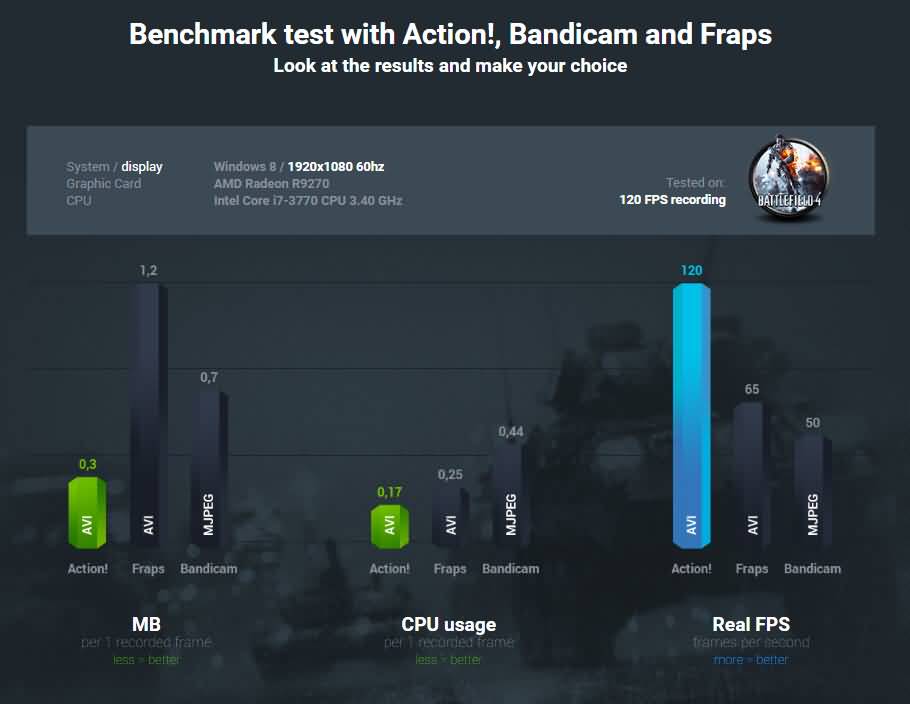
Action! is obviously not the only screen capture software available. Two other programs that are popular are Fraps and Bandicam. In benchmarking tests against these two programs, Action! rose above. In a 120 frame per second record, Action used only .3 MB per recorded frame, while Fraps used 1.2 and Bandicam used .7 MB. Action! used only .17% of the CPU per 1 recorded frame, while Fraps used .25%, and Bandicam used .44%. While these tests were conducted using the 120 frames per second option on each of these applications, only Action! actually achieved this. Fraps only captured 65 frames per second, and Bandicam only captured 50 frames per second.
Action! Game Recorder Alternative: Wondershare DemoCreator
Action! Game Recorder is an excellent tool for recording screens and lives streaming, but its video editing capabilities are limited. Here, I'll introduce you to a very simple and feature-rich video recording & video editing tool: Wondershare DemoCreator Screen Recorder.
The DemoCreator is a new recording tool from Wondershare Technology. It supports 4K video recording and video editing, making it ideal for game recording and tutorial video production.
Key features of DemoCreator:
- Simple and intuitive user interface.
- Supports all popular file formats.
- You can use all the features in the Free Trial Version.
- Supports powerful video editing toolkit, you can edit the recorded screen directly.
Whether, screen recorder for Mac or Windows, the Wondershare DemoCreator interface is easy to understand and you can start the process with just one click. Many such attractive and simple features make DemoCreator one of the best software to make your recording and editing journey enjoyable, comfortable, and worth giving a try.
 Secure DownloadSecure Download
Conclusion
While it may not be without its shortcomings, Action! is one of the best screen capturing software out there for either game recording/streaming or general screen capture. The user interface is intuitive, and the recording tools are full of power. It offers smoother recordings than others on the market and is reasonably priced. However, if you want to get a new screen recording solution with a video editing function, the Wondershare DemoCreator maybe a good choice!


