

[2025] How to Stop Gameplay Recording on PS4

Gaming is fun alone but gets better when it becomes a shared experience. Even if you are playing alone, you can still want to share some gaming moments of the game with your friends or game partners by posting favorite video clips on social media. The PS4 has a built-in video recording feature, and you capture your PS4 gameplay without any issue. You can not only start the record for capturing gameplay that's about to begin, but PS4 continuously records the last 15 minutes of the game, making it easy to save the best moments that have just happened.
Recording the gameplay can't be simpler, especially when you are playing on PS4. You can press the "Share" button twice to start recording when you are already in the game. After pressing, it will begin recording with its default time, about 15 minutes, or until you stop it manually. Now let’s check out how to stop gameplay recording on PS4.
Part 1 How to Stop Recording on PS4?
The most extraordinary part that the PlayStation plays is that it helps in constantly recording the gameplay. However, it saves only when it’s asked. All the recording places strain on the console. Moreover, if you don't use the feature, opt for turning it off. But unfortunately, Sony doesn't let you stop the recording. But you might limit your recording activity, which might help you. Let's check out how to turn off gameplay recording on PS4.
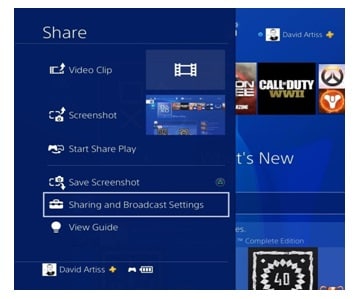
Step 1. Switch on the PS4 and sign in with your registered user ID. After that, you will have to press on the Share button on the controller. Choose "Sharing and Broadcasting Settings" from the given menu which appears.
2. Now click on the "Length of Video Clip", i.e. 15 minutes by default.

3. If you want to change the "Length of Video clip", then adjust it according to your requirements. The nearest switch of the video recording comes out to be 30 seconds.

Now it will record only 30 seconds of your gameplay which can be considered off. It will make sure that it puts less strain on the poor console.
You May Also Like: How to Stop Recording GTA 5 on PC, PS4, PS5, & Xbox
Part 2 How to Edit and Share your PS4 video?
Recording, editing, and Sharing gameplay on the PS4 is much easier than you think. The capture cards are the best way for recording and streaming the gameplay, but you will capture the PS4 gameplay directly from the console, without any requirement of hardware. Now you have learned about how to turn off gameplay recording on PS4.
In this article, we will show how to record, edit, and share the gameplay on PS4. Additionally, we will show you how to upload your gameplay video directly to social media sites or if you are looking for high-quality products how to export files to the computer.
1. Adjust the video settings
First, you have to hold the share button of the PS4 controller to open the Share menu. From there, you can change the setting of how to share the content, including video. You will have to use these settings while uploading the video. But for now, determine how many minutes you want to record the gameplay.

2. Start the recording
Suppose you wish to record the gameplay by just pressing record on the PS4 before your game. Just press twice on the Share button. The PS4 will capture the time that has been selected in the settings. You can stop gameplay recording PS4 anytime by pressing twice on the Share button.

3. Save the last 15 minutes of the video.
When something good happens in the gameplay, you wish to record it to show the moments to your friends. But unluckily, you didn't press the share button. But luckily, your PS4 continuously records the gameplay, but it doesn't save it until you permit them. You can find out the 15 minutes of the gameplay session in the video's cache.

4. Trim the video clip
Now you are ready to edit the video clips and get shareable clips. In most cases, you will need to trim your video for public consumption. Some social media allow short videos, such as Twitter. Even if you don't want to shorten the clips, you have to remove the boring parts in your gameplay at the beginning or end to get the best part.

The Trim Option will be available in two places. First, in the Capture Gallery, you will highlight the video and press the options button of the controller to pull the menu, which includes the Trim option. You can even choose "Share Video Clip" from the Share menu, and you will open up the screen with the list of video services and social networks. You will find the "Trim" at the top of your screen.

Choosing trim will allow removing the multiple footages from the video to make it look attractive. First, find out the spot in your video where you wish to start. Use the directional pad of the controller for scrolling through the macro view of the video's timeline.
When you find the spot where you want to start shortening the video, press L2 to select the start point, scroll forward to see the endpoint, and press R2. The orange box will highlight the portion of your timeline which will become the next new video. Other unselected portions will get deleted while finalizing the edit. To get precise edits, you might watch the video to find the correct spot from start to stop by selecting "Preview Button."
5. Share the video
Once the video gets trimmed to its proper length, it's time to post it on social media. You will need to connect your PS4 to the social media account for direct uploading, but choosing the social media network from "Share Video Clip" will give on-screen instructions to sign in. Once you are all set with the social networks, pick up your video, write a tweet, update the status, and give a description.

Some social media platforms offer additional features to customize the privacy setting for the video. When you upload to YouTube or Facebook, you can choose the controls to allow people to see. On YouTube, you can publish the video as "unlisted," so they are not private but don't show up in search.
Part 3 PS4 Game recorder for PC/ Mac - Wondershare DemoCreator
Wondershare DemoCreator is one of the best software for Gamers, twitch streamers, and YouTubers, who live to share their tutorial content and gameplay with their fans and followers. It also excels in recording daily presentations and meetings for future reference. By implying the real-time screen drawing and the mouse spotlight feature, Wondershare DemoCreator uniquely records the screen. The elements combined make capturing webcam, microphone, and system sound content relatively more personalized and straightforward.
There are many screen recorders on the web that offer the same as DemoCreator delivers. But it stands out from its competition by packaging the screen recorder with an advanced audio and video editor, which possesses the ability to create a fantastic video from the bland video.

 Secure DownloadSecure Download
Features
- Screen Recording: DemoCreator is renowned for its screen recording feature, allowing easy recording with a simple click of the red button.
- Real-time Screen Capturing: Let you annotate and highlight directly on the screen during recording, ideal for instructional videos.
- Webcam Recording: Record your face by the webcam while recording the screen, catering especially to educators, commentators, and gamers.
- Microphone Audio Recording: Records high-quality audio directly from the microphone, offering separate tracks for easier editing of video and audio.
- AI-powered features: Boasts AI features like AI denoise, AI voice changer, AI teleprompter, and AI background remover, enhancing video recording and editing.
User Guide
- Step 1 Install and launch DemoCreator, and select Video Recorder-Game Recording.
- Step 2 Customize recording settings like webcam, microphone audio, and system audio settings. Then choose a PS4 game to start recording.
- Step 3 Finish recording and edit your gaming recording. After you have done the editing, you can save and share your work.

Secure DownloadSecure DownloadConclusion
In this article, you have got to know about how to turn off game recording on PS4. You can easily record, edit and share the recorded video on PS4 easily. If you have any confusion about editing and sharing, you can go through the steps mentioned above. You cannot stop the game recording completely on PS4, but you can select the length of the video to 30 seconds which is near to off.
Faqs About How to Stop Recording on PS4
1. Is PS4 always recording gameplay?
Yes, PS4 automatically records the last 15 minutes of gameplay in the background. You can save or share this footage as desired.
2. How long can PS4 record gameplay?
PS4 can continuously record gameplay for up to 15 minutes by default. This setting can be adjusted in the Share and Broadcast settings menu.
3. Is it OK to leave PS4 on 24 hours?
Leaving your PS4 on 24 hours is generally safe with its built-in power saving features. However, it's advisable to use 'Rest Mode' for long periods of inactivity to prolong the console's life.
How many seconds does it take to turn off a PS4?
Turning off a PS4 typically takes about 20 seconds. However, the time can vary depending on the current operations and processes running on the console.


