Record Instagram Live Videos

The world of the internet is ever-expanding, and with it grows our list of connectivity and social media apps. Facebook, Instagram, and other such apps are some of the most famous ways for anyone to connect to the world. One of such apps is Instagram, which has been downloaded billions of times by people across the planet. It has loads of filters, different features, which makes this platform more engaging and entertaining.
One of such features, which everyone loves the most about social media, is going live on-air whenever you want. Moreover, Instagram is a great place where you can do the same within seconds and with a few taps on the screen. Also, sometimes you want to record either your session or someone's whose you're watching. The following article covers all the aspects through which you can record Instagram live on computer successfully:
Way 1. Record Instagram Live on Computer
We all can agree on the fact that live screens are enjoyed best when they are with details. One fine way to enjoy a good quality Livestream is through a PC screen since it has a greater view. Also, when you want to record any live session with the PC system, one of the most prominent screens and Instagram live recorder that come to mind is Wondershare DemoCreator. To record a live session on Instagram through Wondershare DemoCreator, you need to follow these steps carefully:
 Secure DownloadSecure Download
Step 1: Download and install
Wondershare DemoCreator is a free application available on its official website from where you need to download the software file. After the downloading gets completed, you have to install it on your computer. To do that, you have to right-click on the file and then click "Run it as administrator".

Then an installation wizard will appear, and following that you will be able to install it successfully. Then when you open the application for the first time, it will ask you to give certain sets of permissions, which it asks for the first time. This is a one-time process.
Step 2: Use the software
Then when you successfully enter the user interface of the software, you will be asked whether you want to go through a guided tour of the interface or not. Then after that, you will see options for starting the recording at the bottom corner of the screen. When you click on the start button, it will start the recording with a floating widget.
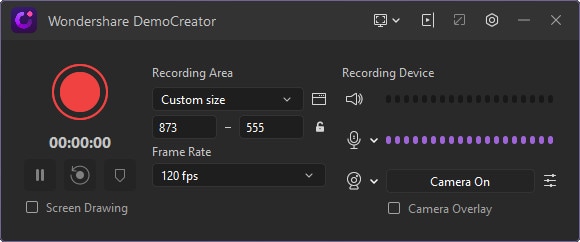
It will have options such as stopping or pausing the recording and taking a screenshot. You can click on the stop button, which will stop your recording.
Step 3: Save and share
When you are done with the recording, you can manually rename it after you save it and share it anywhere you want. This software not only exceeds all our expectations but is very capable of recording everything which is going on in Instagram live.
Way 2. Record Instagram live on Mac
So, when you are using a Mac device such as an apple computer, things get little changed with the whole recording process. With the change in OS, there are changes with everything. Here we recommend you to go for using software such as QuickTime, which is very popular for its user interface and exciting features. Below is a list of steps you need to follow to record an Instagram live session with the help of QuickTime:
Step 1: Opening the app
First, you have to go to the QuickTime player application, which is mostly preinstalled on any Mac PC, and then you have to open the user interface. There will be plenty of options available on the screens, and you have to find the option that says File/New screen recording. You have to then click on it.
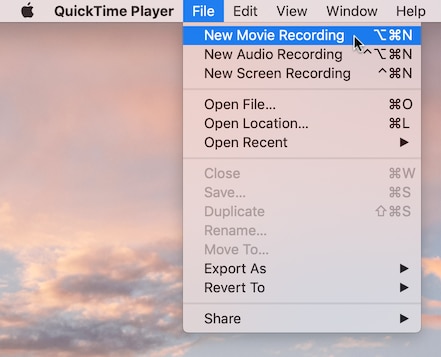
Step 2: Starting the record
After clicking on the above-mentioned option, you will be asked to choose whether you want to record the entire screen or just a part of it. You have to cite your requirements for audio sources from the options and then click on the record button to start the recording. When you are done, you can easily stop it with one click.
Way 3. Record Instagram live on iPhone
We already have discussed the various methods to record an Instagram live session. But if you are using a smartphone then the process becomes a lot easier. To record an Instagram live session, you have to follow these steps:

- First, click on the settings icon to go through the settings of your iPhone.
- Then you need to find the option that says control center. Then you have to tap on that. This menu will show you a list of options by which you can customize your control center. You have to click on the plus icon that is next to the Screen Recording option.
- This will add the red dot or the option for screen recording right from your control center. You have to make sure that you have allowed access for it to use in other apps. Once you have done that, you can just pull down your control center from the top and start the screen recording by tapping on the button. This will start the recording of the Instagram live session immediately. And also, it will put a floating widget for recording controls.
- Once you are done with the recording, you can tap on the stop button to stop the recording and end the session. The stop button will be right in the floating widget placed anywhere on your screen.
Way 4.Record Instagram live on Android
Like iPhone, recording Instagram live on android is also easy. The steps involved are pretty much the same. With recent updates of android, there is a preinstalled screen recorder on your device. If you are using an old version, you can always download one from the play store. After downloading it, the process is the same. To record an Instagram live session in android, the process is as follows:
- In case you are using a default screen recorder; you can find the app in your app drawer, or you can pull down your notification panel where you will be available with the option to start the recording.
- This will open a floating widget that has controls for start or stop or pause the recording. You have to tap on the start button, and when you are done with the live session, you can stop it with a simple tap.
- And if you are using any other screen recorder application, then you need to open the app itself first and then go for starting the screen recording. The rest of the process is the same.
It doesn't matter which social media platform you chose to use, or what methods you chose to record the live session; the whole process almost remains the same. The slight variation occurs only due to the operating system you use Instagram with. These methods that are explained above are yours to choose from, and you can do that by following all the steps. The whole process has been explained with detailed steps, and you should be able to follow them properly. And at the end, you should be able to record any Instagram live session successfully.


