How to Use Sound Recorder for Windows 11

Most people don't know it, but you don't need to download any third-party apps to record high-quality sound on your Windows 7 PC. This is because the Windows operating system comes with an in-built voice recorder that you can use to very easily record sound on your computer. It is easy to use as we shall see later in this article, and it can record up to 3 hours of audio.
This in-built sound recorder uses the computer's microphone or a connected external microphone to capture sound. And, you can continue to use all other apps on your computer as you record the sound since it will not interfere with all other functions of the computer. In this guide, we take a look at how you can use the Sound Recorder for Windows 10 to record sound on your computer.
Download and Install Sound Recorder
The sound recorder desktop program comes pre-installed on Windows 7. This means that you don't need to download and install the program on your computer to use it and you will not be able to find any download links online to download the program on your computer.
For Windows 8 and Windows 10, you may find the Sound Recorder app pre-installed on the computer, although you can also find the Sound Recorder app on the Microsoft Store. If the app is not already available on your computer, simply open the Microsoft Store and look for the Sound Recorder app using the search function to install it on your computer.
Once you have it on your device, read the next section to find out how you can use it to record sound on your computer.
How to Record Audio with Sound Recorder on Windows 11
To record audio on your PC using Sound Recorder, follow these simple steps;
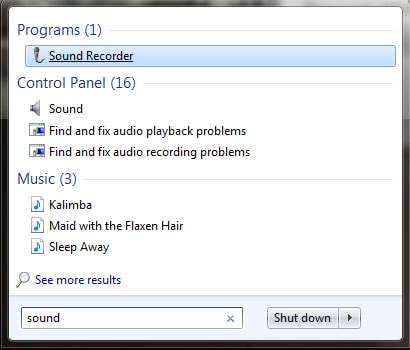
Step 1: Open the Sound Recorder program or app on your computer. You can find it using the PC's search function.
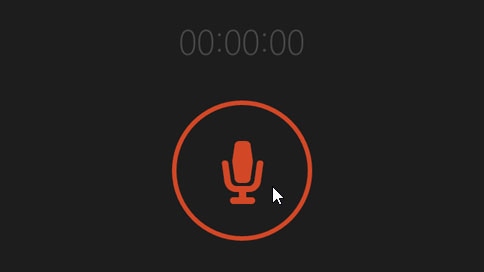
Step 2: Once it is open, click on the circular button with the microphone in the center to start the recording.
Step 3: The button will change to a "Stop" button and the recording will begin immediately. At any time during the recording, you can choose to pause the recording. Just click on the "Pause" button below the "Stop" button to stop the recording. You can click on the "Pause" button again to resume the recordings.
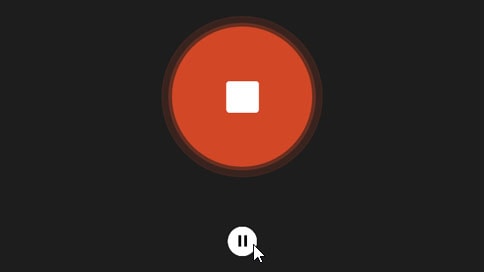
Step 4: To save the recording, click on the "Stop" button and the recording will appear in your list of recordings.
Sound Recorder Not Working? Best Alternative
While the Sound Recorder app can be a very good solution to record audio on your computer, it is pretty much a single-function tool. You can only hit "Record" and "Stop." It doesn't offer a lot of flexibility when it comes to the audio recording. It is also prone to failure sometimes with users reporting that the recording process can sometimes be interrupted for no reason and they have to start the recording process all over again. The app can also sometimes fail to capture sound correctly or the quality of the sound you get after the recording is less than ideal.
If you are having issues recording audio with the Sound Recorder app on Windows PC, we recommend using Wondershare DemoCreator. DemoCreator is a screen recording tool that also allows users to record audio. It is so flexible and versatile that you can choose to record audio alone. This program will use both the in-built microphone and any connected external devices to capture the crisp, clear sound that can be used for numerous purposes. It also comes with a built-in editor to make as many changes as you can to both the audio and video that you record.
Follow these simple steps to use DemoCreator to record audio on your computer;
 Secure DownloadSecure Download
Step 1: Install the Program on Your Computer
Download the Wondershare DemoCreator executable file from the program's main website. Double-click on the executable file to start the installation process and follow the wizard to install the program onto your computer.

Once installation is complete, launch the program and in the main window, click "New Recording" to begin the recording process.
Step 2: Configure Recording Settings
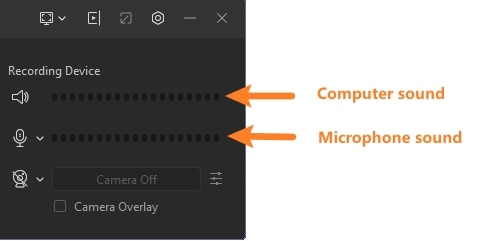
Since we want to use this program to record only audio, ignore the "Screen" and "Camera" tabs and select the "Audio" tab.
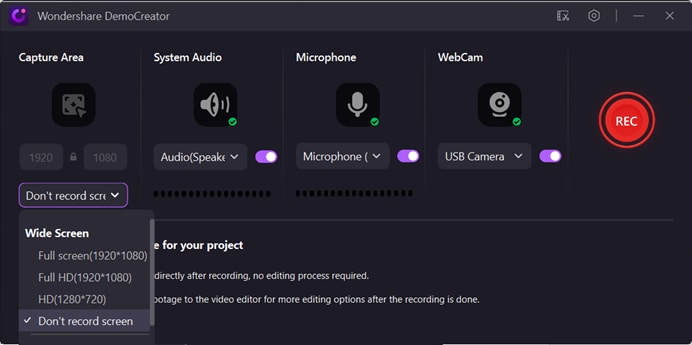
Here, choose if you would like to capture the "Computer Audio" or sounds from the "Microphone" or both.
Step 3: Start the Recording
When you are ready to begin the recording process, simply click "Start Capturing" or press the "F10" key on your keyboard.
You will see a 3-second countdown on the screen and then the recording will begin.
To end the recording, press the "F10" key again and the audio recording will be saved to your computer.
Keep in mind that the program also comes with a number of editing tools that you can use to edit the audio recording in numerous ways.
With the Scree recorder app for Windows, you can quickly and very easily record sound that can be up to 3 hours long. While this app is very useful, the sound quality that you can get from it may not be ideal to share with others, making it a solution that is only ideal for personal use. If you are recoding audio for professional purposes such as an audio-book, consider using DemoCreator, a more professional solution that records very high-quality sound. It is also a good way to record screen capture videos with sound, making it one of the best tools for any marketer to have in their arsenal.


