Lightworks Tutorial
There are plenty of video editing tools in the market, some free and some paid. And although these tools are all designed to make it easy for you to edit your videos to perfection, they all have different ways and different features to achieve that purpose. One of the most recognizable of these video editors is the Lightworks video editor.
This video editor offers both a free and paid version with the variation between the two being the features. In its recent past Lightworks was a video editor that was famously used to edit Hollywood movies, but it has since scaled down to be useful in editing today's digital videos. One of the things that is very striking about Lightworks is that the free version offers a range of features that rival most paid programs although it supports fewer export options.

In this article, we will share with you a complete Lightworks tutorial. In it, we are going to share with you how to download and how to use Lightworks to help you decide if this is the best tool for your video editing needs.
Download and Install
Let's begin with where you would start when using any kind of software; downloading and installing and installing the program.
Lightworks works form Windows, Mac and Linux. To download either version of the program, go to Lightworks and then select the version that you would like to download.
Windows users can download either then 32-bit version or the 64-bit version depending on the operating system they are running. Once the executable file has been downloaded, double-click on it and then follow the instructions in the installation Wizard to install the program.
Mac users can download the latest version of DMG, by clicking on the “Download DMG” button. Once the DMG is downloaded, you can then simply drag it to “Applications”.
Linux users can either download the DEB or RPM files by clicking on the corresponding buttons.
System Requirements
The following are the system requirements that you must have to use Lightworks on your computer depending on the system;
|
Specs/OS |
Windows |
Mac |
Linux |
|
Supported Operating Systems Version |
Windows Vista, Windows 7, Windows 8/8.1 and Windows 10 |
Mac 10.9 and higher |
Ubuntu/Ubuntu/Xubuntu 14.04 and higher Mint 17 and higher Fedora 20 and higher |
|
Recommended System Specs |
Intel i7 chipset or faster, fast AMD chipset Intel i7 chipset or faster, fast AMD chipset 3GB RAM or higher Two high-resolution displays (1920 x1080) or above PCI Express graphics card (NVIDIA or AMD) with 1GB or higher and support for DirectX 9 (Windows only) Separate media and system drives (these can be internal or external as long as the interface is suitably fast Compatible sound card 200MB Disk space for Lightworks installation |
||
|
Graphics |
NVIDIA and AMD Graphics |
||
How to Edit Videos in Lightworks
Lightworks offers users various video editing options although the options you get will depend on the version of Lightworks that you have. The following tutorial is centered around some of the most common editing options available in Light works and how to use them;
Creating a New Project
To begin, you need to download and install the program on to your computer. You can find the link and instructions on how to install the program above. Once the program is installed on your computer, follow these simple steps to create a new project;
Step 1: In the program’s main interface, click on the “Create a new Project” link on the screen.
Step 2: A new dialogue box will popup asking you to name the project. Enter your preferred name for the project in the field provided. In this same dialogue box, you can also select the frame rate as needed and if you will want to use different frame rates in the same video, select the “Mixed Rates” option from the drop-down menu.
Click “Create” top open a new project page. On this page, you will see a log tab. You can use this Log tab to open four titles on the screen to access various unique features including the following;
- The Viewers title located at the upper right corner of the screen has Cue and Metadata markers
- The Edit title has a number of options to edit the video including options to edit the timeline, view selected videos and control various sections of the project
- The VFX title can be used to manage the size of the viewer, but will also have settings that allow you to manage the alignment of titles and subtitles
- The Audio title is meant to help you easily manage any audio settings on the project
Import Media
Once you’ve created a new project, you will need to add the source materials that will go into the video. Here’s how to do that;
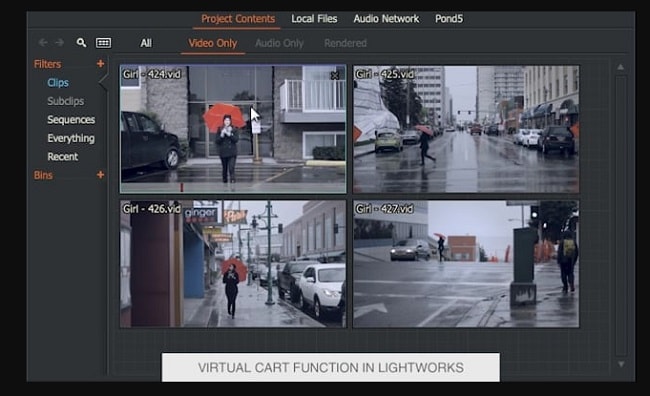
Step 1: Click on the Local Files tab
Step 2: Click on “Places” to browse your computer for the files that you want to add to the project. You may find that you cannot add media files that are incompatible with the frame rate you have chosen.
Step 3: Select the file import method from the drop-down list. You can choose either “Create Link, copy local or Transcode.
Step 4: Now click on the desired media file to import. If you want to import more than one file, you can use the “Ctrl + Shift” keys on your keyboard to select all files.
Playback Using the Viewer
The Viewer allows you to playback the video during editing to make sure the editing process is going as it should. Here’s how to use this valuable feature;
Step 1: To open the video in the Viewer, you can either double-click on the video or drag and drop the title to the Viewer. The video will open in the Viewer with its title or name at the top of the Viewer.
Step 2: You can then use the keyboard shortcut to play the media file. You can also move through the video using the red marker on the indicator strip.

The All-in-One Screen Recorder & Video Editor
- Record desktop screen,audio and webcam simultaneously
- Edit videos quickly with a wide range of professional tools
- Built-in plentiful video effects
- Export to MP4, MOV, MKV, GIF and multiple formats
Adding a Video to the Timeline
In order to begin editing the video, you will need to add it to the timeline. This part is very easy, just go to the “Edit” Tab and then simply drag the video to the timeline.
If you would like to zoom in on the content of the video, use the “+” icon at the upper left corner of the screen. Just click on it until the contents are at the desired size.
Editing the Video Clips
If there are several sections of the video clip that you would like to remove from the video, the following is how to trim the video clip;
Step 1: Hover your mouse over the section of the clip you would like to cut or trim. You should see white brackets appear. Place the left mouse button where the brackets are.
Step 2: The parts close to the area you want to cut will appear in yellow, indicating that the selected clip has now been separated from the rest of the video.
Step 3: The Viewer will now be in “Trimview” mode, showing the frames on both side of the section you’ve just cut.
Step 4: Click on the “Preview” button below the viewer and both videos will begin playing in a sequence. This feature is meant to allow you to make sure you’ve trimmed the video in the correct spot.
Step 5: Once you are certain, you can exit the “Trim View” by clicking on the “Close” button.
The “Edit” tab allows you to do a lot more than just trim the videos. You can add some transitions and even edit the audio to create a unique and attractive video.
Export the Video
Once you’ve completed all the edits you would like to apply the video, you will need to export the video to make sharing easier. To export the video, follow these simple steps;
Step 1: Right-click on the clip, timeline or sequence and then select “Export” from the options that appears.
Step 2: Choose the format that you would like to export the video in. the various options include camera formats, media files, interchange backup, targets, sub-menu headings and presents among many others.
Step 3: A dialogue box will appear allowing you to select any additional settings for the video. Once you have selected all your preferred settings, click on “Start” and the program will begin exporting the video according to your specifications.
Lightworks offers a lot of options when it comes to editing videos. But as you can tell from the tutorial above, it can be quite difficult to work with particularly for beginners. But once you understand it, it can be very useful for editing all kinds of videos and export them in a variety of formats.


 Secure Download


