How to Blur an Image or Screenshot Video in Video Editor?

Most top-notch screen catch software has a device that lets you obscure part or the entirety of a picture and blur image video. There are numerous approaches to cover up or de-underline content in a screen capture. Every so often, the structure an accommodating schedule that makes it simple to be understood and brief. As you use screen captures to an ever-increasing extent, it's imperative to have many devices that permit you to recognize what is significant in a picture. You needn't bother with extravagant picture altering instruments just to blur an image.
Moreover, you will run into times when there is content in screen capture that you'd lean toward not to share, but rather can't be totally taken out. At the point when this occurs, it shouldn't prevent you from utilizing screen catches. In case you're seeking how to blur an image and obscure out a face for an unknown video meet, darksome close to home data in a narrative film, or obscure out a logo to maintain a strategic distance from copyright snares, it's anything but difficult to do with the present altering software. Underneath, we've delineated how to obscure areas of a video cut in software.
How to Blur an Image or Screenshot Video in Wondershare DemoCreator?
A swift approach to tackle this dilemma of blurring the image or screenshot is the easy-to-use Wondershare DemoCreator. You can easily blur image video with this toolkit as it's a handy and efficient video editor. You can also blur a screenshot taken by this video editor so this means there's nothing left that DemoCreator cannot do for you. Hence to try this software must be your utmost priority while tackling such a problematic situation. Here's how to blur an image with this video editor:
Step 1: Launch DemoCreator
In this step, we will enlighten the main and foremost thing you have to do before embarking on the first project with this video editor. That is for sure, downloading and installing this masterpiece from the below-attached links so you can do that here right away:
 Secure DownloadSecure Download
As soon as the download finishes, you're ready to install this software and then launch it right from the desktop of your PC as follow:
Step 2: Import the Media Files
As soon as you're into the video editor interface of Wondershare DemoCreator, you're ready to import your desired files into this software and the best part is that you can easily do that at your fingertips as it allows you to import almost all the format pictures and screenshot videos into the editor. Hence, to do that, hit the Import button as follows:
Step 3: Add Files to the Timeline
Now in the next step, all you need to do is drag and drop your images or screenshot videos into the timeline section of this software so you can have the editing interface opened for you to edit and shape your images or videos accordingly.
Step 4: Add Blur Effect
In this main step, we're going to teach you how you can bring the blur effect to your images or videos so for that purpose, go towards the Effects menu at the left side of the screen interface as follows:
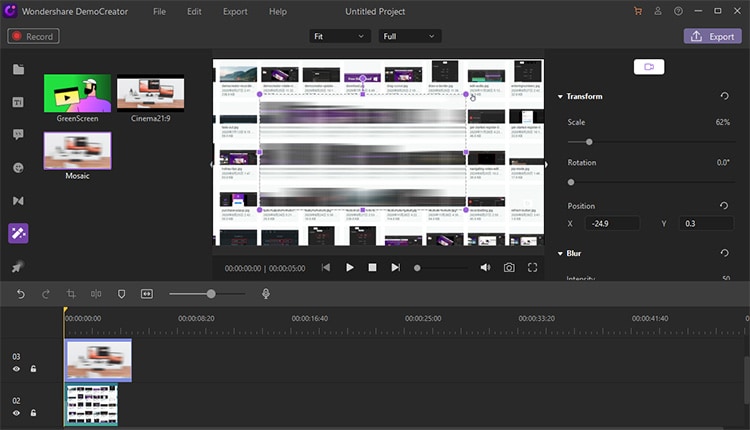
Now, as soon as you're into the effects menu, find the Mosaic effect within the list of effects menu as follow:
Now drag and drop this blur effect into the timeline and drop it exactly over the image or screenshot video you want to effect.
Step 5: Adjust the Blur Effect
In this step, now you're free to customize the blur effect you've added into the timeline over your image or screenshot video. You can easily adjust the various options linked with this effect. Learn more in the below features:
You can easily change the size of the blur effects while comparing it within the preview window of this software interface.
You can easily place your blur effect on the desired place or point of your video and images just by dragging the effect in sync with the video or image comparison within the timeline.
At the right corner of the screen within the editor menu, go to the Blur section and expand it more to find out the Intensity of the blur effect, you can easily change the intensity value to your desired value while comparing it to the preview window as follow:
You can also opt for the Opacity menu which strengthens the blur effect and in the same way, you can check out the updates from the preview window as follow:
Step 6: Export the Video
After you're done with the editing performance of your image or screenshot video, now is the time to share it with the world, and to do that without any hassle, go straight towards the Export button at the top-right corner of the screen of this software as follows:
A window shall open which have all the information and the adjustment factor to be applied to your exporting masterpiece so to do that, customize the output setting of your masterpiece as follow:
You can also opt for the YouTube direct sharing of your masterpiece and to do that, hit the YouTube menu of the software export interface as follow and sign in to your YouTube channel to enjoy the direct sharing benefit of your video:
How to Blur an Image or Screenshot Video in Camtasia?
Camtasia Studio makes great video demos and instructional exercises by recording your PC and software screen. While catching our PC screen there is some delicate data we might need to cover up. In Camtasia Studio, you can cover up or veil touchy data in a video catch, for example, a username, secret key, street number, email address, versatile contact number, individual data, faces, and so forth.
Step 1: Launch Camtasia Software
To proceed with the blur effect to be applied to your images or screenshot videos, launch this masterpiece software from your desktop
Step 2: Open the Media File into the Software
In the next step import your images or screenshot videos into this software studio to get the blur effect implemented over them
Step 3: Blur your desired area on Media File
Select the "Callouts" button. From the Shape device segment, look down to discover the Blur Callout. Double-tap it to add it to your video timetable. You should see a rectangular obscured confine the video see window; you can move it around and re-size it to cover the region where the private individual information can be seen on the caught video.
Step 4: Add Blur Area to your Media
like content aftermath or subtitle, you can likewise change the length of the haze callout. Snap and hold its extreme right edge, drag it to one side or option to abbreviate or expand it.
Note: You can change the force of the haze. Go to Effects > Blur > More.
Step 5: Export Output
In the final step, you can export the masterpiece with the blur effect to your desired location by going into the Export menu of this software interface.
How to Blur an Image or Screenshot Video in Snagit?
Snagit is one of the number one toolkits due to its adaptability and list of capabilities. You can do nearly anything with it including stowing away, obscuring, or redacting text in screen captures. The main drawback with this product is that it's anything but a free device to attempt. Here's how you can implement the blur effect to your image or screenshot video with this software.
Step 1: Open Snagit Software
In the first step, all you need to do is launch this software on your desktop so you can follow the step by step guide of this article to blur your image with this toolkit
Step 2: Add Picture into the Screen Capture
In this step, screen capture your image or screenshot video into this software so you can try out the blur effect on the file
Step 3: Select the Blur Menu from the Menu bar
In this step, follow the Blur menu from the Ribbon of this software as follow, In case you're unable to find this special menu from the list, you can go to the following command to find the Blur menu:
More > List > Blur
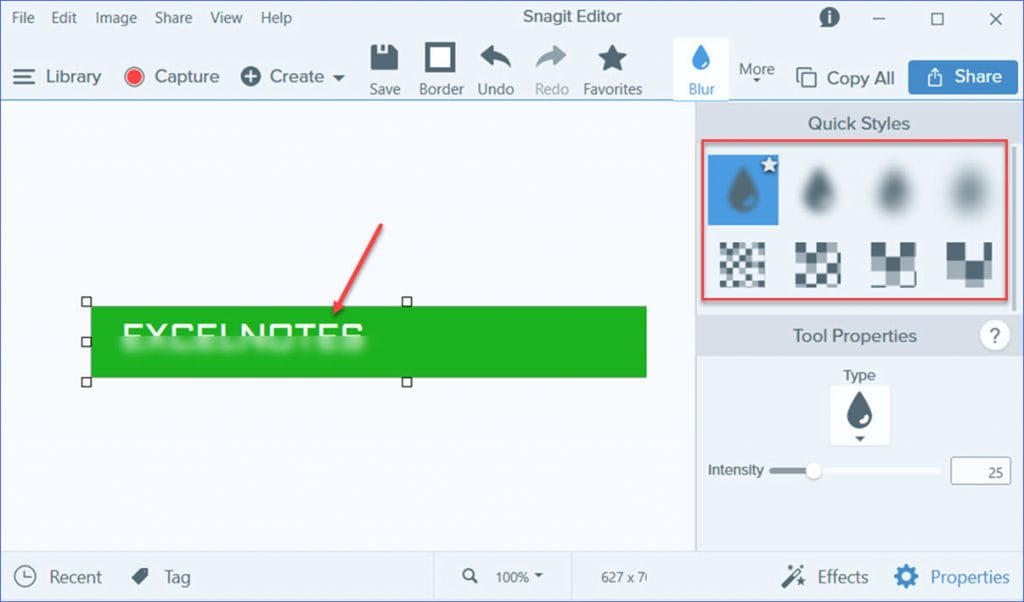
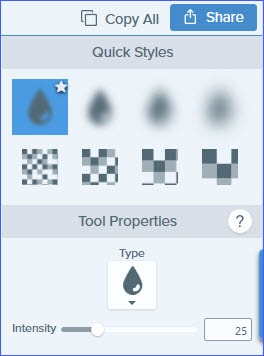
Step 4: Adjust the Blur Effect
You can easily adjust your blur intensity and type around which you can add more to this effect with the customizations as follow, you can also shape your blur effect to any desired shape.
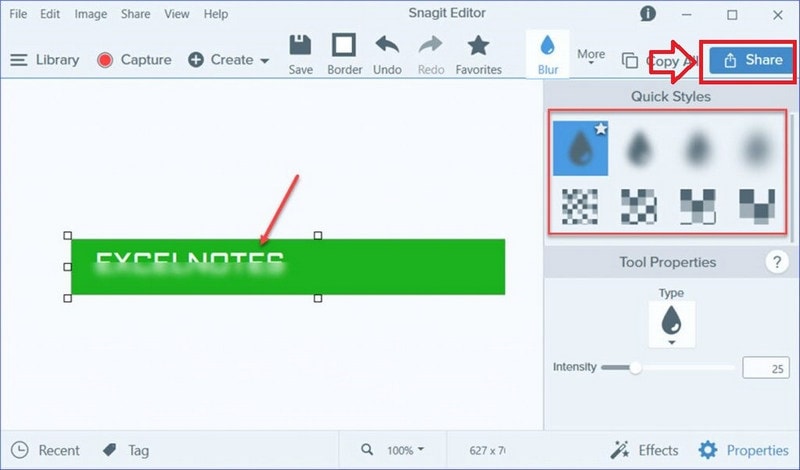
Step 5: Output your Masterpiece
In the final step, hit the Share button of Snagit software, which will output your masterpiece video to your desired location handily.
Conclusion
While clarifying a convoluted interface or outline, a few people like to utilize obscure to do a reformist uncover of bits of a picture. This is an extraordinary strategy in slide decks and introductions. Meanwhile stating the above-mentioned tactics to deal with this feature and specialty, we, therefore, recommend Wondershare DemoCreator software so you can use its featureful interface to help yourselves with the handy and effective approach while blurring your pictures or screen videos without affecting the quality and video footages.
Secure DownloadSecure DownloadWhile performing the blurring task, all you need is a toolkit that can perform the task and gives you the perfect approach to the answer of how can I blur an image? Furthermore, the reason for recommending DemoCreator is quite clear with the fact that it has all the functionalities naturally embedded so all you need to do is pick up the suitable one and embark on it within your first blurring project.


