Movavi Video Editor Plus 2020 Review

Videos are increasingly becoming a popular and impressive marketing tool as they offer an effective way to share a message. Therefore, video editing software is gaining momentum like never before. Now, people want to edit their videos as per their needs and focus less on hiring professionals. One such software that makes editing convenient and unleashes your creative side is Movavi Video Editor Plus.
Movavi Video Editor Plus is a video editing application that can be used on both Windows and Mac. With this tool, you can unwind your creative side as it offers plenty of tools to make your videos memorable. It has powerful editing modules that can be used to create small videos as well as entire movies.
Though there are many other video editors available in the market, Movavi Video Editor Plus pleases the users with its ease of use. Anyone can use this video editor without being a computer expert. It can be a perfect pick for beginners. Its advanced tools make it suitable for professionals as well.
Here is a simple step-by-step guide on how to use Movavi video editor plus steam tool effectively:
Download and Install
Movavi Video Editor Plus download can be done using its official website. Just go to the official website and choose between Windows and Mac. Then, click on the ‘Movavi Video Editor Plus’. You will land on the editor’s page, and a download button can be seen on this page.
Hit the ‘download’ button. Its size is just 63 MB. It may take less than 5 minutes to download this tool. You can also opt for Movavi Video Editor 15 plus free download.
Once you are done with downloading Movavi video editor 15 plus, you need to install the editor on your computer. The installation process is as easy as downloading process. It gets installed with a few clicks. After downloading, open the editor and accept the terms and conditions. Then, click on the ‘Install’ button. (Once the installation completes, you will spot the Start button).
That’s all. The installation part has completed, and it is ready to be used.
Key Features
Movavi Video Editor Plus is a versatile and easy-to-use application. Following features help it to stand out in the competitive field:
- Introduced as a simple, straightforward yet attractive tool, Movavi Video Editor Plus comes in a dark mode interface. The vast timeline and proper alignment of different elements make it look pretty attractive.
- It offers an initial tutorial to give you a quick understanding of all the concepts.
- It can import all kinds of multimedia files like photos, videos, etc. Additionally, it has built-in media. It comes with 20 sample videos, 21 backgrounds, 44 music tracks, and 24 inbuilt sounds that can be used.
- It is well-equipped features like split, trim, rotates video fragments, and has an amazing library of video filters and a variety of transitions to be used between clips. Some other special effects include chroma-keying, picture-in-picture, and freeze frame.
- This editor allows adding texts and stickers to the image.
- Another highlighted feature is its ‘Highlight and Conceal’ feature. You can use highlight feature to draw the attention of the viewers on a particular part of the video or use the conceal feature to hide a specific part of your video.
- It comes with a video stabilization feature if in case the video has shaken while recording. You can fix minor shakes and movement. You can even increase the Accuracy and Shaking level as per your requirements.
- Another impressive feature is the ability to detect the beats of the audio tracks. With the beat detection feature, it detects the beats and marks the timeline with yellow markers. This can be used to maintain the tempo of your video.
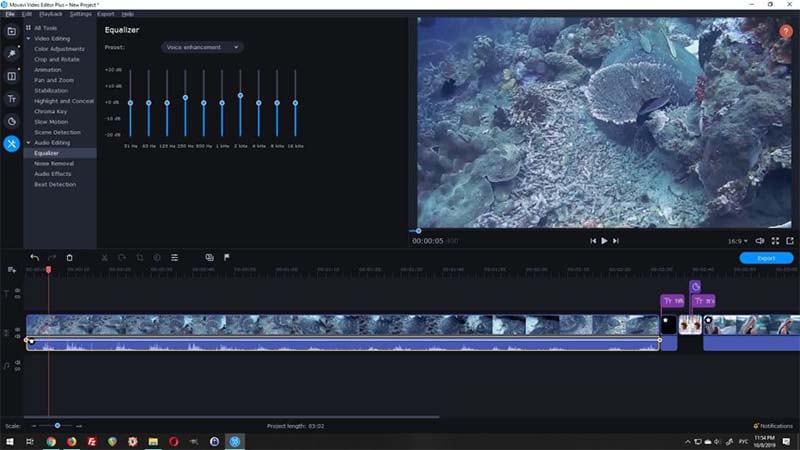
- And in the list of fantastic features, the Noise Removal feature adds up its name. This is a very useful feature as it suppresses the background noise. The suppression of background noise enhances your voice and provides clarity to your video.
To start with basic features, you should take a look at the window and go through some panels like Navigation Panel, Timeline, and Preview. A glance over these panels will help you to understand further steps easily. You can explore other features too.
Importing Files
To start with the editing process, you first need to import files into the Movavi Video Editor Plus. To do so,
- Go to Navigation Panel, press Import followed by File Import, and Add Files. The selected files will be visible in the Media bin
- Or you can simply drag the files from the folder directly to the Navigation Panel.
Then you need to place them on the Timeline. This can be done by dragging the imported files to the Timeline. You can drag all the files, including photos, videos, and audio tracks, and arrange them according to your needs.
Note: Audio files will always be arranged underneath the video files by default.
Splitting a Video
Splitting feature can be used to cut any video or audio track, apply some transition to a single video clip, or add another video in the middle. To split a video into two, you should follow these steps:
- In the timeline, select the clip you want to divide.
- Position the orange marker at the spot where you want to split the video. Then, click on the ‘Divide’ icon present above the timeline in the shape of scissors.
- And that’s all. This process splits your video into two clips.
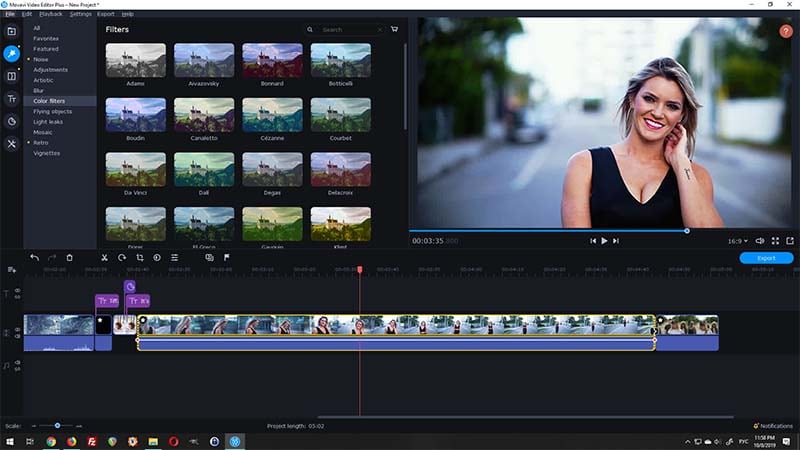
Applying Filters
This is the most interesting feature that an editor uses to enhance the quality and appearance of the video. So, to apply a filter:
- Go the Navigation Panel and click on the ‘Filters’. This will display the library of filters. You can download more filters from its official website or by clicking on the ‘Download More’ option.
- Pick anyone and simply drag it to the video on the timeline.
- If you don’t like the used filter, you can remove it using Ctrl + Z key combination. This way, you are free to try as many filters as you want without harming your video.
Adding Dynamic Transitions
Well, adding a transition to your video is as easy as using other features.
Go to the Navigation Pane and click ‘Transitions’. This will display a wide range of available transitions. Pick the one you like the most. Simply drag and drop the selected transition on the timeline between the two wanted clips.
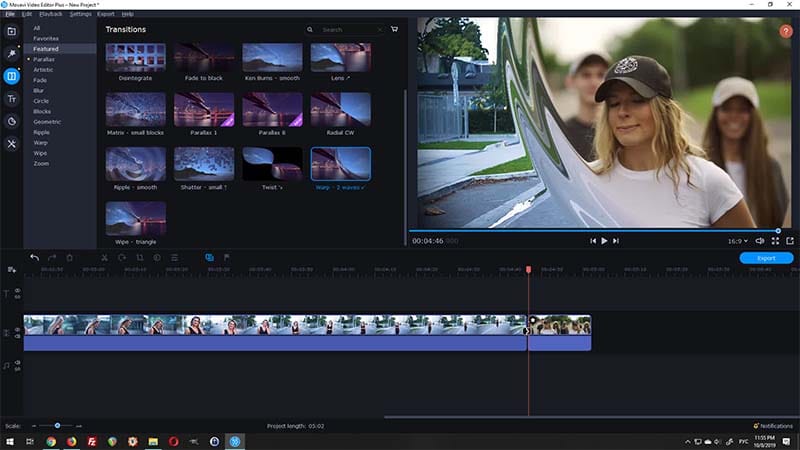
Note: You cannot apply a transition to one video clip. If in case you just have one clip and want to use a transition, you need to split the clip into two and then apply the transition at the required place.
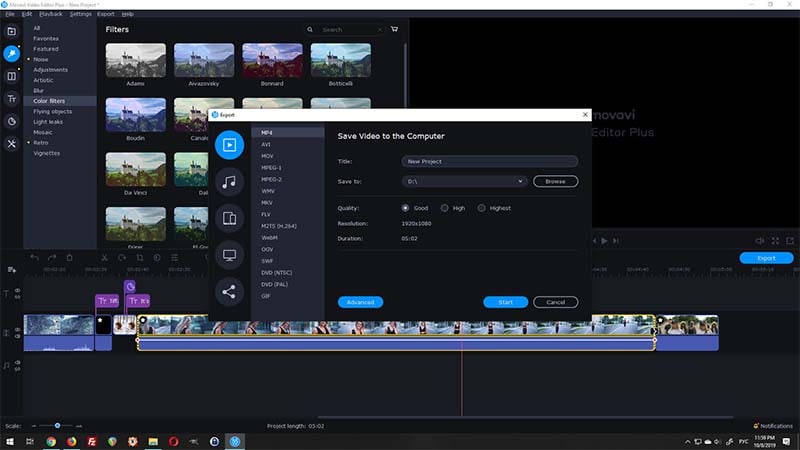
Exporting the Final Video
Now that you have finished the editing part, it is time to export your video. To do so, click on the Export button at the top right side of your Timeline. A window with different options will appear. It displays several options to export the video in different file types like video, audio-only, or device format.
Selecting the video option, you will get a chance to choose the type of formats like MP4, MKV, or GIF. After selecting the format, you need to name your video and select the quality and the location where you want to save the video.
Then, you have to select the resolution by clicking on the ‘Advanced’ button. After making desirable changes, press Accept and the Start. This entire process will render and export the video.
If you think of an alternative for Movavi Video Editor Plus, then Wondershare DemoCreator has that potential. Wondershare DemoCreator is a cost-effective video editor that offers an amazing user experience. The interactive interface allows editing videos using a series of banners, overlays, captions, etc. The easy-to-use editing features enrich your video and make it more creative.
 Secure DownloadSecure Download
It offers features like cut, copy, accelerate/slow down the speed, change the volume, adjust the border, and many more. It is available for both Windows and macOS. Here is a quick guide on how to edit videos on this software:
- Run the software. As the software launches, click ‘Video Editor’ from the main interface.
- In the upper right corner, click on ‘File’ followed by ‘Import Media Files’.
- After importing media, drag it on the Timeline.
- Once the videos appear on the Timeline, you can start editing them by using annotations, cursor effects, change speed, etc.
- After finishing all the edits, save and export your videos to your computer in different formats like MP4, MOV, and GIF.
Conclusion
To sum up, you should know that Movavi Video Editor Plus is a light-weighted, simple yet impressive tool that can be used by beginners as well. It is a feature-rich video editor. You do not have to put all your brain to understand its features. The easy-to-use interface helps users to learn its work within minutes. Now with Movavi video editor plus 2020 review, you will find it easy and fun to edit your videos. You have a chance to showcase your creative side. And with little practice, you will excel in the art of editing.


