Audio Hijake Review and the Alternative Tool
Audio Hijack is actually more than 15 years old and has more than a thousand users, especially broadcasters. It's a beautifully simplistic DAW (Digital Audio Workspace) that is designed to make recording podcasts, radio shows, phone calls, and the like extremely easy. After exploring it for a while, you will notice that it is very simple to use and provides you with all the features you could want.
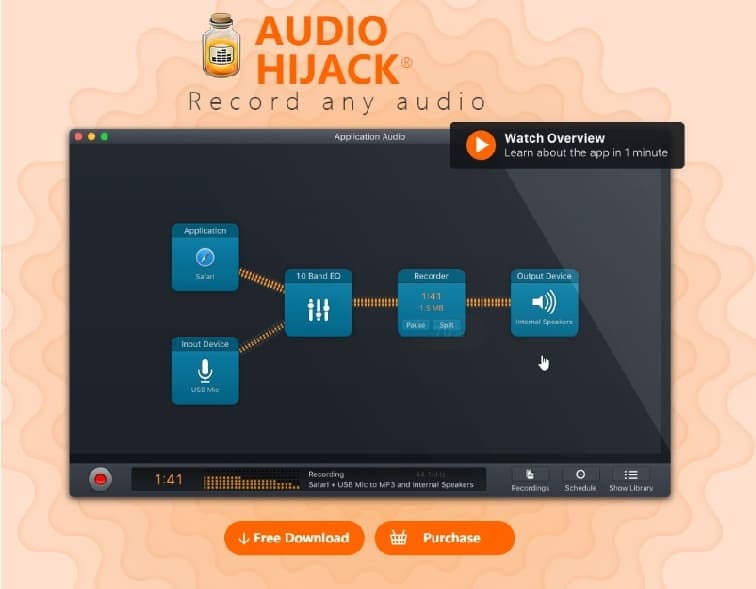
Audio Hijack is among the reliable audio recorders for Mac computers, meaning that it is a quite powerful program. It has a special design compared to other programs, whereby you can drag options from the menu bar to the main window and customize settings. It makes uninteresting settings process more interesting audios and the diverse combinations of options will produce dissimilar effects. With this Audio Hijack for Windows and Mac, users could grab audio from any input source, including applications such as, built-in DVD player, microphone, Skype calls, among others. Audio Hijack troubleshooting is easy. This article contains more information.
Part 1. Audio Hijack Key Features
1. Time Shift
Audio Hijack allows you to transcribe audio and more. This is possible through time Shift, which acts like a DVR for your Mac's audio, with the ability to pause and jump back.
2. Audio Block Presets
You are likely to save presets for an Equalizer. However, you should not limit yourself to that while Audio Hijack for Windows and Mac allows you to save configurations for almost every Block, which you can instantly use in other Sessions.
3. Live Stream & Broadcast
The Live Stream block has the ability to send via RTMP to Facebook Live, Twitch, YouTube Live, and more. On the other hand, you can stream MP3 or AAC to a remote server with the Broadcast block and thus power an internet radio station.
4. Import and Export Sessions
Audio Hijack easily lets you export sessions that are sharable with co-workers and friends. Simply get the right configuration and then pass it on to others.
5. Simplified Audio Effects
Audio Hijack makes audio effects attractive as well as simpler. This gives you the confidence to manipulate everything until you get the sound you are seeking.
6. Accessible for All
As you use this audio recorder in your Mac computer, you can explore Apple’s Voice Over. It works perfectly for the visually impaired people, making the recorder an all-inclusive tool.
7. Streamlined Recording Options
There are numerous sensible recording defaults to choose from. Therefore, if you are looking for more advanced recording options, they are readily available.
8. Bulletproof Audio Recording
Audio Hijack recording format indestructible. Therefore, if your Mac experiences problems such as crashing, your audio recordings will remain safe and secure.
9. One Session, Many Recorders
This audio recorder allows you to record to both the MP3 and AIFF, or other formats at once as well as record different sources in sync. The only requirement is adding multiple Recorder blocks to get multiple files!
Part 2. How to Use Audio Hijack
Audio Hijack for PC functions through blocks, which you can drag and drop from the side. For example, you can easily drag the Application block into the workspace, connect it to Google Chrome and have a complete block setup that can send everything out from the browser.
Sending audio to multiple places is also achievable through blocks. You can broadcast to your radio station, record the show, and then listen to the outcome through your headphones. Audio Hijack provides built-in effects that you can insert between these blocks to adjust the EQ, balance, ducking, and much more.
If you decide that you want to broadcast to your Radio.co station, here is how you can use Audio Hijack for PC.
Step 1: Set up Audio Hijack
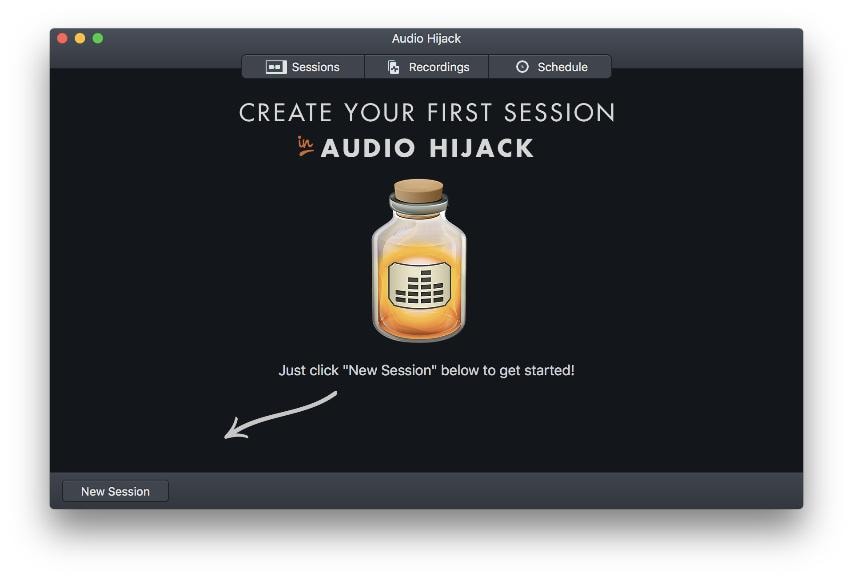
Start using Audio Hijack by setting it up, which involves selecting a New Session by clicking the function at the bottom left.
Step 2: Make a new blank session
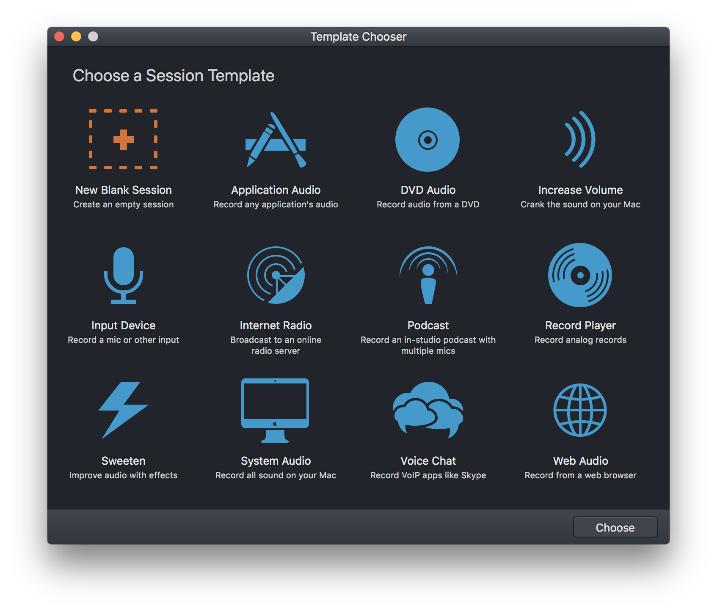
To make a new blank session, you need to choose New Blank Session. Consider renaming your new session to something meaningful; you could use the radio station's name.
Step 3: Drag the necessary items into position
Go to the Sources area in the side-panel and drag in Input Device, and then select the microphone you want to use. Now head to the Outputs area, and drag in Broadcast.
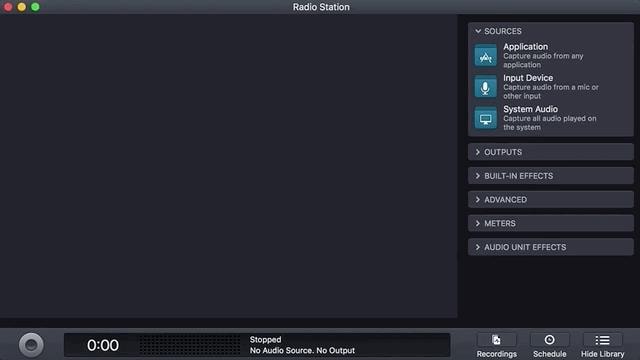
Select the Broadcast block and go to Setup; here, enter in your Host Name, Port, and Password. These details are readily available under your Live tab in the Radio.co Dashboard.
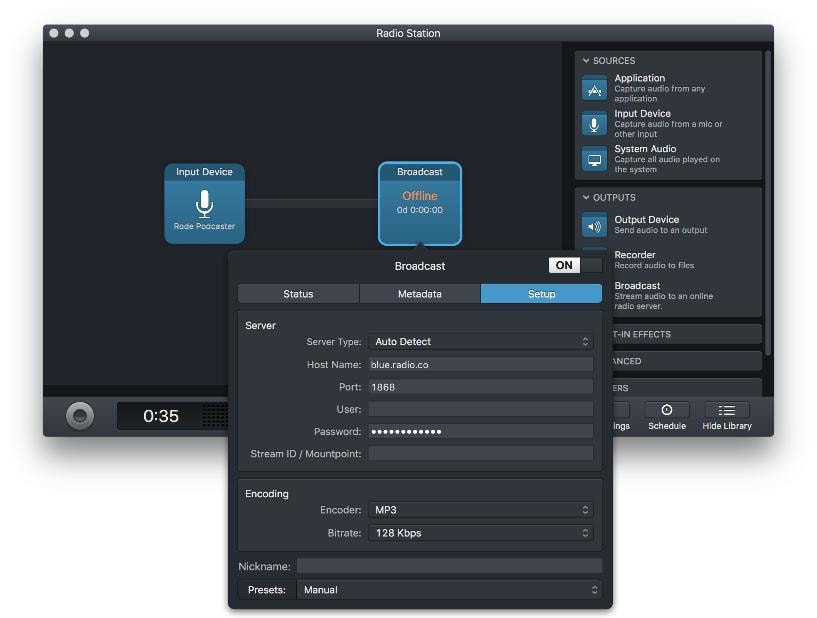
Step 4: Broadcast in Audio Hijack
To proceed with broadcasting to your radio station, select the function in the bottom left corner. This process may take a couple of seconds as your stream reaches your station. As soon as it does your connection should show that it's on air on the left upper side.
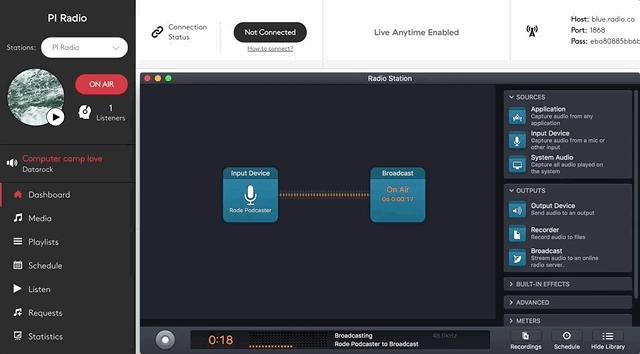
The Pros and Cons of Audio Hijack
From numerous Audio Hijack reviews, it is evident that many people prefer it due to its amazing beneficial features. The software is also quite easy to use and being user-friendly causes beginners to gain the confidence to handle audio recordings. The moment you hit the record function, you will automatically capture streaming audios. It has plentiful input sources including apps like QuickTime Player and Safari, computer system and microphone, among others.
Audio Hijack also has embedded timers that start and stop recording automatically, which is amazing for recording online audios. While using it you have absolute control over the recording and you can save in MP3 as well as AIFF file, or burn a CD.
Unfortunately, Audio Hijack has multiple setbacks that may discourage you from acquiring and using it. It may have a complicated workflow and so the majority of beginners need tutorials. Whereas advanced users prefer extensive custom settings, others may find them cumbersome. What’s more, the software requires users to install certain features for maximum functionality. The cost as well is quite demotivating as well. Due to all these issues, it is recommendable that you use a better Audio Hijack alternative instead, one that is completely reliable and less stressful for beginners.
Part 3. Alternative Tool to Record Audio - Wondershare DemoCreator
Wondershare DemoCreator is definitely the only Audio Hijack alternative that you can rely on and work without stress. This powerful application can replace Audio Hijack in Windows and Mac computers since it simplifies the entire process of producing audio. Therefore, you can easily record sound originating from the applications in your Windows PC and Mac, DemoCreator is a tremendous application that not only, allows you to record the internal audio of your computer, but also video. It performs better than all other software for Mac and because it has advanced features that propel its success in the market.

The All-in-One Screen Recorder & Video Editor
 Secure Download
 Secure Download
It enables you to record your screen and capture videos of apps or games, while also supporting real-time screen drawing. It can capture your emotions and sound as well through the webcam and microphone, respectively. DemoCreator also provides the audio fade in and fade out functions, and annotation features for people making tutorials. You can edit the videos through transitions, captions, and green sound effects, or simply export fast without much manipulation.
Use the following are steps to record audio with this Audio Hijack alternative:
Step 1: Download Wondershare DemoCreator
Using the browser in your computer, you can access the right website to download this Audio Hijack alternative, DemoCreator; simply search and then download the program on your computer. Here is how to do so.
- Open the official website of Wondershare DemoCreator, and choose between downloading the free version or purchasing it through the perpetual license.
- Double-click on the downloaded program setup file to run the installation program
- Open the installed program and use the onscreen instructions
- Remember to register your identity by clicking the top-right corner button and then inserting the relevant Wondershare ID on the pop-up window at the top.
- You can create an ID if you won none through the Create Account function.
Step 2: Recording Preparations.
To adequately prepare for audio recording on DemoCreator, open the software and hit the red function named New Recording. Configure the recordings parameters, which are the audio settings, and then situate your operation in a noise-free zone to record great sound. You may also construct the recording region or webcam if the audio must have video.
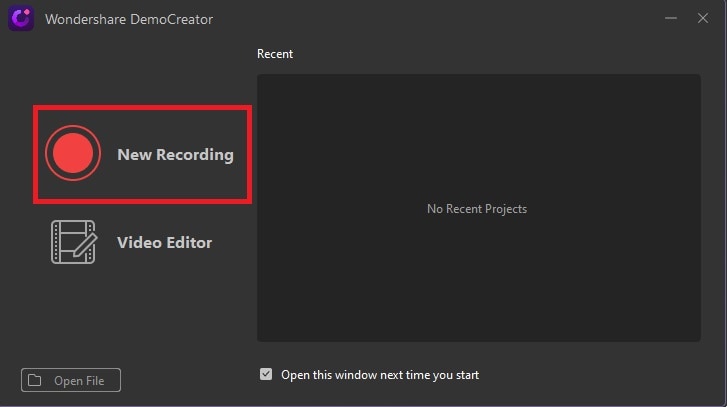
Step 3: Set your recording liking.
Before starting the recording, download the sound effects and then ensure that you place the microphone and laptop near your location. Ensure that you are well prepared if you are recording yourself and have an attractive background if it also involves a video.
If you are recording applications like YouTube through internal sound you do not need external noises or visuals and so you should turn off the microphone, and also confirm that the System Audio function is highlighted green.
Conclusion
Having a complicated workflow makes Audio Hijack a difficult choice for beginners. Installation of certain features for maximum functionality also makes you feel less motivated to proceed with your audio recording goals. So, you need Wondershare DemoCreator because it suits professionals and beginners. It contains the necessary features that you need, and you only have to access them in the interface. What’s more, the price is extremely fair and cost effective. Having Wondershare DemoCreator in your Mac should be your ultimate goal, if you wish to record high quality audios and proud upload online or share with close friends and family.


