
How to Resize Images Without Distortion

Pictures are basic to how your clients imagine your business and item. When utilized appropriately, it assists you with winning their trust and creating higher marketing projections. Your interest group will, in general, like and effectively recollect visual contents over plain text-based ones. Photoshop or other progressed photograph altering instruments are not required on the off chance that you're simply searching for resizing and do essential altering to single or cluster pictures. Resizing pictures is diverse to editing since it keeps up with the first picture while essentially making it bigger or more modest. Twisting happens during picture resizing when you endeavor to build the size of a picture. Expanding the actual size of a picture extends the pixels of the picture, turning out to be all the clearer as the size increments.
Part1. Why There Will Be Distortion When Resizing Images
Utilizing pictures to address your item, administration, or brand isn't sufficient. You need to guarantee that the pictures you use are excellent and high-goal photographs improved for the Step you are posting them on. On the off chance that the pictures you use are not the right measure or seem contorted, it ruins your whole informing and causes your business to show up less expert. Making pictures and afterward resizing them to fit a few Steps can be troublesome on the off chance that you have no involvement with visual communication. Because of the accessibility of picture resizer and analyzer apparatuses, you can undoubtedly explore this hindrance. This is additionally alluded to as pixelation. It is difficult to expand the size of a picture without causing bending or something to that effect; however, you can diminish the size of the picture without causing contortion, showing yourself visual computerization, or attempting to DIY out of a picture; resizing bogeyman? Here's the beginning and end you want to know about resizing pictures.
Part2. How to Adjust the Aspect Ratio in Photoshop
Adobe Photoshop empowers you to make complex designs just as expertly alter photographs. If you want your pictures to have a particular size, Adobe Photoshop can scale them for you. Without a doubt, who might have thought such an easy decision-sounding assignment could be so disappointing. It's occasions such as these that we see the area of expertise of visual creators, in any case, underestimated. Be that as it may, if you change just one of the qualities (stature or width), your picture is contorted. Physically ascertaining the worth of the subsequent quality each time you scale your pictures is tedious. Photoshop can scale without bending by changing the second property naturally.
Step 1: Launch Photoshop
Open your photograph in Photoshop by going to File> Open and choosing it from its area on your PC.
Step 2: Open the Aspect Ratio Window
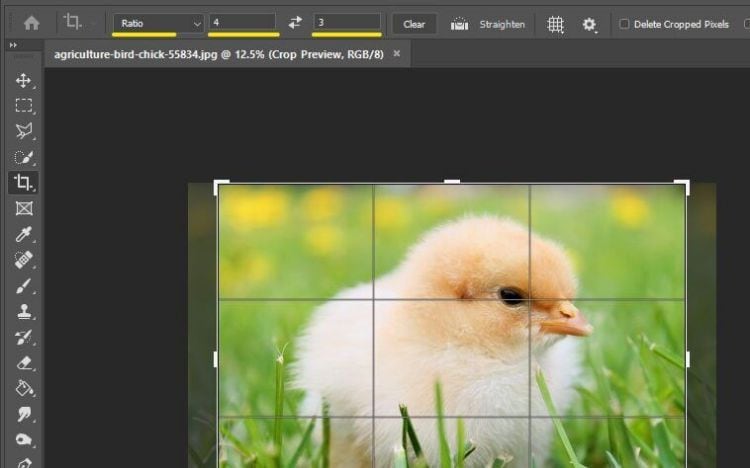
Select the yield apparatus or utilize the easy console route "C." The yield handles and blueprint will show up around the picture.
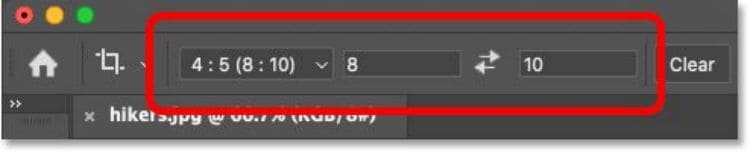
Step 3: Set the Aspect Ratio
In the choices bar at the top with Ratio chose, type your ideal angle proportion like 4:3. That is 4 in the width field and 3 in the stature field.
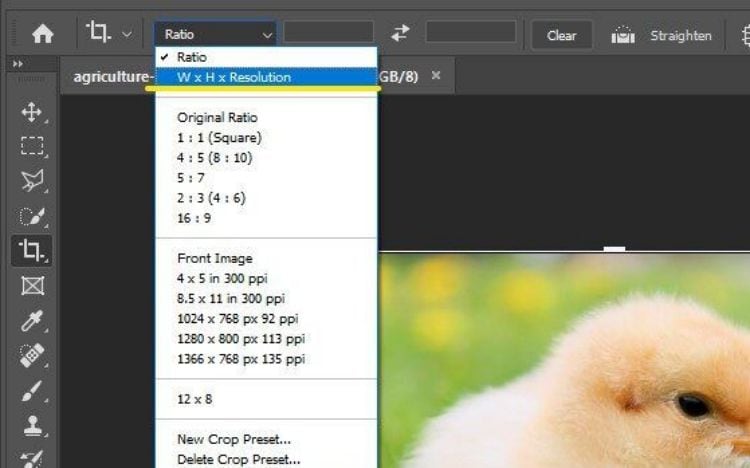
Step 4: Set the Proportion
If you might want to add genuine aspects like 12 in by 9 in, click the "Proportion" field, and in the drop-down, select "W x H x Resolution" as displayed. Type in your width in the primary field, your tallness in the subsequent field, and your goal. The width and stature will probably default to inches (In). You can transform it to centimeters if you'd like by composing "cm" after the digit. Type the goal as 300 px/in if your picture is planned for print or 72 px/in for screens or sharing on the web.
You can also snap and drag the picture, and the yield region will continue as before size and viewpoint proportion. Assuming you need to all-time erase portions of your picture, you can check "erase trimmed pixels." In any case, leave it unchecked, and photoshop will conceal pixels that fall outside your material size, and you can uncover them again with the change devices.
Step 5: Enter the Ratios
Press Enter or the mark of approval once you're done filling your perspective proportion and goal. Assuming you need to fix your harvest, use CTRL or CMD+Z on your console. To re-try the yield, simply select the harvesting device again and click on the picture. Your last viewpoint proportion and goal will, in any case, be the default; however, you can transform it according to your requirements. Initiate your rulers to consider your picture aspects to be your work.
Step 6: Save the Preset
You can save your new perspective proportion as a preset by choosing the proportion drop-down and clicking "New Crop Preset " Name your preset and snap alright.
To change your perspective proportion from scene to picture, you can tap the flip symbol, and it switches your width and tallness inputs. To eliminate your viewpoint proportion and switch back to freestyle editing, simply click "clear," and it eradicates your field inputs.
Part3. How to Resize a Photo in Photoshop
Resizing a picture is one of the most normally utilized abilities in all of Photoshop. It's so normal, indeed, that even individuals who know nothing about Photoshop figure out how to utilize it to resize their pictures, which should provide you with a thought of the fact that it is so natural to do. Resizing pictures in Photoshop might be simple, yet there's something vital to remember with regards to keeping up with picture quality. As a general rule, it's OK to make a photograph more modest than its unique size, yet you need to try not to make it bigger sooner rather than later.
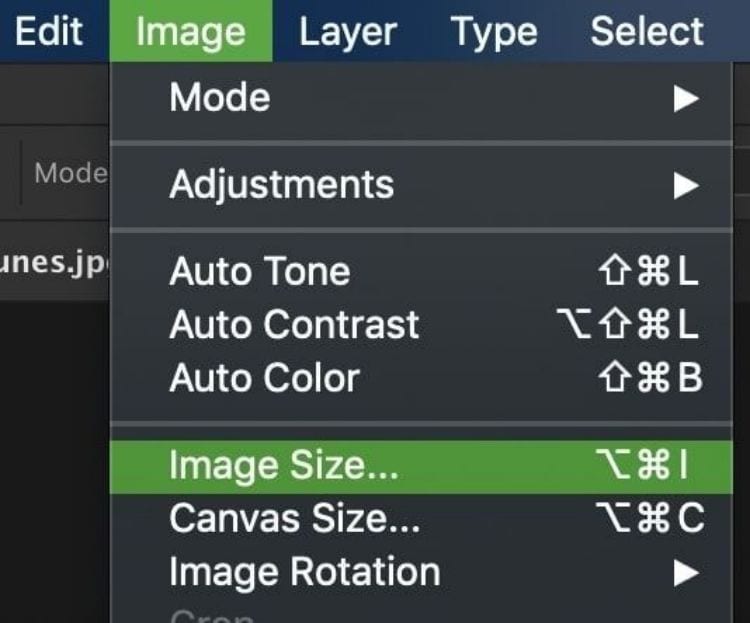
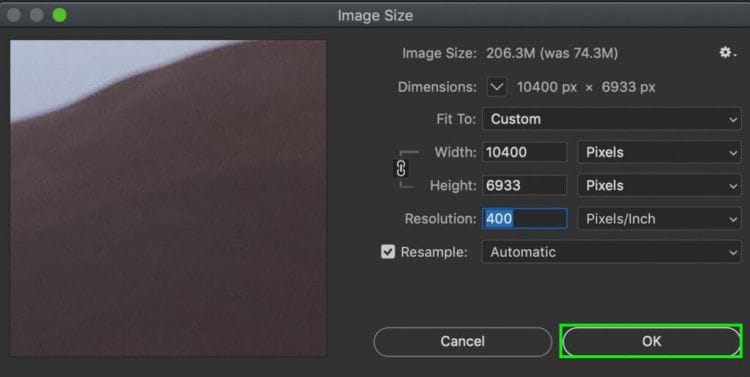
Step 1: Go to Image > Image Size
With the layer, you need to make greater chose, go up to Image > Image size.
Step 2: Set Your New Image Dimensions
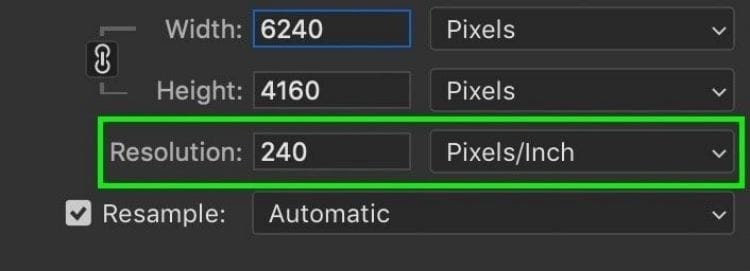
In the Image Size discourse box, there are maybe a couple of choices to work with. The first to take a gander at is your picture's present aspects.

Step 3: Change Your Image Resolution
With your picture aspects extended, it's an ideal opportunity to change the goal. In straightforward terms, a higher goal will give you more pixels in your picture, which eventually makes a more excellent and more fresh-looking photograph.
Step 4: Apply Your Resize Settings to The Photo
With every one of your settings all set, simply press OK at the lower part of the Image Size discourse box.
Part4. How to Crop an Image in Photoshop
Photoshop makes it more modest basically by discarding pixels. It simply takes a portion of the pixels from the picture and throws them out the virtual window. Luckily, Photoshop is great at knowing which pixels to discard without forfeiting picture quality, so making our pictures more modest isn't typically an issue. To edit a picture with the Crop apparatus, adhere to these directions:
Step 1: Pick the Crop apparatus from the Tool Panel or press C.
Step 2: Put the cursor to a point on the picture, where an edge of the trimmed picture will be, and left-click the mouse.
Step 3: Moving the cursor askew, keep the left mouse button squeezed. Deliver the left mouse button. A container will show up over the picture with checked corners, demonstrating the region that will be saved. This container can be moved, resized, and turned.
To move the harvest box, move the cursor totally inside the chosen region, press the left mouse button, and keeping in mind that keeping the left mouse button squeezed, drag the case.
Step 4: Save the Final Image. Press Enter or press the button in the Options Panel to edit the picture. To close the yield box without trimming the picture, press Esc or press the button in the Options Panel.
At the point when Photoshop makes a picture bigger, it needs to add pixels that were not there previously, and since Photoshop wasn't on the scene when you snapped the picture, it has no clue about what a bigger, more definite rendition of the picture ought to resemble, which implies it needs to figure. Photoshop is an exceptionally incredible program. Its conjectures depend on some extremely convoluted and progressed math, however toward the day's end, it's still a supposition, and it won't figure effectively. So once more, while resizing your picture, it's OK to make your pictures more modest, yet you ought to try not to make them bigger at all expense except if you totally couldn't care less with regards to picture quality.
Part5. How to Resize or Crop Photos by DemoCreator
Our fundamental manual for resizing pictures can assist you with staying away from foggy pictures by giving data regarding what's going on when you resize photographs. Overseeing and limiting the measure of lost picture quality through the expansion cycle can be accomplished using DemoCreator software. Adjustable recipes for growing your pictures are incorporated into this product so you can alter them like a star. On the potential gain, this simple to-utilize program works with one or the other Mac or Windows, has numerous kinds of processor backing and bunches of cheats and presets to make things simpler for a novice.
There are a lot of pre-characterized settings to browse, making your errand a ton speedier and simpler. Despite how experienced you are with photograph altering software, even you can get quality augmentations without bending from DemoCreator. This is a work area application with the entirety of the augmentation and altering instruments you want to deliver a great expansion. More prominent precision, cleaner yield, and an easy-to-understand interface are probably the best highlights of DemoCreator. The nature of augmented pictures with restricted misfortune is likewise among its positive advantages. This product additionally works with the two Windows and Mac working frameworks.
Steps to Crop or Resize Photos by DemoCreator:
Step 1. Add the Photos to DemoCreator
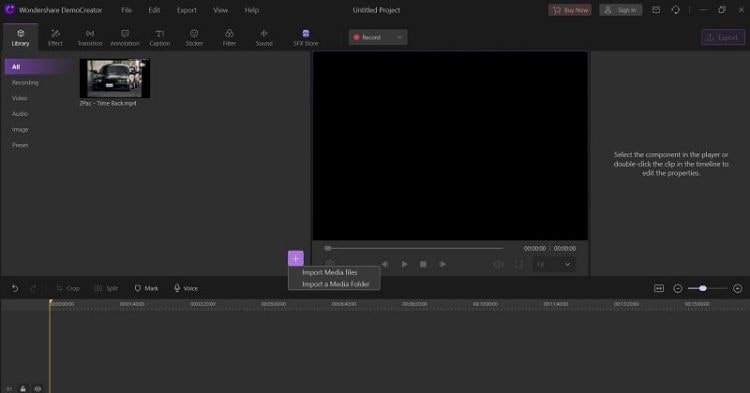
To resize photos with the DemoCreator solution, you need to download and install the launcher of the DemoCreator application from the website. It's available for both Windows and Mac versions. After the installation finishes, launch it to go into the Video Editor of DemoCreator.
After you're into the Video Editor of DemoCreator, hit the Import button to select your Photos files to import right away. The DemoCreator supports numerous file formats of Photos, including JPG, PNG formats to import of your own choice. After you've made a selection, proceed with the selection.
Step 2. Use the Crop Option
In the next step, drag your imported files to the timeline, and from there, you can right-click on the video or Photo's file and select the Crop option from the list as shown here:
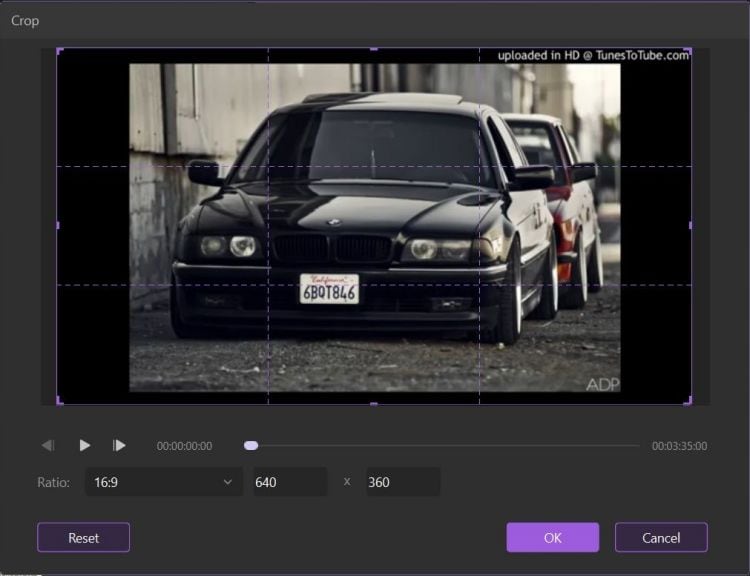
Now inside the Crop window, you can utilize the feature as per your requirements. It's super handy and easy to use the feature with DemoCreator.
Step 3. Resize the Photos More Precisely
Lastly, if you want to resize the photos or even videos with full accuracy, then we've another option for you. You can do it by the Project settings. To begin with, refer to the File menu from the top menu bar, and from there, select the Project Settings from the list as shown here:
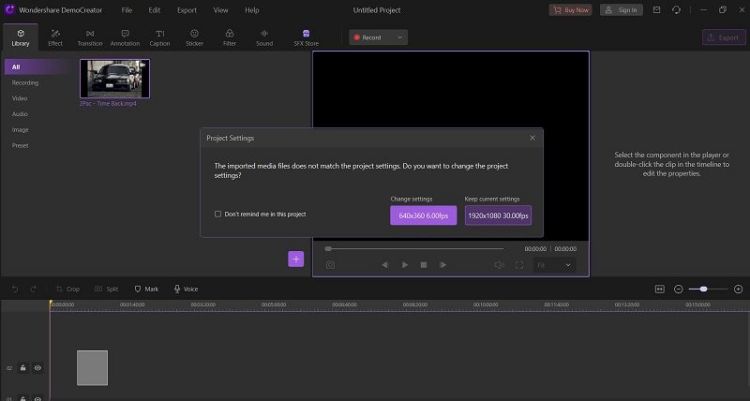
Now here's the kicker is you can put your desired cropping and resizing numbers to apply to the video or Photos final resolution to be edited with DemoCreator. You can simply save the changes on the go.
Conclusion
Each time you stretch a picture, logo, or text style, someplace, a visual architect wince. We can't reject that photograph altering application is the best thing since the creation of paintbrushes. Yet, with incredible innovation comes more noteworthy obligation and assumptions to convey immaculate visual encounters. Web-based media, web designer, or blog, most Steps today are furnished with a "resize picture" button. Resizing and developing photographs is quite normal among all people who utilize computerized pictures for different purposes. Having the option to deliver an extension without forfeiting picture quality is an assumption that we as a whole have about photo altering. To accomplish the best standards of photograph altering corresponding as far as anyone is concerned and abilities just as what your spending plan will deal with, you should pick the DemoCreator software arrangement which best suits your necessities and utilize a portion of our tips for further developing extension quality at the end. So, give it a try nevertheless.


