How to Add Video Transitions in Wondershare DemoCreator?
Video content, alongside many other pillars, has been directly affected by video transitions you use to dissolve the multi clips. A banging transitions enriched video is always tending to reach a mass of viewers while comparing with the boring and simple one. But it's in your head now that how to add transitions that rock your video content. Well, here we've got you a perfect solution, so if you are going to dissolve your various clips at one point.
Generally, video transition editor tools are built-in within the video editors but some editors lag this feature, which might be your concern before shifting towards a video editor. Contrary to your concerns, we have introduced an all-in-one video editor with video transitions effects that will rock your output video worthy of watching by the audience. So if you want to flip your videos like a comic scene, making a designated wipe between the clips or applying the famous Hollywood reel transitions, you can find out more here.
What is Video Transition Effects?
A video transition effect is a kind of effect that can give your videos an animated touch while joining several clips.
When you are done editing and trimming the clips you want to include in your video project, then just before the rendering step, a video transition phase comes where you need to emphasize on how to dissolve one clip over another so it looks like a fancy and realistic your viewer may find captivating. Usually, your video clips are displayed without transitions like preview clips which comes after one another and it's quite boring for today's viewer as there are trendy videos in almost every niche.
A simple and transition free video lacks creativity and it's not attractive at all. With this rapidly changing technology era, your viewers have plenty of more options to opt while watching videos over the internet. In this regard, the best way to stay put your audience to your videos is to bring surprising and rocking effects into your video transitions which your viewers will find eye-catchy and stick to your content rather than searching for something other. The best editor you can pick for swaying your video content is Wondershare DemoCreator.
Wondershare DemoCreator transitions will allow you to include artistry and creativity to your videos effortlessly. With its wide range of built-in transition effects, you can Circle, Warp, Square, or Ripple your clips while joining them within the main video project. So, what are you waiting for? Head into the topic below which demonstrates you to doing so.
How to Add Video Transitions in DemoCreator?
Having fragments in your final video project? You are at the right place to make them rocking and captivating. Wondershare DemoCreator transitions will bring this sophistication to your videos as this software has numerous transitions effects that can fade out, dissolve or warp your video clips over one another to give it an amazing touch your viewers must enjoy. Just follow the steps below:
Step 1: Download and install the Wondershare DemoCreator program
- The first and foremost step to begin with adding watermark to your videos is by downloading the software if you haven't already, from the below button:
 Secure Download
 Secure Download
- After the download completes, now open the .exe file which you have downloaded to install the software
- Just proceed with the default options selected automatically and intelligently by this software
- After the installation finishes open the software from your Desktop
Step 2: Import the media file
- Now you are probably within the Wondershare DemoCreator interface, click on the Import icon that will lead you to the file explorer of your PC

- Now you can select the variety of files and video clips you want to include in your video project.
- Hit the open button to add the files into the media section of the DemoCreator.
Step 3: Cut off unwanted video parts
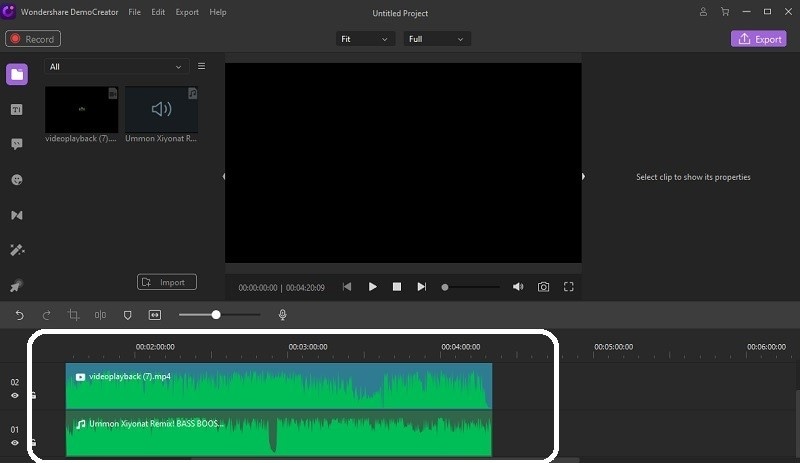
- The beauty of Wondershare DemoCreator is that you can trim and crop your video clips after adding them to the timeline which is the editing area for your video clips.
- Within the timeline, you can select the desired video clip and make fragments of it by cutting it into the desired small clips.
- You can also trim the video clips to your wanted duration and period you want to include that clip into your main video.
Step 4: Add transitions
- Here's the best part with Wondershare DemoCreator software, you can effortlessly add the numerous transitions which are included naturally within the software.
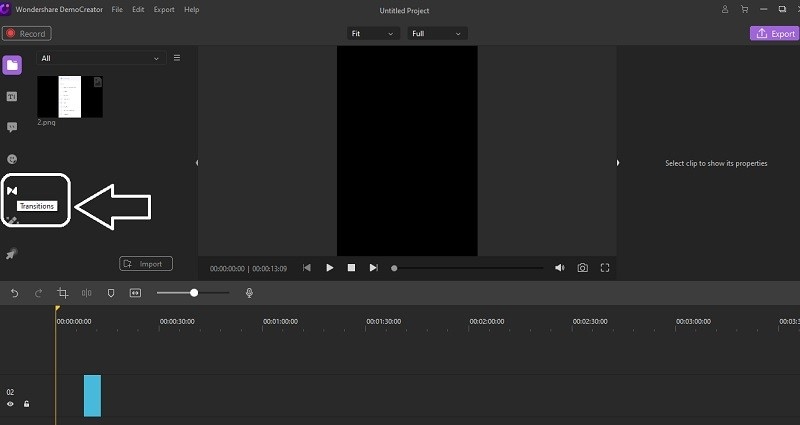
- Just head into the Transitions menu situated on the left side of your software interface as follow:
- There you will find various shaped transition effects which are already stored within the DemoCreator transitions for you
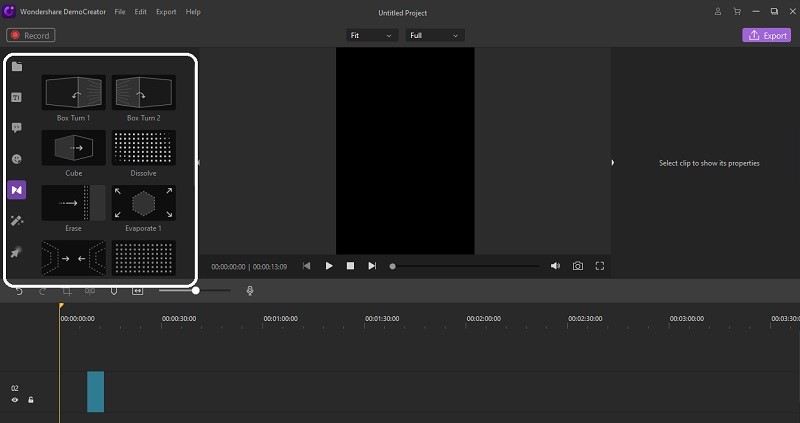
- Pick the one you find rocking as you have Ripper, Flash, Morph, and plenty of more within the list, and add it to the timeline between the desired clips.
- You can also set the selected transition effect's duration by clicking on the transition effect and customizing it in the timeline.
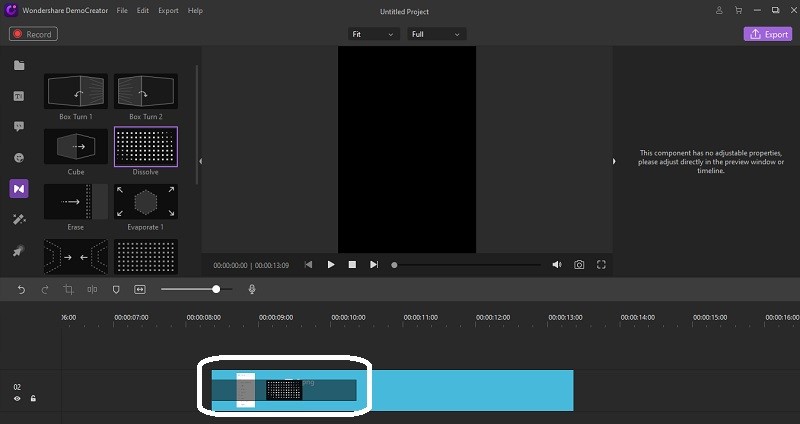
- After the addition of the transition effect to your video clips, you can now preview the final video and remove any anomalies within the synchronization of the clips and the transition effects.
Step 5: Edit the video file
- To lead into the edit settings of your video clips, just select the video clip within the timeline you need to polish with this software's editing tools.
- Now you have numerous options visible to your right side of the screen, these options include Transform and Composition as well.

- You can add text animations by hitting the Annotations menu at your left and choose the best pick you want to include in your videos.
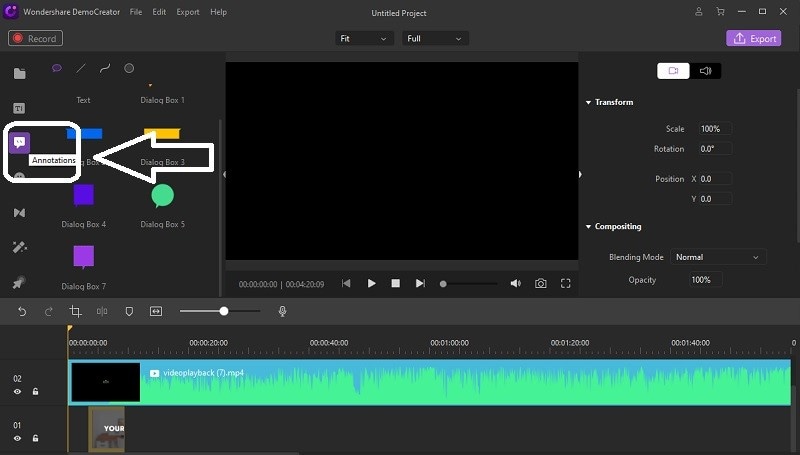
- For the Stickers, you can go to the Stickers menu where you will find out plenty of built-in stickers to include in your timeline.

- You can also add the titles and add built-in credit templates to your timeline by hitting the Titles menu and be with it.

Step 6: Add the music and set the duration
- Now in your final editing process, the main part is the music added to your video project. Which Wondershare DemoCreator has made it easy and handy for you.

- You can add your desired music files along with the video clips to your videos and include them in the timeline at the same time.
- When your music file is in your project's timeline, you can click on it and edit it accordingly with the powerful editing tools popped up at the right side of your software interface.

- You can also drag and trim the audio file to match with the video actions and synchronize it well with the time.
Step 7: Export The Masterpiece
- After you are done editing your video files and adding transitions to them, now is the time to export the masterpiece.
- To continue with exporting the video project, click on the Export button which is situated on the top right corner of the software interface as below:
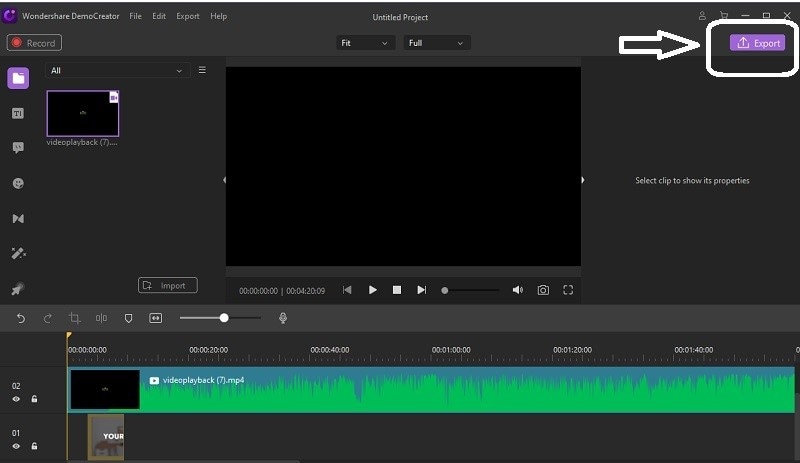
- You can customize your video file's export settings, including the format and the destination of your video project within your PC.
- In the final step, hit the OK button which instantly starts exporting your video project to your desired location to access it directly.
Conclusion
Video transitions are a viable tool that helps to build a mood for better engagement and give the fragments of your videos a storyboard which stays put your viewers to your videos. In this article we have overviewed the transition effects, you must include in your videos to make them a standing out among the other competitors. Video transitions free accessibility within the Wondershare DemoCreator has added more to the usability of this all-in-one master tool for your video content.
 Secure Download
 Secure Download
The bottom line from the above demonstration of steps with the Wondershare DemoCreator suggests that it's obvious for you with the Wondershare DemoCreator that you can do plenty of creative things to your video clips which make your video content more fascinating and even more eye-catchy for your audience.
