How to Capture a Photo From Video in Adobe Premiere Pro

2025-04-11 15:40:24 • Filed to: Creative Video Effects
Are you creating video content and need a crisp and engaging thumbnail for the video? Well, most of the time, you can get it from within the video. You simply need to capture a screenshot of the image from the video and add it as your title image or thumbnail.
Here, we will show you how to do Premiere Pro screen capture and another quick and straightforward way to do it.
Why you will want to capture a photo from a video
Capturing a photo from a video is something most of us have done at least once. The reason could be anything depending on our particular requirements.
Below are some instances where capturing a photo from the video is a valuable utility.
● Use as a thumbnail for a YouTube video
The most common use case of capturing a screenshot from the video is using it as a video thumbnail. If you’re a content creator on YouTube, you will benefit a lot from this simple utility. You don’t need to create a custom thumbnail because there’s at least one frame in your video that makes a click-worthy thumbnail. So leverage this utility to your benefit.
● Snapshot for social media
If you want to post about your video on social media and drive traffic to your other social accounts, you can take a screenshot from the video and post it wherever you want. Compared to a still image, a screenshot is smaller in size and makes it easier to post on your social media account.
● Still image of a fast-moving object
How many times have you tried capturing a still image of a fast-moving object and got a blurred image? That’s why wildlife photographers set their camera shutter speed very fast to capture at least a few good images. If you don’t have the luxury to afford a professional camera, you can simply capture a video and take photos from video – numerous frames combine to make a video.
● Capture a reaction
Video is how spontaneous reactions are captured. Think of beautiful moments like laughing with your friends or crying tears of joy – all these reactions are captured better in a video. You can capture the best photos of these reactions from the video and save them in your gallery for a lifetime.
Steps to capture a photo from video in Adobe Premiere Pro
Adobe Premiere Pro screen capture can be performed to take crisp photos from your videos. It’s a professional-level video editor with all sorts of video editing tools one can imagine.
To capture screenshots from video in Adobe Premiere Pro, follow the below steps:
Step 1: Start a new project
Launch Adobe Premiere Pro on your computer. Now, start a new project.
Step 2: Name the project
At this point, you need to name your project and choose the desired location where you want to save the project. Either keep the default location or change it and click the OK button. You don’t need to change any settings here.
Step 3: Select video
To perform Premiere Pro screen capture, you need to import the video file to the program. You can do this from the media browser; double-click to view the media browser or click on Edit at the top left. Now browse the video file from the file explorer and double-click to open it in the program.
Step 4: Extend viewing area (Optional)
Whether or not you want to extend the viewing area is up to you. However, it’ll let you view the video more clearly so you can find the desired frame easily. You can extend the viewing area by dragging the borders of the video player. You can also zoom in.
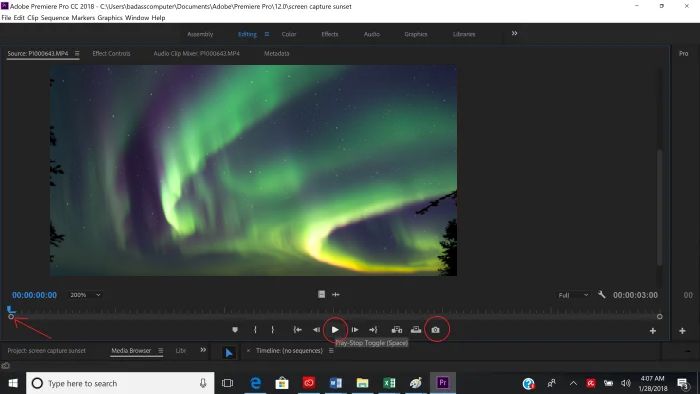
Step 5: Find the frame and capture a screenshot
At this step, you’ll be able to capture screenshots. Either drag the playhead to your desired location in the sequence or play the video and stop it at the frame you want to capture. You should be able to see a little camera icon in the video player control panel; clicking it will capture a screenshot.
Step 6: Save Your File
Now, you’ll see an Export Frame window on the screen. Name your file and click on the OK button. You can also select the image format. It’s set to JPEG by default.
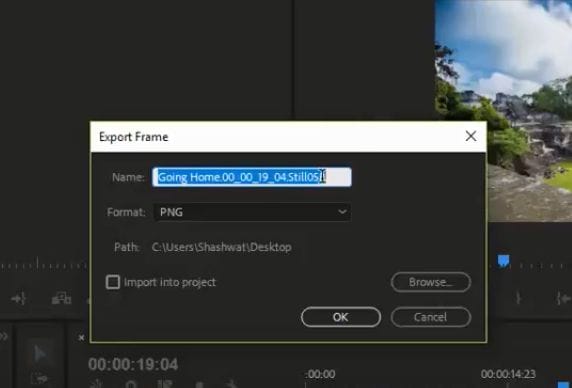
You can access the screenshot image from the default location or wherever you saved the project.
Adobe Premiere Pro Alternative – Wondershare DemoCreator
While you can do Premiere Pro screen capture, it’s a full-fledged paid video editor. You’d not want to pay for a video editor only to do some minor tweaks and capture a screenshot from the video. That’s where Wondershare DemoCreator comes into play.
Wondershare DemoCreator is primarily a screen recorder, but it also features an impressive video editor. You can do video editing and capture a photo from the video as well.
It’s a free and easy way to make your videos stand out from the crowd.
How to use DemoCreator to take a screenshot in a video
Whether you want to simply capture a photo from a video or edit it completely, you need to follow a simple process of a few steps. This process takes the pain out of taking crisp screenshots from within a video. Here’s how you can do it:
Step 1: Download and install Wondershare DemoCreator
The first thing is to download and install Wondershare DemoCreator if you haven’t already. You can visit the official website of Wondershare DemoCreator to download the setup for your Windows or Mac computer. After downloading, run the setup and install by following the on-screen guidelines.
If you rely on its free version only, you’ll have limited access – some editing features come at a cost.
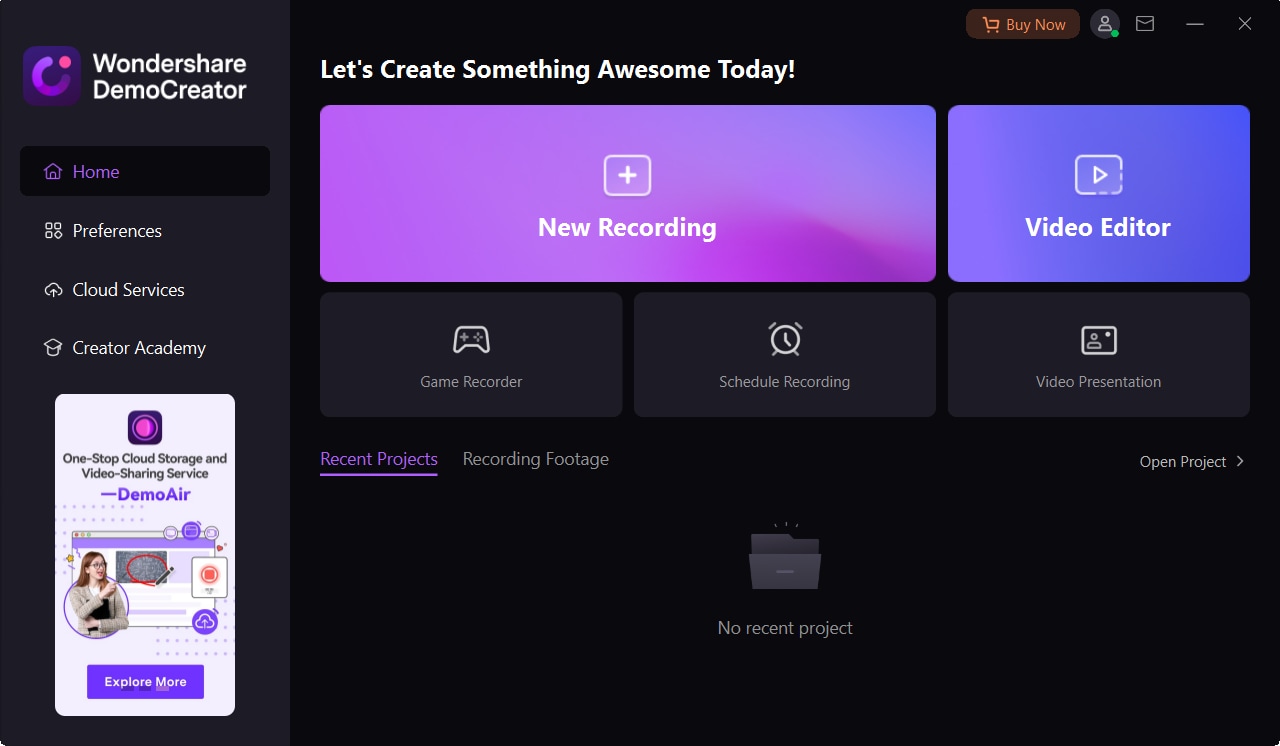
Step 2: Select the Video Editor
After launching DemoCreator, you’ll see a variety of options. It includes screen recording modes and a video editor. Since you need to capture a photo from the video, you need to select Video Editor. This opens up a gate to new opportunities such as allowing you to make your videos more engaging and appealing.
Try It Now - It's Free!
 Secure Download
Try It Now - It's Free!
Secure Download
Secure Download
Try It Now - It's Free!
Secure Download
Step 3: Import the desired video to the library and drag it to the timeline
Now, you have to open the video in the editor. You can do so through the media library. Once it’s in the Media Library, drag & drop it to the timeline at the bottom.
Step 4: Find the frame you want to capture
The most amount of work you’ll do in this process is at this step. However, it’s very easy.
You need to find the frame you want to take a screenshot of from the video. Play the video and then stop at the exact frame you want to capture. It’s very easy and simple to take screenshots of a specific frame. All it takes is the click of a button and your screenshot will be ready.
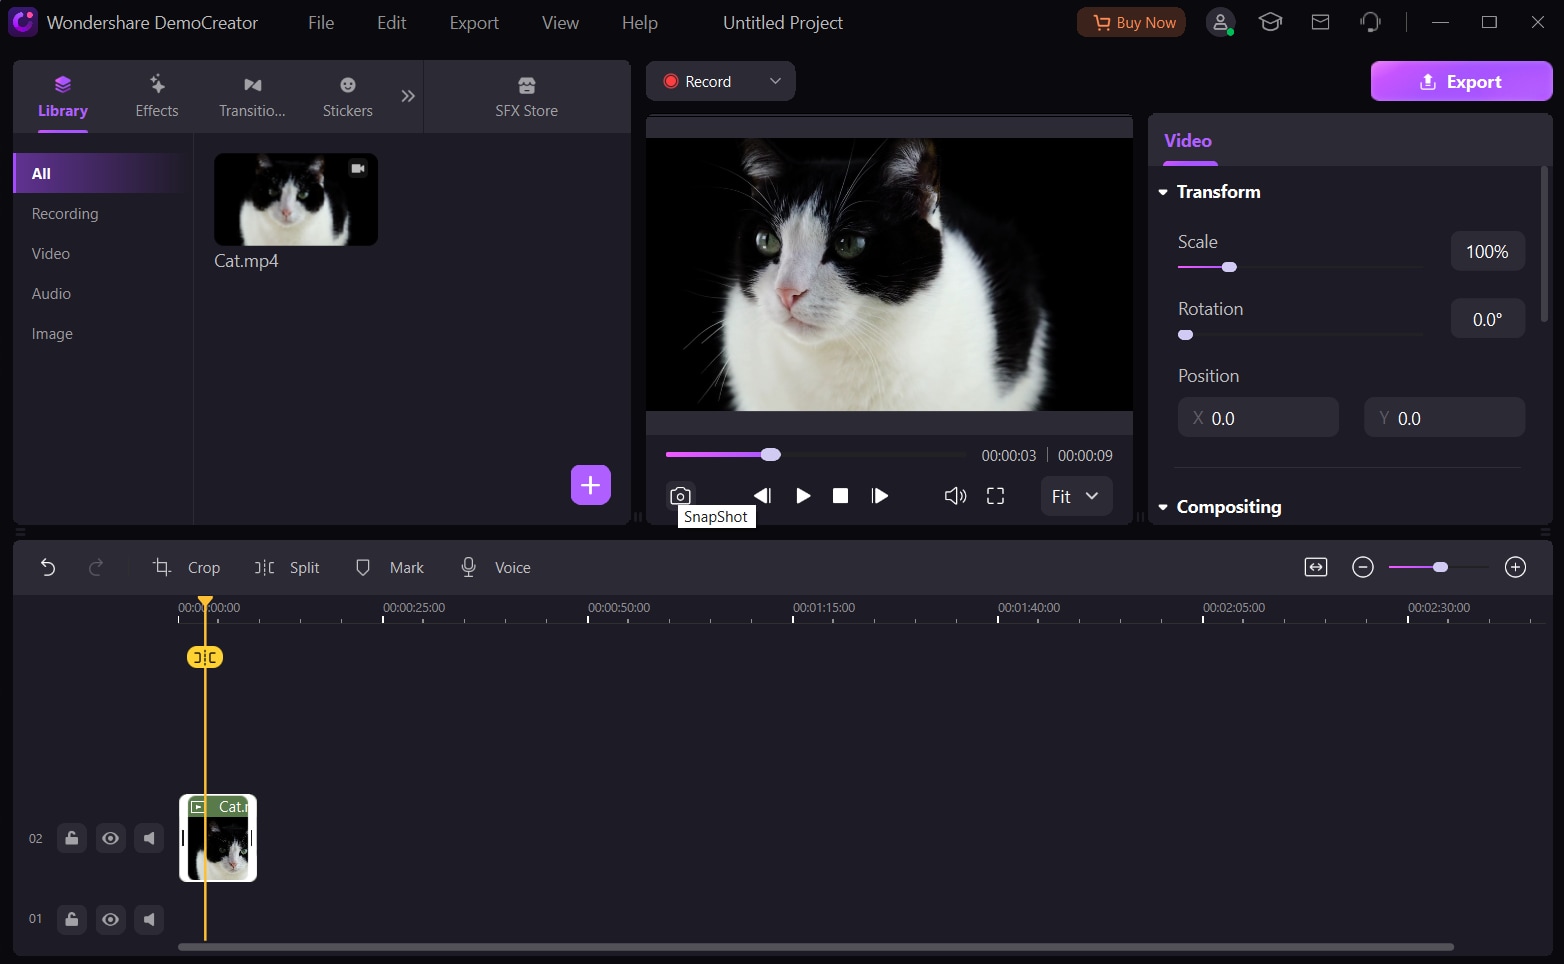
Step 5: Click the "Screenshot" icon
Once you’ve paused the video at the right frame, find the Screenshot icon on the preview window and click it. The screenshot will be added to the Media Library from where you can save it to wherever you want on your computer.
How to record screen with DemoCreator
Wondershare DemoCreator is a complete solution for your screen recording, and video editing needs – easy and effective for both beginners and professionals. Over the years, it has garnered massive popularity because every new release introduces new features.
Professionals extensively use it to record how-to videos, marketing videos, gameplay, and so more.
DemoCreator’s new version offers a screen recorder, an animation video maker, and an online screen recorder – a 3-in-1 tool to meet your multiple needs.
If you also need to record your screen, you can use DemoCreator to do it with ease.
It’s quite an easy method to record your screen with Wondershare DemoCreator. Follow the below steps to record your entire screen or a section of it.
Step 1: Launch & select recording mode
Firstly, you need to visit the Wondershare DemoCreator website to download the setup for your Mac or Windows computer. Install the software after downloading it on your device.
Once installed, you need to launch the program. You can see a variety of options available in the interface.
When you choose Select a Record Project, you can adjust everything as per your requirements. The record Screen option has some predefined settings to capture the entire screen.
The record Game option can be used when you need to record your gameplay.
Step 2: Adjust the screen size
When you click Start a Record Project, a dropdown menu appears; select Capture Area.
Now, set the dimensions of the screen record area according to your requirements – drag the frame inward or outward from its edges.
Step 3: Set up Audio and Camera Settings
DemoCreator records the system sounds and microphone sounds by default. You can choose to disable them using the toggle switch – or select a microphone of your choice. Y
Also, you can enable WebCam recording to include your facecam video in the recording.
Step 4: Start recording
To start screen recording, click the REC button. The recording will begin after a countdown of three seconds. You can also press the F10 key on your keyboard to begin the recording.
If you want to pause/resume the recording, press the F9 key or use the pause button on the control panel. Click the Stop button or press F10 to stop/cancel the recording.
Once you stop the recording, it opens in the DemoCreator editor, where lightweight video editing can be performed.
Conclusion
This concludes our Premiere Pro screen capture tutorial, and we hope you’re now aware of this easy process. However, we strongly recommend using a better alternative like Wondershare DemoCreator for its screen recording and video editing abilities.
DemoCreator is particularly effective if you want an easy way to capture photos from videos and do efficient video editing. It won’t cost a dime to download and use its features.