
Adobe Premiere Rush Screen Capture Tool

Video editing is a big part of content creation. it doesn't matter if you're just starting out or a veteran, whether you're creating content meant for entertainment or information, whether you're using just a smartphone or a 4K UHD camera to shoot your content, if you're creating video content, chances are you will need to edit your videos to some degree. To make the process of editing as seamless and convenient for you as possible, you will need intuitive, feature-rich, and powerful video editing software. Adobe Premiere Rush is a competent contender, more than capable of fulfilling all your editing needs and then some.
How to Shoot, Edit, and Share Your Videos
Adobe Premiere Rush is a brand-new video editing software by Adobe that's meant to be quick, easy, and convenient to use. The software is supported on all major platforms including Windows, Mac OS, Android, and iOS. This will allow you to seamlessly edit your videos no matter where you are, saving you time and effort. Whether you're creating gaming videos for twitch and similar platforms, or churning out content as a YouTube creator, Adobe Premiere Rush will help you take your videos to the next level.
How to Capture Professional Quality Videos and Photos with Adobe Premiere Rush on Mobile
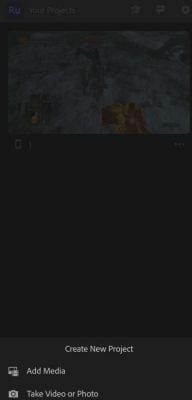
You can use Adobe Premiere Rush on your mobile device to edit videos as well as shoot videos directly through the mobile app. To do so you will first need to download and install the app from either the App Store if you're using iOS or the Google Play store if you're using Android. Once you've downloaded and installed the app, launch the app.
When using Adobe Premiere Rush for the first time, the app will give you a short tour of all the basic controls and editing features that it has to offer. You can choose to skip the tour if you'd like, but it is recommended that you go through with the tour, as it will help you to better understand and use the app.
Once you want to start editing, Tap the plus sign at the bottom of your screen to create a new project. The popup menu will give you the option to choose between pre-existing media on your phone and shooting a new photo or video. If you tap on “take video or photo”, the app will launch its own camera that you can use to take photos and videos to create a project.
Set Resolution and Grid Lines
Once you have launched the camera, you will see some icons at both the top and the bottom of the screen. Add the top the second icon from the left, the one that looks like a grid, which will enable gridlines when tapped. Gridlines can help you better align your camera relative to the subject of your shot.
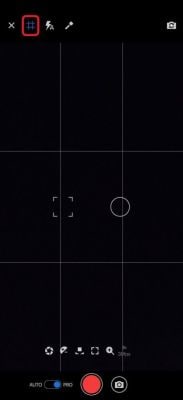
Once you've enabled the gridlines it is now time to set the resolution of your video. Among the icons at the bottom of your phone's screen, you will see a slider switch that will switch between automatic and pro mode. By default, the switch is set to auto, but you can switch it to pro which will grant you control over various parameters of the camera such as the ISO, shutter speed, exposure bias, temperature and tint, white balance, focus, and zoom, as well as the resolution of the video. The option to set up the resolution and the frame rate of your video will be at the right, and you can choose between resolutions ranging from 480p to 4k. Frame rate choices will vary depending upon the device you have.
Shoot directly to New/Existing Project
As well as shooting video directly to a new project, you can shoot video to a pre-existing project. To do so, open your project. At the left bottom corner of your screen, there will be a blue plus sign.
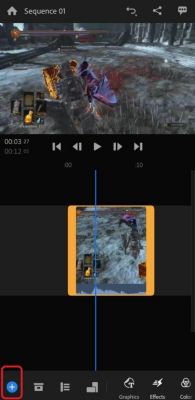
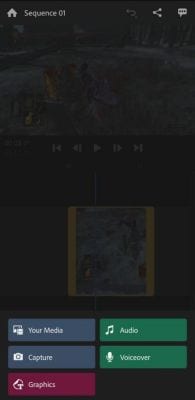
If you tap the plus icon, a menu will pop up with options to add new video and/or audio to your project. You can add pre-existing videos from your device or shoot new videos. Select “Capture” to record a new video for your project. Similarly, you can add audio files from your device or record a voice-over using your device’s built-in mic.
Basic Editing: Trim, Edit, and Melt Audio
Once you have opened your project, all the basic editing features can be found along the bar along the lower edge of the screen. Here, you will find options such as trimming, splitting, filters and effects, audio settings, and graphics.
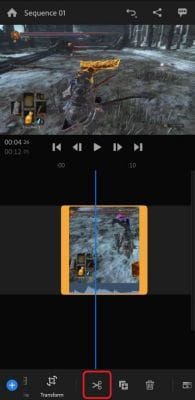
Trimming your video is very simple with Adobe Premiere Rush. With the project open, simply slide your video along the timeline track so that the blue marker is where you want your video to start. Now, slide the toolbar along the lower edge of the screen until the find an icon that looks like a pair of scissors. Tap on that icon, which will split the video. You can then delete the surplus part of the video by clicking the delete icon found in the toolbar.
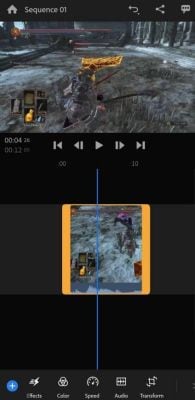
The toolbar also houses controls for most other editing features found in the app. These include graphics and annotations, effects, color and temperature settings, speed, transformations, and transitions. Selecting one editing feature will show additional controls that you can use to fine-tune your edits, allowing you complete creative freedom over your content.
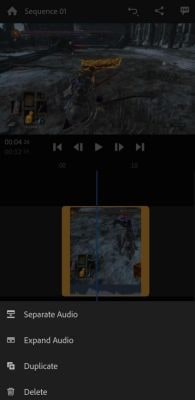
When browsing the toolbar, you will also notice controls for audio. You can expand and separate the audio clip from the original video file using the toolbar or by tapping and holding down the video, which is useful when adding external audio and voiceovers to your content. Moreover, you can adjust audio volume or mute your clip outright. Lastly, you can also specify the type of audio you are using to help the app optimize the final audio as well as apply auto volume.
Adobe Premiere Pro
If you feel like lighter software just isn't going to do it for you, you can try out Adobe Premiere Pro. This is Adobe’s full-fledged karma top-of-the-line, cutting-edge video editing software, offering a massive number of features and advanced firepower to satisfy even the most experienced content creator’s video editing needs. The software is available for download from Adobe’s website and will cost $20.99 to purchase. There is a free limited-time trial version so you can try out the software before you purchase it.
You can use premiere pro to record your desktop screen, as well as insert audio and video from both internal and external sources. Supporting nearly all video file formats and qualities from AVI to 8k resolution videos, Premiere Pro allows seamless compatibility with media from a wide variety of sources.
You can also add audio from both external sources such as a microphone and internal sources such as your computer’s drive. This is useful when overlaying music or voiceovers to your video. Moreover, you can also upload your edited videos directly to platforms such as YouTube and Adobe’s Creative Cloud directly from the application.
The edge with Adobe Premiere Pro is utility and control. The software is immensely feature-packed and capable, so you can be sure that whatever your purpose, you can always rely on Adobe’s Premiere Pro to take your content to the highest level of refinement.
Adobe After Effects
If you’re looking to get creative with advanced graphic animations and effects, it may be worthwhile to look at Adobe After Effects. This is a digital visual effect and graphic application immensely useful for post-production editing of both video and audio.
Add Footage and Import Files
To get started, you will need files to work with. To import files, select the file option in the main menu. From the drop-down menu, choose import and then file. This will take you to the import dialogue box, where you can then select one or more files or folders to import.
Correct Color and Exposure
Using the Lumetri Color effect panel, you can greatly fine-tune the color and exposure settings for your edited video. Adjustable RGB and hue saturation curves mean you have, at your fingertips, the means to color correct every single frame of your video.
Fix Shaky Footage
Adobe After Effects also offers digital stabilization for your video. If you are shooting using a handheld camera, you’re likely to end up with footage that is less than ideally stabilized. You will need to find the Warp Stabilizer VFX feature which will also allow you to track an object in the frame on top of stabilizing your video.
Essential Graphics Panel
The Essential Graphics Panel is a way for creators to have frequently used controls and parameters available for manipulation in a pinch. To enable this feature, access the workspace bar. From there, go to the window and then workspace.
Save and Export
Once you are done editing, you will need to export your video file for use. To export your file, go to file, export, and click add to render queue. After that, head on over to the output module and go over the output settings, making changes if you wish. Once that is done, go to output to, and specify the folder location where you want your video to be exported to.
Alternative- Wondershare DemoCreator
Wondershare DemoCreator is a good alternative if Adobe’s offerings are not to your liking. DemoCreator is an all-in-one, comprehensive, and intuitive to use video editing software that offers a broad selection of features including all the most used editing features such as trim, split, annotate, caption, filter, effects, and audio controls. DemoCreator is free to download and use, available on Wondershare’s website for both Windows and macOS.
As well as editing, DemoCreator also offers the option to record media, including video from the webcam as well as the desktop screen, and audio from a mic. If you would like to work with recorded media, click “start a recording project” after launching the software, which will allow you to record media using your device’s built-in camera and microphone, as well as your screen. You can also schedule recordings so you can perfectly time the inserted media with your video.
How to Edit Your Videos Using DemoCreator
To edit your video using DemoCreator, launch the software. This will bring you to a window where you can choose to start a new project. If you already have an ongoing project, you can open that as well. Once you open a project, you will then be taken to the editing window. Here, users can import new media, drop video and audio onto the timeline track, and proceed towards making edits.
Cut, Trim, and Crop Your Video
You can easily cut, trim, and crop your video in the editing window. Once you’ve imported or recorded media, drag your desired media onto the timeline track. You will see a yellow marker on your video that you can slide along your video. Take note of that, as it will be important for using many editing features.
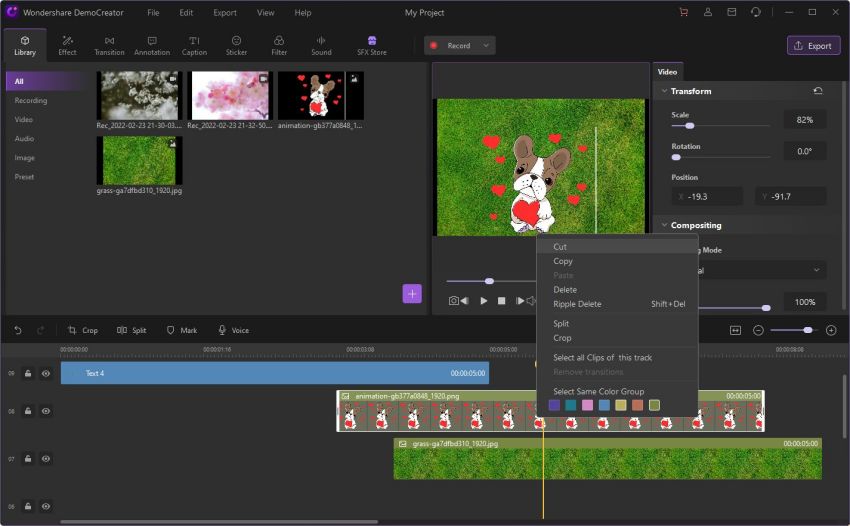
To cut or split your video, simply drag the yellow marker along with the video to the point where you want it cut. Having done that, hover the cursor over the marker, where you will see the option to split the video. Click it to split.
Trimming your video is as simple as dragging the tabs at either end of the video to bring the starting and end of your video clip to the desired points. This can aid you in making your content brief and concise.
As far as cropping your video is concerned, you can find the crop button in the toolbar atop the timeline track. Click the button to access controls for cropping your video. You can manually resize to crop the video, use preset ratios, or enter a custom resolution. Once you’ve set the parameters, click ok to apply changes.
Import and Combine Audio
If you want to add extra audio to your video, you will need to import an audio file to your project. To import audio, go to the library, and click audio from the drop-down menu. You can then click the plus sign and browse for the audio file you want to add.
Once added to the library, the audio file can be dragged and dropped onto the timeline track. If you’d like to edit the original audio of the video, right-click on the video and select the detach audio option, which will allow you to edit the audio.
Combining audio can be useful if you’re looking to overlay music or voiceovers onto your content. When looking to combine audio, drag the audio file you want to combine from the library and drop it over or under the video on the timeline track. You can slide the audio forward or backward to synchronize it.
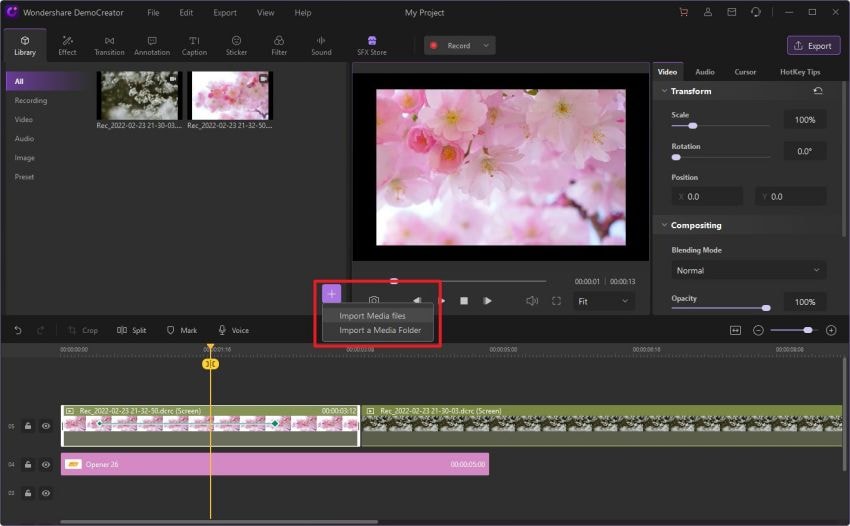
Adding Media Resources
When editing a project, you don’t need to have all the relevant files in the library, since you can add media resources to your library as you move forward with your editing. To add a media resource to your project, click on the library icon at the top left of the screen. This will lead to the library window opening in the upper left quadrant of the editing window. Click the plus sign to browse your computer for the media you intend to add. Once added to the library, drag, and drop the media onto the timeline track to include it in your project.
Transitions
Transitions are a quick and easy way to add a little pizzazz to your videos. Applying transitions is quite simple. Click the transitions icon in the top toolbar to bring up available transitions. Scroll through the transitions to find one you like, and drag, and drop the transition onto the video on the timeline track. The transition will apply to your video, and you can preview the result before you export your video.
Animated Text and Captions
Text and captions can make explaining what’s going on in your video a breeze. To insert text and captions, select the caption tab from the top toolbar, which will bring up various caption styles and designs. To insert a specific caption, drag and drop the caption onto your video. This will apply the caption to your video.
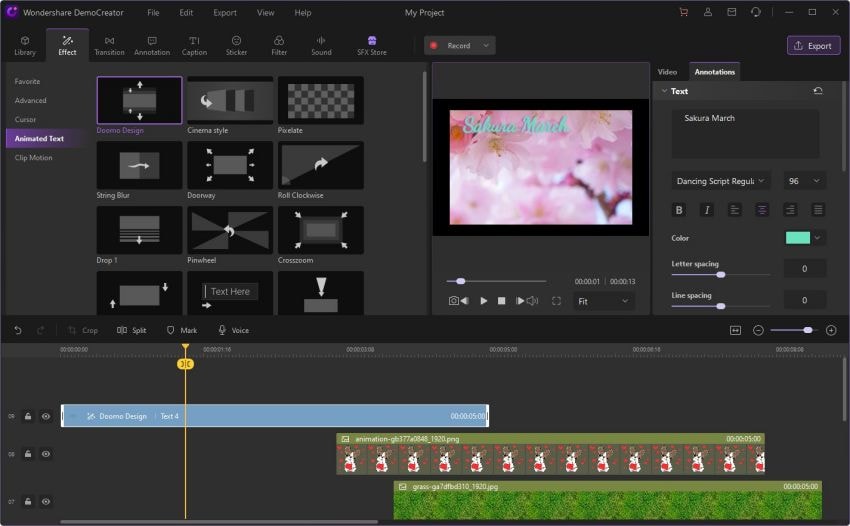
Once applied, you can then edit the size, text, and placement of the caption using the customization window in the upper right quadrant of the screen.
Annotations and Stickers
Annotations are a convenient way to draw the viewer’s eye to the subject of the shot. You can add text as well as shapes, lines, and arrows to better frame your subject.
To insert annotations, simply go to the annotations tab, drag, and drop the desired annotation onto your video on the timeline track. You can then customize the annotation.
Similarly, stickers can be dragged and dropped off the stickers tab onto the video on the timeline track.
Sound and Audio
DemoCreator also allows you to add and edit audio to your video projects. There’s a wide selection of sound effects that come pre-loaded with the application that you can use for your projects.
To add a sound effect to your video, open the sounds tab to browse the various available sound effects. Drag and drop the intended sound effect onto the timeline track and it will be added to your video. Right-click the audio on the timeline to access controls for a specific audio file.
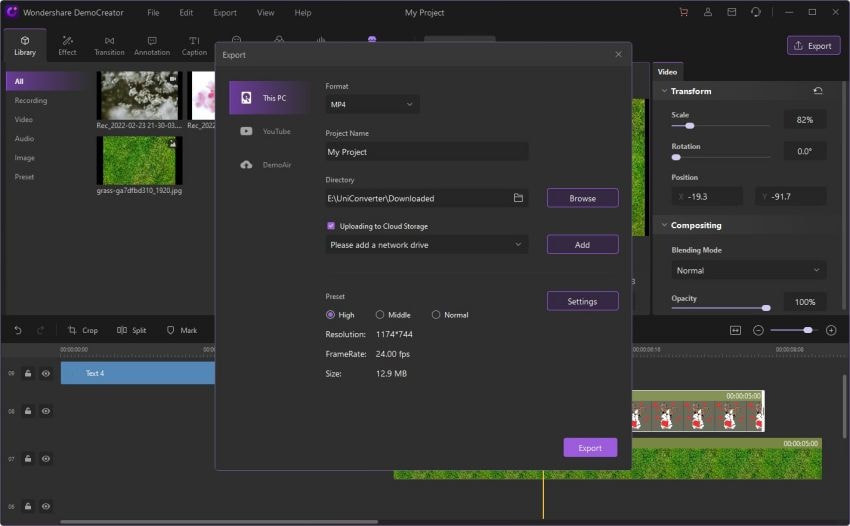
Export Your Video
Once you are done editing your video, you can preview it to make sure the result is to your liking. Once you have done that, your video is ready to export. Click the export button at the top right corner, which will present you with options related to exporting your video. You can choose the format, as well as the output resolution for your video. There are also options for frame rate, codec, and bitrate parameter adjustments for all the pros out there.
DemoAir
You could also opt for recording and exporting your video online as opposed to exporting to a local drive, using Wondershare’s DemoAir platform. You will need to create a Wondershare account, but it will allow you to directly upload your video content to the web.
Conclusion
Video editing can seem to be an intimidating and exhausting task. It can be especially brutal if you are just starting out and aren’t familiar with all the jargon and technicalities of various video editing programs. In this concise article, we have included comprehensive guides for using some popular video editors, so that you can take your content to its maximum potential, whether you are a novice or a veteran content creator. With a little bit of patience and prior planning, anyone can easily tidy up and create video content.


