How to Fix OBS Full Screen Not Working

For certain PCs, the OBS studio not recording full screen doesn't work as expected even though window catch does. Rather than catching everything on the showcase, the exchange box is just dim and nothing is recorded. This outcome in your recording simply being a dark screen. This is an impediment assuming you need to record various windows simultaneously or when attempting to record programs that have pop-ups or exchange boxes. This primarily influences workstations. Relax, OBS not capturing full screen is a typical issue, you can discover fixes in this article.
Part 1. How to Fix OBS Not Recording Full-screen
Fortunately, there are multiple ways of doing that with OBS Studio. Aside from a huge number of inherent altering highlights, there are additional outsider answers for stages like Windows. It sometimes works extraordinary with games in windowed mode, permitting you to record numerous screens without a moment's delay. Nonetheless, there are a few constraints to it as OBS fullscreen not working. Certainly, you will not have the option to catch any pop-ups or menus.
1. Quick Solution:
To counter OBS's fullscreen not working, there's a clever order that permits you to physically resize the screen catch in OBS. It's presumably the most straightforward technique out of the four. Simply follow these means, and you'll have the option to edit or extend the catch however you would prefer:
Select the Display Capture source with your cursor. You'll see a red blueprint with a few little red dabs put at the top, base, sides, and corners. Drift your cursor over the red spots and press "Order." For Windows and Linux Users, hold the "ALT" key. Left-snap and move the red circles while holding the way to trim the Display Capture.
2. Switch OBS's GPU
If you have two design cards and one is NVIDIA, you can attempt this strategy to tackle the issue. The justification behind the OBS dark screen under the present circumstance is in all probability because of OBS and the game you need to record run on various illustration cards. Since they're on independent connectors, the picture of the game can't be obtained because it's not accessible on the gadget OBS is on.
So OBS and the objective game ought to be running on similar designs connector to get a legitimate catch. Run NVIDIA Control Panel and select Manage 3D settings. Then, at that point, click Program Settings on the right board and snap Add.
Snap Browse and explore OBS.exe. You can right-tap on the OBS symbol and select "Open record area" to find its way. Pick "Superior NVIDIA processor" and snap Apply. Close the NVIDIA Control Panel and restart OBS to check whether the dark screen issue is fixed or not.
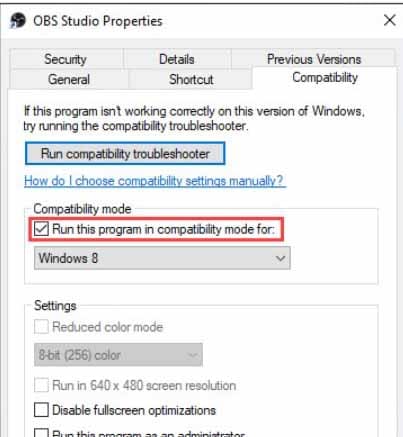
3. Empower the Compatibility Mode
The OBS dark screen issue might be brought about by similarity issues with the running applications. In case this is the explanation, you can empower OBS's similarity mode to settle it.
Right-click on the OBS symbol and pick Properties. Under the Compatibility tab, tick Run this program in similarity mode, then, at that point, you can pick the framework you need to be viable with. Snap Apply > OK and then restart OBS to check whether the dropping frame issue is fixed or not
In case you're not content with screencasting a solitary window, you can utilize Display Capture as the source and harvest out the additional parts. OBS Studio has an underlying trimming channel that is simple to utilize. Here are how to do it: Launch the OBS Studio app and scroll down to the "Sources" box. Right-click to access a pop-up options menu. Select "Add" and then click "Display Capture" as the source.
Dispatch the OBS Studio application and look down to the "Sources" box. Right-snap to get to a spring-up choices menu. Select "Add" and afterward click "Show Capture" as the source. A little spring-up box will show up. Name the source and afterward click "OK." If you have more than one screen, you need to choose it physically. Look to the "Show" bar and snap on the little descending bolt on the right-hand side. Pick the screen starting from the drop list. Try to check the "Catch Cursor" box before you press "OK."
Look down to the "Sources" box and right-snap to get to the spring-up menu. From the rundown of choices, pick "Filters." A spring-up window will show up. Snap on the little "+" button in the lower-left corner. Find the "Yield/Pad" channel on the rundown and snap on it. Hit "Ok" to apply. Change the trimming boundaries as indicated by your requirements. Then, at that point, in the comparing fields, enter the pixel esteems you need for the catch. Whenever it is done, hit "Close." Button.
After you're done, the window and OBS material ought to be impeccably adjusted. A few components might be impeded by the Windows framework that causes the dark screen issue. With high uprightness access, the OBS can utilize its components. So run OBS ahead to fix the issue.
Part 2. Alternative Way To Record Full Screen On A Computer - Most Recommended
OBS Studio has different choices that permit you to catch both the whole showcase and individual parts. For instance, with Window Capture, you can screencast a solitary open window rather than the full screen.
Notwithstanding, the element doesn't function admirably with instructional exercises and comparative substance since it's restricted to just catching the primary window and that's it. That implies assuming you need to record any pop-ups, menus, and extra boards, you'll need to edit a standard Display Capture to fit the screen. If you feel like the OBS and other implicit devices can't address your issues, you can think about utilizing Wondershare DemoCreator. DemoCreator is an integral asset for screen captures and video recording.
DemoCreator has a screen recorder, which allows you to switch between a webcam and screen recording during a video. You can utilize the recorder to add an individual touch to your partners or clients, regardless of where they are. Additionally, the sound can be recorded in your video from either a mouthpiece or your PC's framework sound. DemoCreator permits you to record video as well as allowed you to alter video. You can utilize it to manage video cuts and eliminate undesirable areas to make your video more fragile.
With DemoCreator, you can transform part of your video into an enlivened GIF and offer it to others. It's an exceptionally helpful device for YouTubers and for any individual who needs to make a video instructional exercise or a how-to video. In addition to the fact that it helps to catch developments, however, it additionally catches your voice through your microphone.
 Secure DownloadSecure Download
Steps to Record Full Screen with DemoCreator
Since full-screen recording is an issue with the OBS, your solution, DemoCreator brings you out of trouble completely. Let's get to know this better with the steps you need to perform with the DemoCreator full-screen recorder.
Step 1: Install and Launch DemoCreator
For that, simply refer to the DemoCreator site and download its installer for your PC. You can have this software in the specified versions, either Windows or Mac respectively.

Afterward, open the installer right away and have it installed by default installation setup. Now, as the installation is finished, you can launch it from your PC and initiate the recording procedure with the upcoming steps hassle-free.
Step 2: Setup your Full Screen
Inside the DemoCreator window, you can see the following interface, where you need to select a single option out of the various ones available. For recording purposes, you need to click on the Capture button to proceed with capturing your video screen:
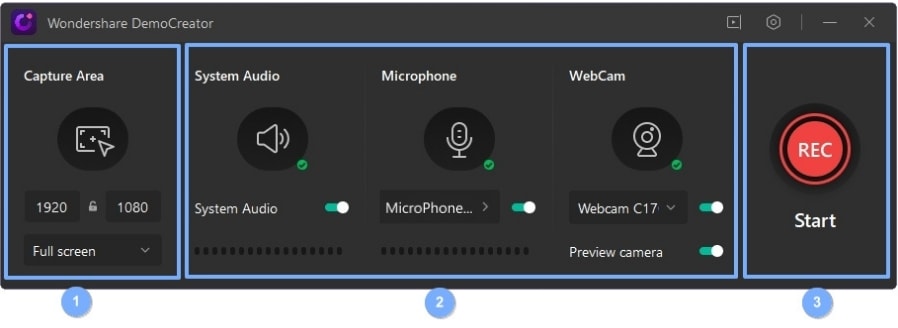
On the screen area, you can specify the full-screen interface which you want to capture in your final video. After selecting that, you can handily customize the settings of your recording at the corner settings box as shown in the interface. Just click on the tab and be with the customizations of your videos as you want. Along with the full screen, you can also enable your system audio and the Webcam options so you can record the webcam and audio along with the video as well.
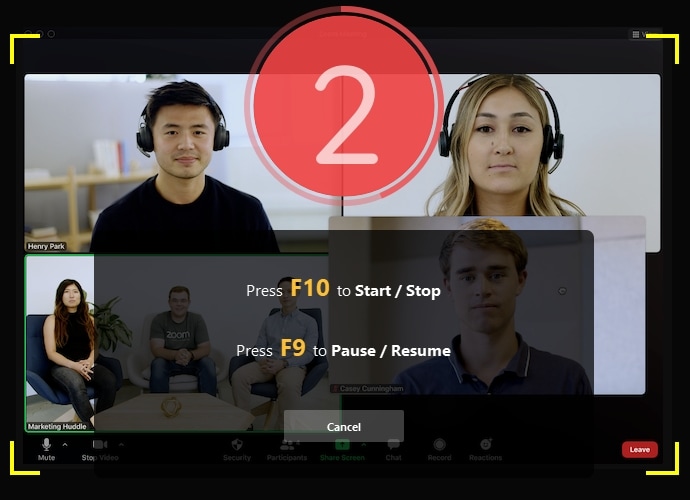
Step 3: Start/Stop Recording
In the main step, after you are done with the full-screen customizations, then you need to start the recording. For that, just hit the Start Recording button inside the recorder window as follows. Now your screen capturing will be started after giving you a 3-second timer.
On the other hand, to stop as you're done with the recording hit the Square shaped red button and it'll make your recording stop on-spot.
Step 4: Export/Share to YouTube
In the final step, if you want to export the screen recordings right away, simply hit the Export button at the top of the video editor interface and be with it. Furthermore, if you want to share your recording on a social platform like YouTube, then hit the YouTube menu bar from the list and sign in to your channel to share it handily. You can also save it in your desired format as well.
Secure DownloadSecure DownloadConclusion
OBS Studio is similarly helpless to intermittent bugs and errors, similar to other streaming software. As should be obvious, you can fix the majority of these issues just by reinstalling the application or force cycling your PC. Be that as it may, if the bug is brought about by meddling illustrations, it requires some further developed investigating measures. OBS Studio is stunningly well known unequivocally because of its smoothed-out interface. While specific provisions like Window Capture have their cutoff points, they're still lovely and valuable. Moreover, there's a wide scope of elective arrangements you can go to all things considered.


