

OBS Won't Work How to Fix

Open Broadcaster Software (OBS) is an open-source tool that users will find super helpful when it comes to online streaming or recording any desktop activity. The application can be installed on Mac, Windows, and Linux. All the features and options that you will find here will be completely free and you will get to use them without any hassle. However, some people reported that OBS Studio not working on Mac or Windows after the update or black screen.
Here we'll list out the common OBS not recording problems and explain why they occur and how to fix them. Follow the post below.
Part 1: Common OBS Not Working Problems
1. OBS Black Screen
There are many complaints where the users have pointed out that once they launch the application and while setting up all the parameters, all it shows is a black screen. The issue might be occurring due to multiple reasons; the most common one is related to the graphics card.
Make sure the OBS is configured and fetching power from the dedicated GPU rather than the onboard one. Another reason that might be playing its role in case the OBS not working and a black screen is the installed drivers have become outdated. Apart from these issues, there might also be the one where OBS doesn't have all the administrator permissions.
2. OBS Audio Not Working
While using OBS, the users also face a few issues where the audio isn't properly working. The general issue is that the application is able to record the mic input but the system sounds, and desktop audio is not recorded. The primary cause of this issue is outdated drivers that you must update to make everything work.
The sound card driver can be found by reaching out to the official website and find the right driver according to your system's model number. If it's all well and good, you must cross-check the sound settings of your computer that is located in the Control Panel.
3. OBS Not Responding
Among various issues that users are facing daily, one that's not very common is as soon as you launch the application, it just stops working. What I mean by this is that you are not able to click on or use any feature in the interface. As we discussed in one of the aforementioned issues cross-check if the application is running in the Admin mode. Also, make sure that the setup file that you have downloaded is the one with the building structure of your operating system.
4. OBS Not Detecting Webcam
The creators who are into making video guides and tutorials will need to have a crisp video added to the stream. It will be made possible only by adding an external camera, as the integrated webcam will not be good enough.
There will be certain problems that you might face; the most common one is the application unable to detect the camera. The error that is generally behind all this is that the USB port to which you have inserted the camera isn't working. Make sure that while setting up the parameters, you have selected the right device.
5. OBS Game Capture Doesn't Work
The gamers will need OBS to live stream the game they are playing. However, it isn't always that straightforward as the application has way too many bugs on it. If it is unable to capture the game, there might be an issue related to source input. What you can do is that re-input the source and it might solve the issue in no time. If it's still not appearing, you can try capturing the specific window. Also, there might be a video card driver issue that is putting restrictions to let OBS record the session.
6. OBS Microphone Not Showing Up
The open-source tool that you are getting will resolve the said issues but you will need to have some patience. The interface that you will get here is quite intuitive and user-friendly. The dashboard that you will get here will give you the options to set all the parameters and if you are using an external mic, make sure that the cables are connected properly. If you think everything is good, go to the Control Panel>Sound and check whether the mic is taking any input. There might be a driver issue and you should check whether it needs to be updated.
7. OBS Video Not Showing Up
Just like the mic issue, the video input will also have multiple issues depending on the system configuration you are on. The primary issue behind the video errors is related to the graphics card. If the system you are on has a dedicated GPU, make sure that OBS is fetching data from the dedicated one and not the onboard one. Moving on, if you are a creator, there are high chances that you are using an external camera for crisp video. Make sure that the USB port in which you've plugged in is working properly.
8. OBS Not Streaming Fullscreen
While you are all set up and running, one of the very last issues that you might face is that the output that you are getting isn't full screen. There is nothing to worry about as it's quite an easy thing to fix. Before moving to the troubleshooting steps, it's important to understand why it's occurring. The resolution in which you are playing your game should be the same as that of your desktops. If it's different, the application will do some calculations of its own and you will end up seeing huge borders in the final output.
9. Can't Download OBS
It's an issue that is highly limited to the system settings. The issue occurs when you are on the official OBS website and going to hit Download to get the setup file for your system configuration, the browser shows an error and the download fails. While you are downloading the application, make sure that you are downloading the Installer version of the file. However, if all the supported files and the setup file are downloaded correctly, the issue might be with the Windows Firewall settings. Disable it completely to download it without any errors.
10. OBS Crashing Minecraft
It's an OBS bug that is faced by a lot of users. While playing Minecraft on full screen, and in case you have changed the OBS scenes, the game will crash. On the first thought, you might think of it as a RAM issue, but it's not. The solution that's generally opted for by a lot of people is to play it in maximized window mode and not in the fullscreen mode. It's a bug that gamers are still waiting on OBS to fix. You can also try running both, OBS and Minecraft, as administrators. There are a few instances where it fixed the issue.
Part 2: How to Fix OBS Doesn't Work
Now, once you have known all the issues that one might face related to OBS not working, you need to know the troubleshooting methods that you can implement. The open-source application that you get will not have a very advanced support system. The developers will only take notice of the issue if it's being heavily reported and you will need to find the solution discussing with other members on the community page.
1. Run OBS as Administrator
When it comes to using a tool in all its righteousness, you will need to run it as an administrator. The features and options that you will get here will only offer their full potential if you have granted all the permissions.
The issues that you might be facing are black screen, accidental crashes, etc. will only be resolved when you will launch the OBS tool as administrator. The process is quite simple and easy and you will not be able to seek any professional help, whatsoever. I am going to jot down the steps with proper images so that you are not left with any confusion.
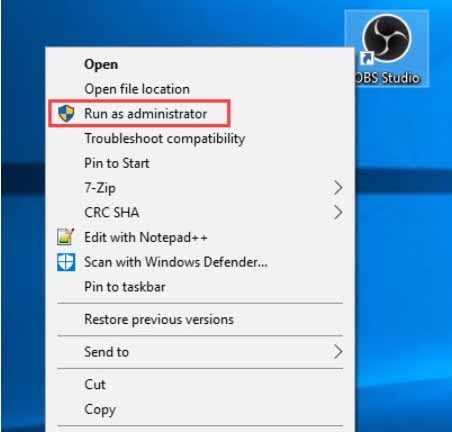
- Locate the application. Most probably, it will be on the desktop.
- Right-click on it to get a list of options. You will get a Run as administrator option.
- Click on it and Windows will give you a prompt to give certain permissions.
2. Update Drivers and Software on Windows
There are a lot of applications that you will find glitchy and not working properly. The primary reason behind this is that there is a majority of users who never update the drivers on their computers. It might be the case where your OEM is offering a tool to find all the latest drivers and updates.
However, if there isn't, you will need to do it manually. In this section, we are going to jot down the steps that you will need to follow to keep your system updated and make all the applications working properly.
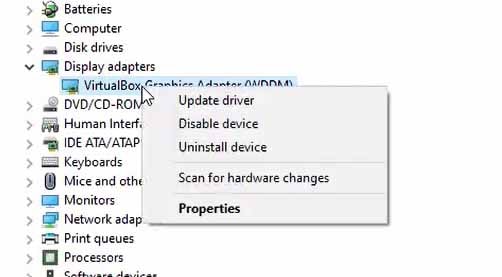
- Users will need to launch the device manager. There are multiple ways to do this. Either you can enter Device Manager in the search box, or right-click on the taskbar and find Device Manager.
- Here, you will get a dialog box where you will get a list of applications including the available I/O on the computer. Find the one you want to update drivers of and click on the icon before it.
- Below that, you will get the driver's name. Right-click on it to click the Update Driver button.
- It will give you another dialog box that will prompt you to select the search automatic update or manual update options. The automatic feature is recommended. If your device has the best drivers, it will give you the prompt that the best drivers are already installed.
- However, if you believe there is an updated version, you can download it manually by searching from a web browser. Once downloaded, choose the second option where you will need to select the driver from local storage.
3. Switch OBS's GPU
When it comes to video problems, there is not a very long list of reasons behind it. The primary one is that the GPU used by the application isn't the correct one and you can easily troubleshoot the problems by switching the GPU preference. It's because if we look at a macro level, a majority of people who are using streaming applications are most probably high-end users and they use a dedicated GPU in their system.
What happens is that when you launch the streaming application, it registers the one that comes integrated with the CPU. Before we proceed to the steps, it's important to know that the graphics card you are using should come with the same structure build like that of the CPU. Also, the encoder should be present on the GPU.
- On the desktop, right-click and go to the Nvidia Control Center. Find the Manage 3D Settings tab followed by Program Settings.
- Here, the system will give you a dropdown menu that will give you all the options.
- Select OBS and then click on the Add Selected Program button. Also, make sure that you've selected the Nvidia (Dedicated Graphics) from the other dropdown menu.
- Hit Save and restart the computer.
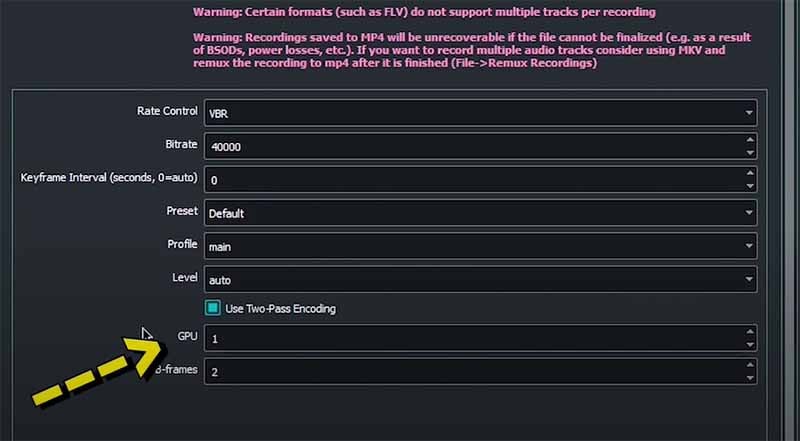
On the OBS, you will have to follow the steps mentioned below.
- Launch the application and once it fully loads up, click on the Settings menu on the bottom-right.
- It will give you a dialog box where you will need to select the Output tab and then navigate to the Recording tab.
- Now, you will need to scroll down to the GPU heading. See the highlighted part in the screenshot below.
- By default, it will be set to 0. Hover your pointer over it and it will be changed using the arrows present on the extreme left. Make sure it's set to 1.
- Hit Save to apply the changes.
4. Enable the Compatibility Mode
There can be multiple reasons behind the need to enable the compatibility mode. The primary one is that you are getting a full black screen while you are launching OBS to do online streaming. The users have complained about it quite a lot and it is seen that running the application in compatibility mode can solve the issue a majority of times. You might ask why we need to turn this on, it's because the app might not find itself fully compatible with all the other apps that are running on the system. Let's dive into the steps you need to follow to enable the compatibility mode.
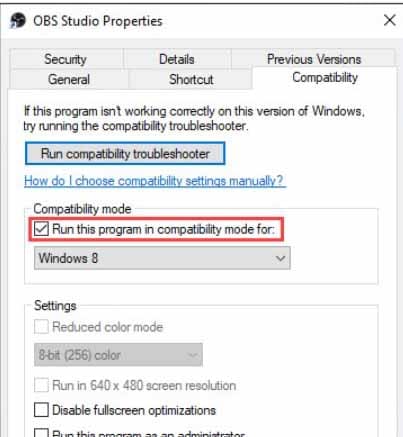
- Find the OBS Studio installed location and right-click on the app icon. In the list of options, go to Properties.
- A new dialog box will appear up and you will need to find the Compatibility tab in the top 2nd row.
- Make sure the Run this program in compatibility mode for the checkbox is checked. (As shown above)
- Click on the Apply button at the bottom and then hit Ok.
- Reboot the system and check whether the OBS Studio not working is resolved or not.
5. Reinstalling OBS Studio
If the issue that you are facing doesn't seem to resolve itself, you will need to find the only resort, that's to re-install the app. It is because there are many times when we have seen some package doesn't get properly installed and it creates all the issues. OBS Studio is an open-source platform and you must not expect to get high-end customer support to resolve your issues.
That's the reason we recommend trying all these aforementioned troubleshooting tips to resolve the issues, all by yourself. To uninstall the app, launch the Control Panel and then go to Program and Features. Select the OBS Studio and click on the Uninstall/Change button on the top. Follow the on-screen instructions to remove it completely.
- Launch a browser of your choice and enter obsproject.com. Once the page loads, you will get 3 different tabs to select the OS you are using and to start the download.
- Once the file downloads, open it and follow the onscreen instructions to install it successfully. Make sure you are not denying any permission as it might interfere with the performance later.
- Before finishing the installation, the application will ask you whether you need or want to install any extra plug-ins. Leave the boxes unchecked if you don't want to install any.
- Hit Finish and the installation will be completed, successfully.
6. Use an OBS Alternative - Bonus
If any of the steps that we have mentioned above aren't working, there is nothing else that you can do, honestly. The only option you are left with is to try some other application that has the same set of features and the one thing that you need to focus on is to get one that can offer you a very intuitive interface.
We are going to recommend you Wondershare DemoCreator. It allows you to record computer screens, webcam, and audio as you want with real-time screen drawing tools. Not only the screen recorder, but the app will also let you add some quite enhanced transitions and annotations where the end result will be quite rich and enhanced in terms of quality. Let's dive into the steps you need to follow to record the screen.
 Secure DownloadSecure Download
Step 1. Download and Launch the app and based on the system specs, it will take a couple of moments to load.
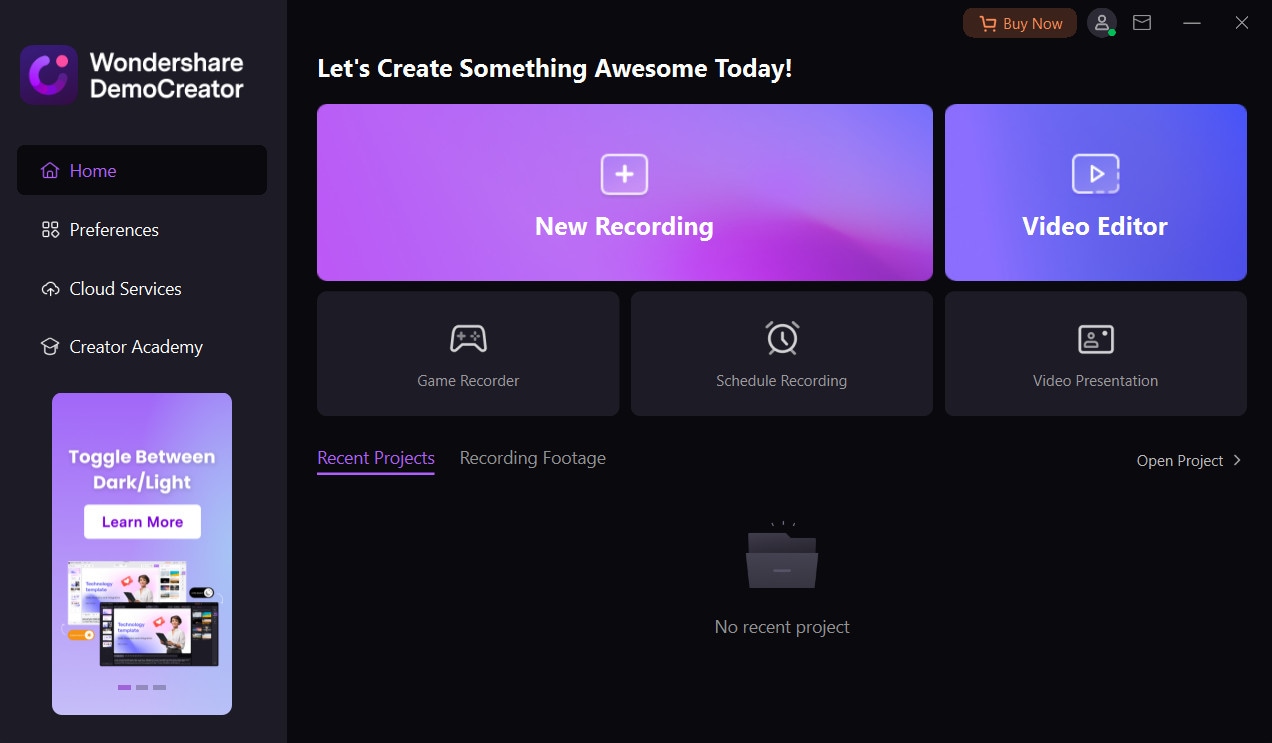
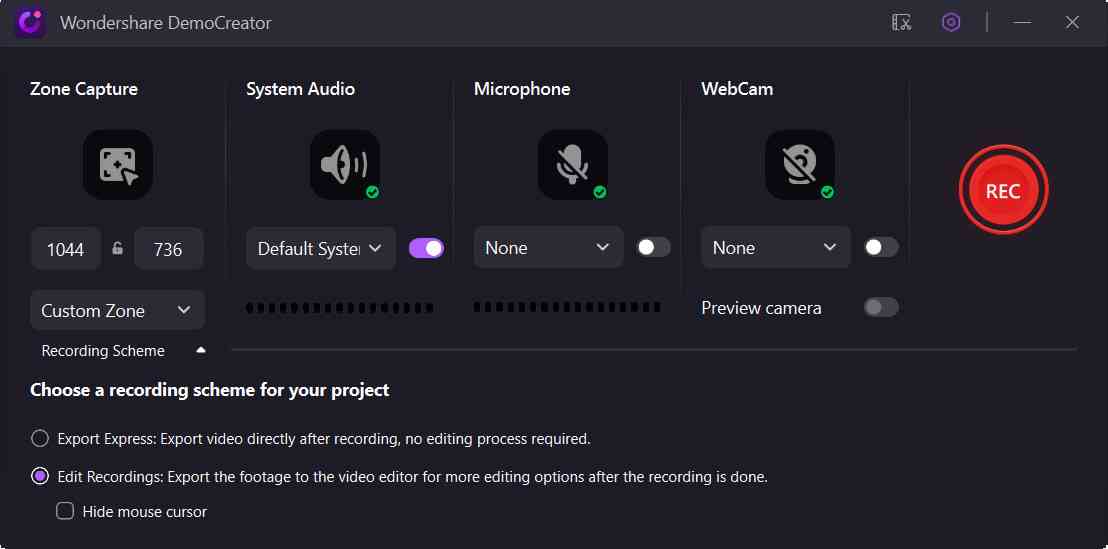
Step 2. Click "New Recordings" from the main interface, and a new window will allow you to set up the recording parameters, including screen area, audio, and webcam options.
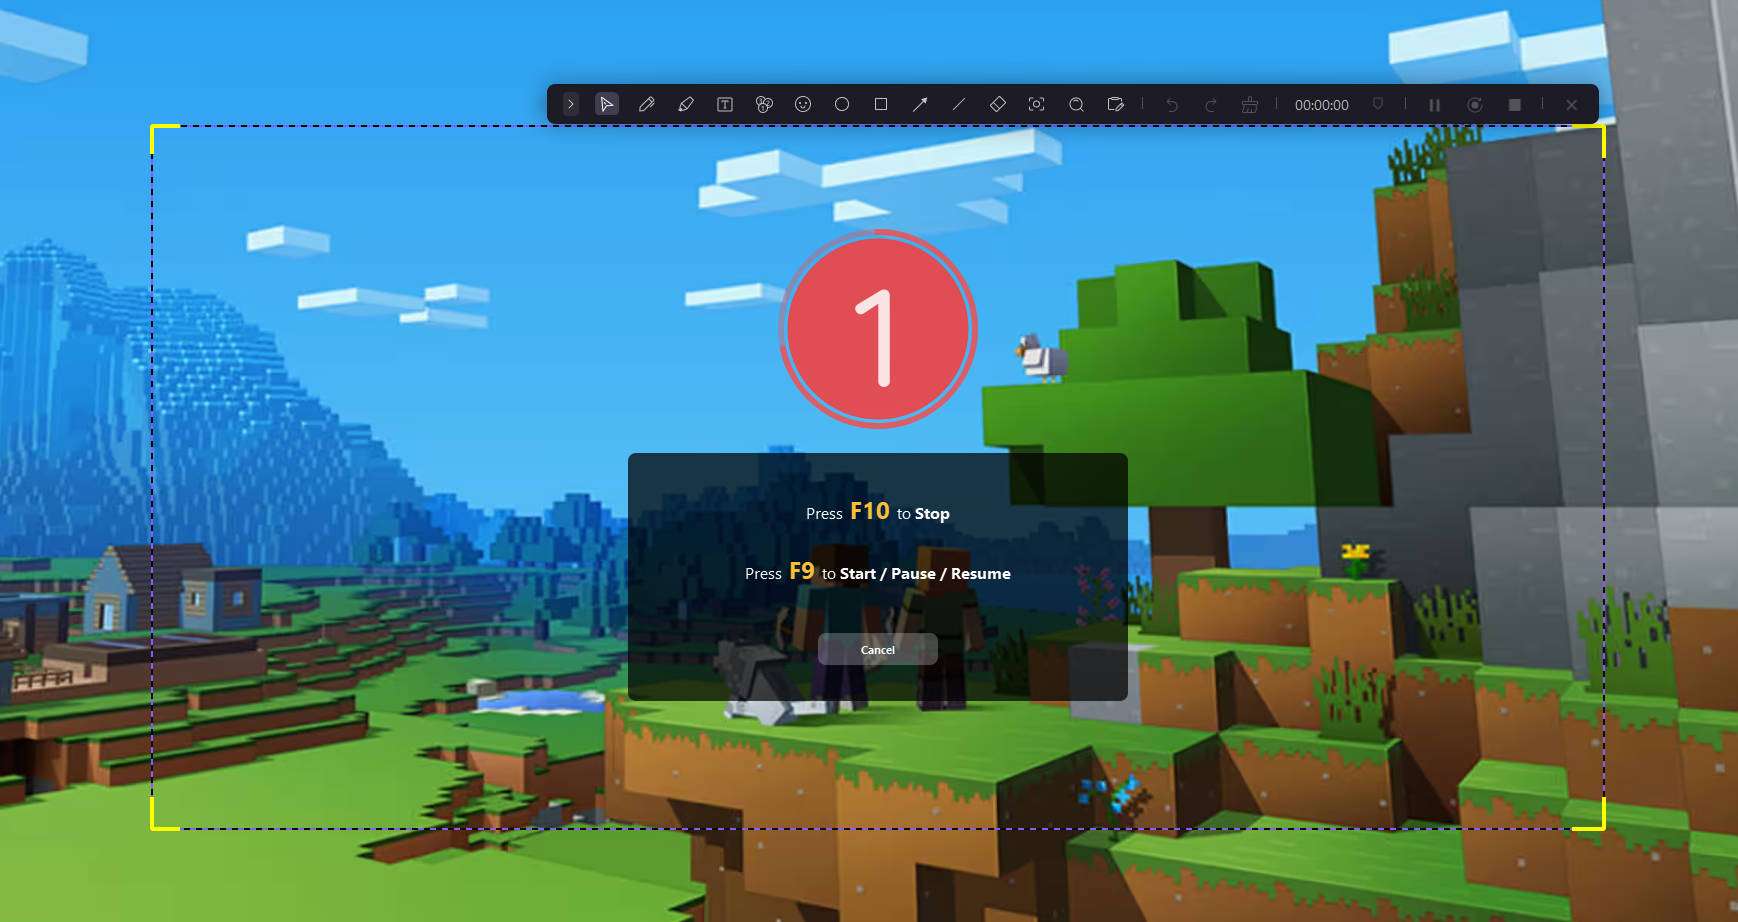
Step 3. Click on the red button once all settings are fine. The process will begin and you can end it by pressing F10.
Conclusion
The content creators rely heavily on advanced tools like OBS. There are multiple instances when they face the errors or bugs that end up jamming up the application and users start searching OBS not recording screen. We hope that we are able to resolve all the issues that are present in your OBS application.
Secure DownloadSecure Download


