
How to Create a PIP Video with Wondershare DemoCreator?

We have observed video creation excelling with the versions it has introduced with time. Picture-in-Picture (PIP) video has become a very explicit version of screen recording and video production, where it has provided users with the ability to exhibit multiple view aspects, providing users with more detail. Furthermore, it provided an enhanced capability of creative techniques for users where they can display multiple screens without fondling through various screens through conventional means. Picture-in-Picture has allowed people to view things with more detail and without any certain obstacles that prevent them from working with clarity and efficiency. This article discusses a very explicit video editing software that provides the PIP video windows 10 features in both recording and creating videos. This article intends to create certain boundaries among different video editors with the PIP feature that would allow the users to select the best PIP video editor with impeccable features to work on.
How to Record a PIP Webcam Video with Wondershare DemoCreator?
Wondershare DemoCreator is one such explicable screen recorder that provides its users with a detailed set of video editing features, which makes it a two-in-one facility. This software provides a very cohesive environment for both the beginners and professionals to work in, giving them the ability to create their own masterpieces according to their discretion.

The All-in-One Screen Recorder & Video Editor
 Secure DownloadSecure Download
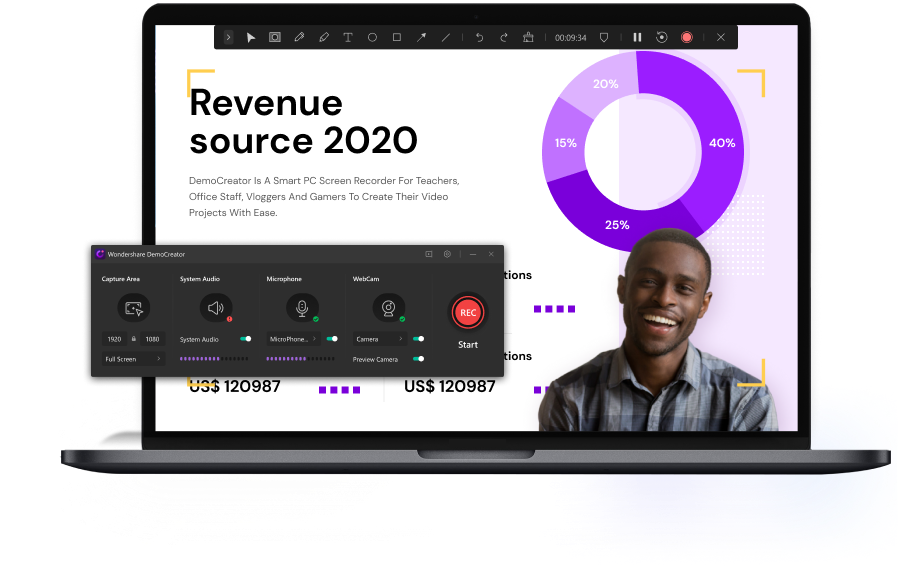
Since the task is to record a picture-in-picture video of the screen with both the webcam and the PowerPoint slide simultaneously opened, Wondershare DemoCreator provides its users with the ability to effectively operate the windows with its built-in set of screen recording features. Initially, you are required to customize the settings of the screen to have it recorded. For successfully executing the picture-in-picture video recording task, you have to follow the steps as described below.
Step 1: Setting the Screen
Initially, you have to set the settings of the screen for having it recorded. You are provided with the options of setting the screen size, and the frame rate with an additional option of game recording. Since the task is to capture a PPT presentation, this feature is not recommended to be consumed.
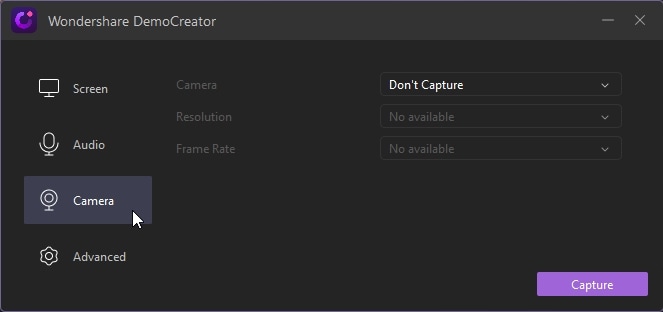
Step 2: Setting up Audio and Camera
For audio settings, it is up to the user to select the recording for both computer and microphone. However, the user can additionally record the webcam along with the screen. After selecting the right camera, its resolution, and frame rate for recording, you can initiate the PIP video recording.
Step 3: Initiate Recording
After having all the options handled, you can now initiate the process by selecting the option of "Capture." Following this, the process starts as soon as you hit F10 on the keyboard or the button showing "Start Capturing."
Step 4: Change of Recording Areas
The recording area selected by DemoCreator is a full screen by default. However, the size can be simply adjusted by selecting and dragging the area that you wish to record on-screen. This can be made more precise with the help of a magnifier. The video can then be successfully record as per the requirement of the user.

Secure DownloadSecure DownloadHow to Create a PIP Video with Wondershare DemoCreator?
Apart from recording videos, Wondershare DemoCreator provides its users with a very detailed video editing feature set where they can edit and create all forms of PIP video editing projects. However, it is done by following a set of tasks that effectively allows the user to create a very submissive PIP video using the best PIP video editor in the market.
Step 1: Adding Files in the timeline
Initially, it is important for you to have your video files imported into the Media Library from the desktop. When you propagate towards the editing process, the files can be simply dragged from the library into the timeline for editing.
Step 2: Preview the Clips
With the video clips added, you can preview any of them by hovering the cursor onto them to view their details.
Step 3: Use the PIP Video Mode
The layering of different video clips and various media files has been made easy with the PIP feature. Wondershare DemoCreator is a perfect application to build such a video, which is widely used in the market for professional purposes. Have the videos imported initially since this feature can be performed on two different videos? Have the size of the second video adjusted on the preview screen for making an effective PIP video. This, however, successfully concludes the picture-in-picture video editing on Wondershare DemoCreator. You can now successfully export the videos with your prescribed file format, resolution, frame rate, and bitrate.
Use Movavi Programs to Create a PIP Video
Another platform that is known to provide effective remedies in video editing is Movavi PIP Video editor. Similar to Wondershare DemoCreator, it provides the feature of PIP Video editing, which can be effectively done by following the steps as follows:
Step 1: Download and Install
You have to first download the software and have it installed on the desktop.
Step 2: Import Videos
Following the download, you have to access the option of "Add Media Files" as soon as you start a new project on the software. Select two files with whom you wish to perform the action.
Step 3: Edit the Videos
With the timeline on the front, add another track with the option of "Add Video Track" emerging from the "+" icon. Add one of the videos on the additional track.
Step 4: Add PIP
Following this, select the icon of settings and approach the top of the window having another toolbar. Select the option of "Picture-in-Picture" from the list that appears. Following this, you have to adjust the size of the second video on the screen to develop a good-looking video.
Step 5: Save video
With the completion of the edit, tap on "Apply" to inaugurate the PIP function. Following this, tap on "Export" and the appropriate options of the video coming on screen to save the project.
Conclusion
This article has presented users with a detailed guide on creating and recording a PIP video using two different PIP video processor. This article provides users with distinguishable features of the software to allow them to select the best option to suit their requirements.


