How to Cut Video On MacBook

2025-03-11 14:26:44 • Filed to: Basic Editing Tips
Are you struggling with how to cut video on MacBook? The video trimmer on the Mac is not only for the professionals. It is also critical for someone to make their creative videos for Twitch, Vimeo, YouTube, or other social media to ensure the clip's appearance looks slick, professional, and polished. The MacBook is mainly targeted by creative professionals and especially during the video and photo editing. Also, the MacBook has various powerful applications for video editing. There are numerous applications you can choose from.
Have you been searching for the applications that trim the video in Macbook? Well, today, we will tell you how to cut the video using various applications and which is the best video cutter Mac. Here are some steps and details of how you can trim your videos on Mac by using QuickTime player, WonderShare DemoCreator, and iMovie. So let's not waste more time and get started.
Way 1. Cut Video on Mac with QuickTime Player
Are you searching for an easy video cutter Mac? If you are an Apple user, getting confused between various video editing apps, you can go for the easy option Quick Time Player. This app is developed by Apply and is included in every Mac by default. It also allows the user to share, edit, record, and play the video and picture.
If you want to trim any video using Quick time player, it can easily allow the user to edit the video length from the end and beginning. Moreover, quick time doesn't need any extra download space because it comes pre-installed in your Mac until and unless you uninstall it by yourself. So are you interested to know what steps should be followed to cut the video?
If you don't know how to cut video on MacBook air, then Quick Time player is the straight answer. Here are the steps by which you can easily trim any video by using a Quick Time Player.

- Launch the Quick Time Player – You can give a search in the spotlight to find out the app, or else you can also find the app with the help of the finder app, which is located in the Dock, by selecting the “Applications” you can find out the Quick Time application and then launch it.
- Once you have launched the Quick Time player, you have to click on "File" and click on the "Open File." Next, select the video which you will have to trim from the location of your Mac. Keeping the video open, click on the “Edit” option from the top bar.
- Then, click on the "Trim," or you can also press "Command + T" on the keyword.
- The yellow bar will appear over the length of the video at the bottom. You can drag "Handles" for trimming out the unnecessary parts which you don't need. Everything which you will adjust inside the yellow bar will remain, and other parts will get trimmed.
- After trimming the video, you can select the "Trim" on the right. After that, you can also preview the videos by selecting the play icon while editing the videos.
- To save the video trimming, you can click on the "File" and then click on the "Save." Name the trimmed video and choose where you will save the video in the MacBook, and then click on "Save."
- Name your trimmed video; select where to save it on your computer, and then click "Save."
Way 2. Cut Videos on Mac with iMovie
iMovie have acquired the household in the Apple devices because of its rising popularity and demand. This is a famously known app for video editing on iPhone and MacBook. The functionality of this application makes it even more suitable for professionals to edit movies and clips. To trim your videos in iMovie is a very straightforward process. If you are a Mac user and looking for an easy trimmer application this can be the best option for cut movie mac. So, now let's check how it is done.
Launch the iMovie app on the MacBook:- The app icon looks like the Purple video camera with a white start and purple background. You can also find it in the Dock or the Application folder.
Choose the video you wish to trim:- You can double click on the video or movie projects on the “Projects” page for opening the editing page. The video editor app will pop up at the bottom of the application window.

Select the exact part of the video:- First, play the video in the editor on the bottom half of the screen and then pause it at the same point where you want to trim it. You will get the editing roll on the video at the bottom of the screen. You can then click left on the mouse on the video to jump out there.
- White and vertical playhead will be located at the exact moment from where you wish to trim.
- After that, you can press Space Bar on the keyboard to pause and play the movie or video.
- Then use the left and right arrow keys for moving the playhead in one frame backward and forward.
- You can also find out every detail of the iMovie shortcuts on the official site of Apple. So learn every keyboard shortcut of iMovie to save your time.
Press the “Command +B” on the keyboard:- The combination of the keyboard gets automatically split into the two parts and is located by the white vertical mark at the exact moment. After that, a white vertical will get located. After that, you can choose one of the parts and delete the other by pressing "Delete" on the keyboard.
Right-click on the exact moment you wish to cut:- This is optional to the keyboard shortcut. This step is optional, but users who don't know about shortcuts can use this. For example, you can just click over a video clip in the editor room at the bottom and then right-click on the exact moment to trim the part.
Split the clip:- You can easily right-click on the menu. It is like the keyboard combination, which will help you split the clips from where you have selected to trim the video.
- Left-click on the part which you wish to cut the video. As a final solution, you can also trim the video and select the part you wish to cut the video with a simple click.
- It will automatically place a white line on the exact moment of the video.
- Now you will have to click on the modify menu on the menu bar. The button on the MacBook menu is at the top of the screen. It will also open up the drop-down menu.
- After that, click on the split menu through the Modify menu, and then it will trim your video from the actual moment you have selected with left-click.
Way 3. Cut Videos on Mac with DemoCreator
The popularity of video creating software and video creators is increasing in this pandemic time. Numerous users are searching for software that can look forward to illustrating their ideas in monumental content and developing captivating. The video editing software is now needed in every sector, and it is possible through Wondershare DemoCreator.
It is a platform that is available to beginners without any price tag. If you are searching for any platform that helps you trim the video in a MacBook, then this software is one of the best for all. This is one of the easy video cutter mac. Let's look at the steps to how you can trim the video.
Step 1:- Download and install the software.
For operating the DemoCreator and editing your video, you will have to download and install the software into the MacBook. This software is available on Wondershare's official website and is also available for the free trial.
Try It Now - It's Free!
 Secure Download
Secure Download
Try It Now - It's Free!
Secure Download
Secure DownloadTo download the software, you will have to install the .exe file and follow the directions to install it successfully. You can also register the DemoCreator according to the requirements.

Step 2:- Create a project and import the files.
To start the project from scratch, you can create the project by accessing the "Files" in the toolbar menu. For doing this, you will have to add the video, audio clip, or image to work on it. Then, you will have to select the "Import Media File" from the menu by clicking on the "File."
For importing the files on the WonderShare, you can find multiple ways you can open the media file through "Import " which is in Media Library, or you can also open it from "Add Files," or you can also click right on the blank portion in the library to select the option for importing media files.

Step 3:- Drop and Drag the required videos.
You can add your files in Media Library by dragging and dropping the video clip to the preview window or timeline.
Step 4:- Select the clip.
You can do this by just hovering the mouse over the thumbnail of videos. It will show a clear preview of the assorted file. You will have to double-click on the file to play.
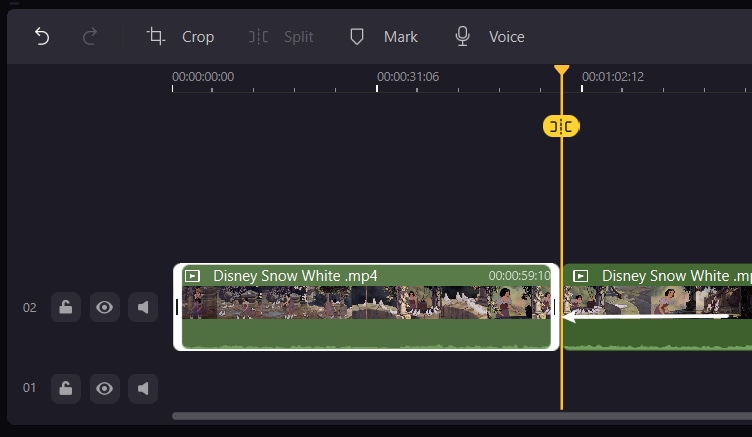
Step 5:- Drag the clip edges.
For practical and straightforward video trimming, you will have to set the cursor to the edge of a clip. The preferred video can get trimmer effectively by dragging clips in any direction. It can be achieved by setting the marker.
Step 6:- Save the File
You can also export the trimmed video in MOV, MP3, OR MP4 format after you have completed the trimming process. The Export window can also set the specific setting, bitrate, frame rate, resolution, and video sets.
The Bottom Line
There are many ways to trim video on MacBook by using multiple applications. In this article, we have discussed three applications and how to trim your video with those applications. You can choose the application according to your comfort. For example, suppose you want to edit something professionally in your video. In that case, you can go for WonderShare DemoCreator, or else if you are only trimming the video for any purpose, then all three are the best options to go.


