How to Remove Sound from Video with Wondershare DemoCreator?

Video creation and editing have emerged as a distinctive endeavor that is being adopted by many people in this century. Where creativity was supposedly shown through bare hands in earlier times, the technology helped us develop contemporary ways of displaying the creativity that lies in the mind of an individual. Video editing is one challenging mechanism of displaying the ingenuity one can develop by amending the frames of a video. This might seem too easy from its name; however, it isn't an effortless task by any angle. Developing a video by adding finishing touches is a craft of a veteran in this field, having the experience and knowledge of managing a video editor. Out of many aspects of editing a video, this article discusses different mechanisms that can be adopted for removing audio perfectly from within a video with the help of a video editor.
Wondershare DemoCreator is an intuitive video editor that presents a very impressive interface for beginners as well as veterans. This editor effectively provides its users with two diverse methods with detail on how to remove sound from video.
Method 1: Remove video sound by "Audio Detach."
The first method that can be adopted by any user who seeks to remove sound from video is by using the Audio Detach feature presented by Wondershare DemoCreator. To successfully execute this task, you would be required to follow the steps as shown below.
Step 1: Download and install the Wondershare DemoCreator.
Before using the software, itself to remove sound from a video, it is important for you to install it on your desktop. It can be simply done by downloading the software from their original site, following its installation in an appropriate place. You can register onto it, considering you wish to move forward from the trial version.
 Secure DownloadSecure Download
Step 2: Import video to Wondershare DemoCreator Video Editor
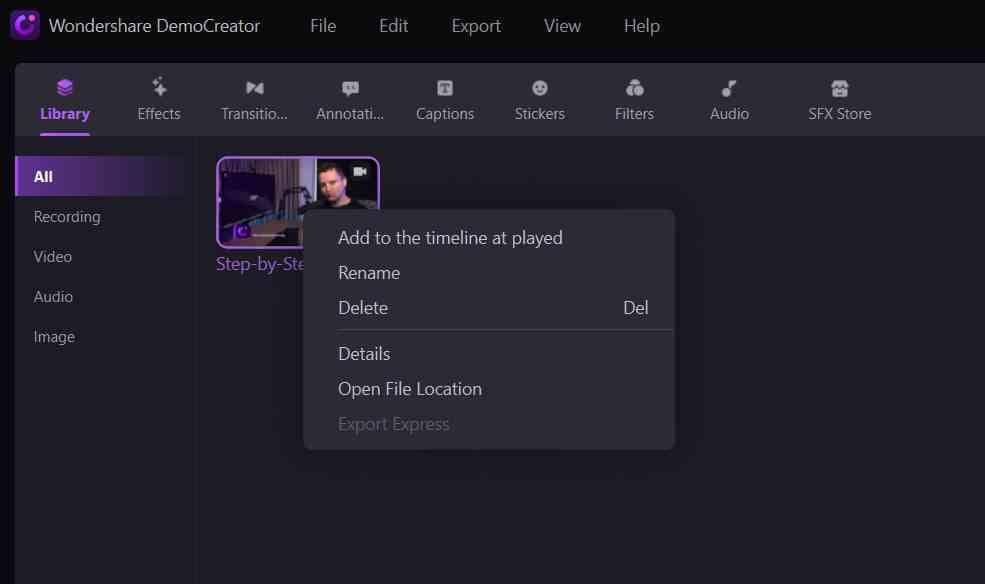
Since the task is to remove background sound from video, which can be any cramming sound that hinders the effect of the video that it tries to depict, you need to import that video onto the timeline of the software. For that, you need to simply select the file by approaching the "File" submenu following the option of "Import Media File" or "Import a Media Folder." Alternatively, you can select the files from the "Import" icon present on the Media Library panel or simply "Add files" from the tab on the timeline.

Step 3: Drag the video on the timeline
Another method of adding a video on the timeline is by simply dragging and dropping it. Files can be selected from the Media Library and dragged onto the timeline to add it to the project.
Step 4: Selecting the option of "Audio Detach."
With the video clip on the timeline, the process to eliminate sound from video is a simple one. For detaching the audio from the video, right-click on the video to open a drop-down menu. Select the option of "Audio Detach." An audio file will be separated and can be observed on the timeline separately.
Step 5: Delete the audio track
With the original audio track separated from the video, you can now simply tap on the audio and have it removed by simple means. The audio track is then successfully removed from the video.
Step 6: Export the Video
After having the edit finished, simply export the video in the form of any major file format. Set a name and location for the file along with its major settings such as resolution, frame rate, and bitrate within the window.
Method 2: Remove video sound by "Mute Audio."
Another option that can be adopted to delete audio from video is by simply muting it from the settings within Wondershare DemoCreator video editor. For this, you shall follow the stated steps:
Step 1: Import Video
Initially, import the video by selecting the respective option from the toolbar or through the icon present on the "Media Library." This will help you import any file present on your desktop onto the video editor for further operation.
Step 2: Drag the video on the timeline
Files present on the Media Library of Wondershare DemoCreator can be simply dragged and dropped on the timeline. You need to perform this to add files on the timeline for further editing.
Step 3: Click the Video and Mute
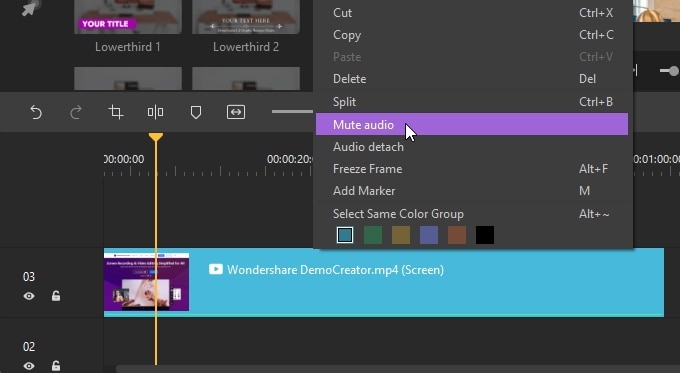
After having the video added, the process of muting is quite similar to that of the audio detachment. Right-click on the video presented on the timeline and select the option of "Mute." This will help you remove the sound from the video.
Step 4: Export the Video
After completion of a video's editing, you can save the file by exporting it. For this, you need to select the file format, the file resolution, frame rate, and bitrate along with such important settings to have it successfully exported onto the system.
 Pro-tip
Click here to get the tips about How to Remove Sound from a Video on Android or Ios Phones?
Movavi is among the top software that has presented many remedies to video editing with its effective tools. Their sound remover application is another solution to remove sound from a video. For using the application to remove the sound, you need to follow these simple tasks.
Step 1: Install
Follow the on-screen guide to install the application.
Step 2: Add Files
After opening a new project, tap on the option of "Add Media Files" for selecting the appropriate files.

Step 3: Delete the Audio
For deleting the audio, tap on the track and select the option representing "Remove."

Step 4: Save
After completion, select the "Export" option to save the file where necessary. With the necessary options selected, tap "Start" to initiate.
Wondershare DemoCreator vs. Movavi
Wondershare DemoCreator has presented a complete package with both screen recording and video editing solutions. While keeping a balance in both sections, it presents a very detailed feature set where it allows screen recording of a selected area under 30fps. Movavi, on the other hand, presents this feature under 60fps. There are many features presented by Wondershare in video editing that are quite detailed as compared to what is present in Movavi.
Furthermore, the ease of use is another factor that helps Wondershare DemoCreator top Movavi by a clear difference. Movavi, along with this, lacks in providing audio features in detail as compared to what DemoCreator tends to offer its user. Wondershare DemoCreator is surely an option that can be considered while undertaking a perfect option for video editing specifically to remove sound from a video. So, Wondershare DemoCreator vs. Movavi, which video editor would you prefer?


