How to Resize Video in iMovie - 3 Simple Steps

There are many program options you are likely to bump into on the internet to resize your videos. Finding the right software is not our issue, but how do you know the right perfect program to resize videos. Regardless of your device, there are resizing apps compatible with every device platform. Therefore, if you are a Mac user, you should try the iMovie video editor program. iMovie video editor is free to use editing tool available for Mac users; however, this tool does not have all the necessary functions to resize your video accordingly.
Furthermore, video resizing is not all about altering the format; many things should be considered when resizing videos, including not affecting the video quality. Therefore, we have also listed the best alternative program to iMovie to resize videos. But first, read on and find out how to resize videos in iMovie.
Part 1: How to Resize Video in iMovie
iMovie is a standard video editing tool that is available for iOS users. It lets you save your file as a QuickTime file for sharing with friends without quality loss. iMovie lets you customize your videos by cropping, editing, and resizing to give a video a more professional look. Do you know how to resize video in iMovie iPhone? Well, you can resize your videos in Mac and share them via Apple device platforms swiftly after editing. Here is a guide on how iMovie resize video works
Step 1: Launch and use the program
iMovie program comes pre-installed on Mac devices most of the time, but you can download the tool from the apple store if you don’t have it. Download and install the program to get ready to edit your video. Now proceed to import your video onto the program by clicking on the ‘Import Media’ button. Browse through your video files and select the video for resizing and complete the process by clicking ‘Open’ to import the file.

Step 2: Resize your video
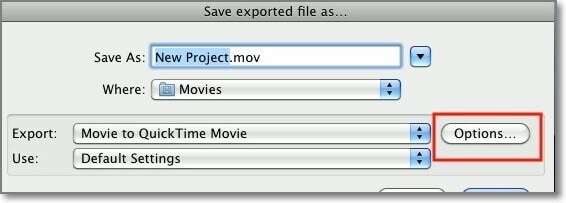
Immediately, add the video, click the ‘Share’ icon, and select the ‘Export to QuickTime’ option from the resulting options available. Then, continue and hit the ‘Options…’ button.
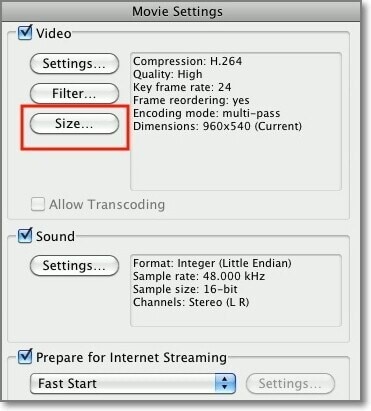
From the resulting window, visit the ‘Video’ part and opt for the ‘Size…’ button to resize your video. Under the Size menu, the bigger the size dimensions, the larger the file size increases and vice versa.
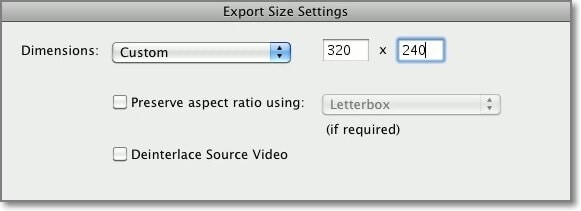
Step 3: Customize settings and export file
Immediately you are done resizing your video, select the preferred aspect ratio for the video. When done, hit the ‘OK’ button to save your changes. Now, let iMovie resize the video and transfer it to QuickTime for you to share with the set dimensions.
Part 2: How to Resize Video with Best iMovie Alternative

The Best Video Resizer & Video Editor
 Secure DownloadSecure Download
If you happen to edit many videos or you have several video files to work on that have different formats, iMovie might not be the right tool for the task. iMovie supports a limited number of video formats. Again, you may face problems when resizing videos and don’t know the right size to choose if you are a beginner using iMovie.
Because of this, we are recommending Wondershare DemoCreator for video resizing. This tool has different ways to resize videos, and all these are done in three simple steps. In addition, Wondershare DemoCreator supports many video formats; therefore, there is no need for conversion tools to edit videos. This feature makes DemoCreator the best alternative to iMovie when it comes to video editing and resizing.
Method 1: Resize Video by Changing Video Resolution
Step 1: Import Video
Download and install DemoCreator on your device. Run the program and proceed to add video for resizing. Adding a video, you have to hit the ‘Import’ icon, and a pop-up window will launch containing your directories. Browse through and select your video to edit. Click ‘Open’ to import the video. Then add the video to the timeline. Click the video and drag and drop it to the timeline, ready for editing.
Step 2: Change the Resolution
You have two options to change the resolution. First, you click the ‘Export’ button, then from the resulting window, select the right resolution for your video in the drop-down menu options. A smaller resolution will reduce the video size, and the reverse is true. Another way to change the resolution, locate the ‘File’ option at the top, then scroll to ‘Project Settings’ and hit the ‘Resolutions’ button.
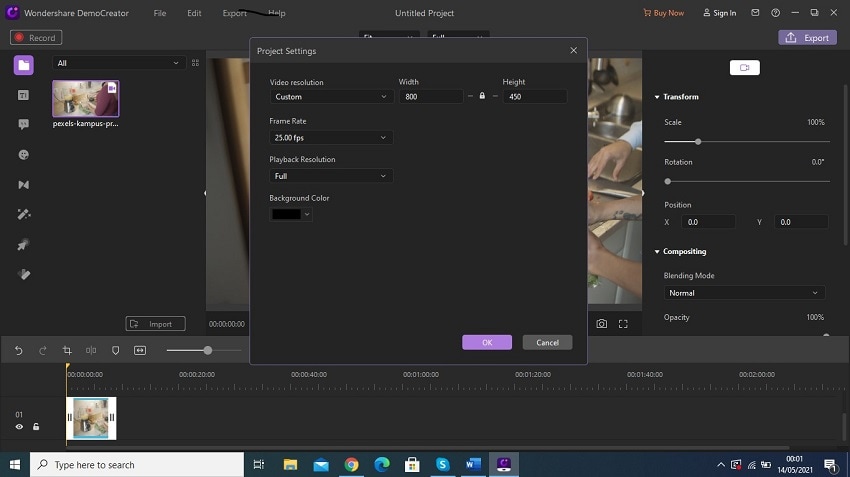
Under the resolution, using the drop-down menu, select the preferred resolution size or use the ‘Custom’ option as the standard option. Next, alter the ‘Height’ and ‘Width’ figures that fit your video. In this window, you can also change the playback resolutions and frame rate. Finish this step by hitting the ‘OK’ button.
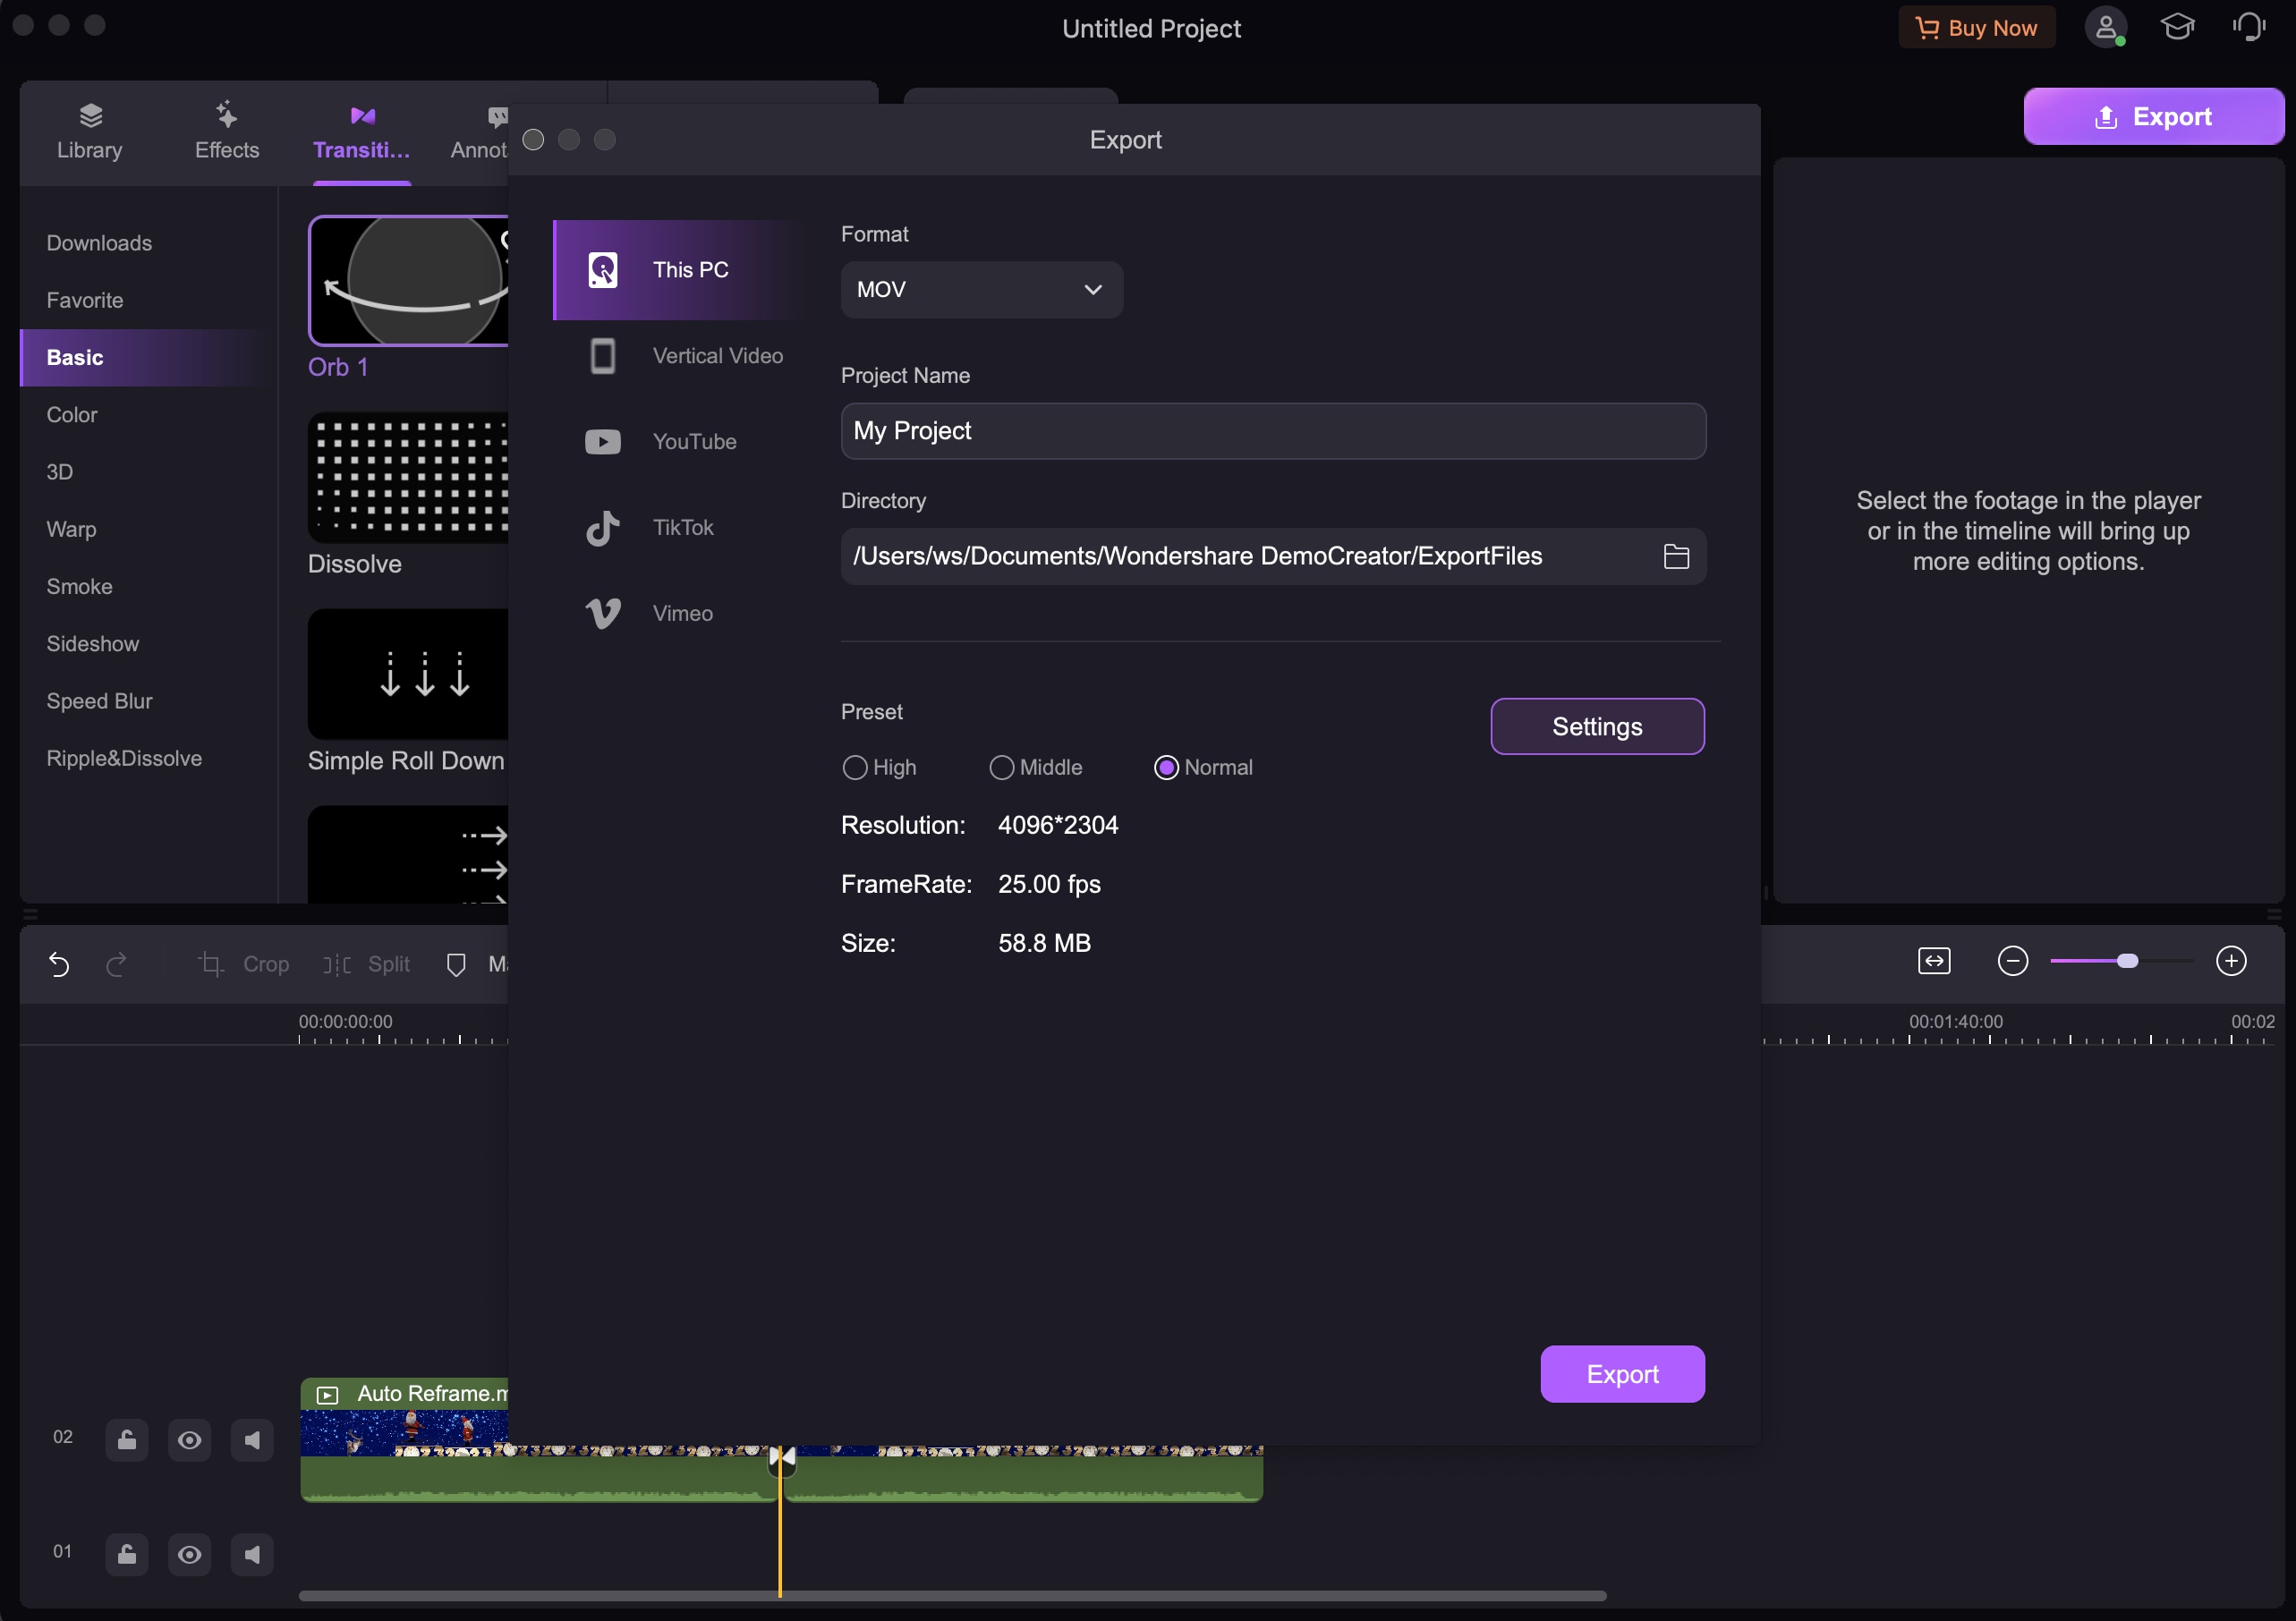
Step 3: Export video
Now, click the ‘Export’ button and choose the file format or customize the frame rate, bit rate, and file encoder. Finally, click the ‘Export’ tab to save your file and share it.

Method 2: Resize Video by Cropping
Step 1: Import Video
Download, install and launch Wondershare DemoCreator then click the ‘Import’ button to add video files. Right-click on the video file and click ‘Add to timeline at play head’ to get the file ready for cropping.
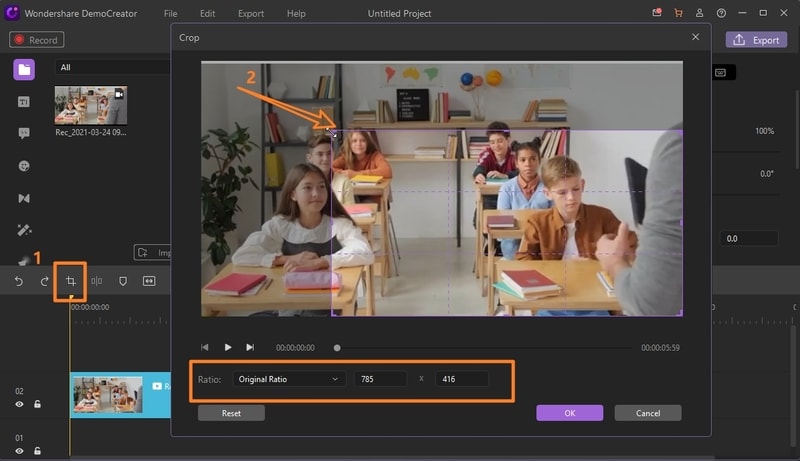
Step 2: Crop video
On the timeline, locate and hit the ‘Crop’ icon for cropping the video. Then drag the cursor to where you want to crop. Next, click the cursor and drag it onto where you want, and your DemoCreator will crop your video. When done, hit the ‘OK’ button.
Step 3: Export Video
Finally, now hit the ‘Export’ button to save and share your video. However, you can select the file format, name the video and customize other features for your video from the resulting window. To save the file, hit the ‘Export’ tab once again to save your resized video.
Method 3: Change the Video format
Step 1: Import Video
You can also resize your video using Wondershare DemoCreator by changing the video format. Import your video using the ‘Import’ button and click ‘Open’ once you have selected your preferred video.
Step 2: Change Video Format
Click and drag your video to the timeline. Next, proceed to hit the ‘Export’ button and locate the ‘Format’ menu option. Once you set the right format, you can add the name and also customize the video’s resolution. Finally, hit the ‘Export’ button to save your video on the device, ready for sharing.
Part 3: Differences between iMovie and Wondershare DemoCreator
Wondershare DemoCreator facilitates fast editing for videos as all these steps are available in steps. On the contrast, you will find it difficult to use iMovie, especially when you are a beginner. iMovie works best for those who know what they are doing, while DemoCreator is beginner-friendly.
Another thing, working with iMovie may need you to convert video files to a supported format, unlike Wondershare DemoCreator. On the other hand, DemoCreator supports thousands of video formats. Hence, you can resize any video you have with no need for conversion tools. Lastly, if you are using a Windows PC and looking at how to resize video in iMovie, Wondershare DemoCreator is the best alternative to go for. DemoCreator is compatible with both iOS and Windows platforms, while iMovie is only available for Mac users.


