OBS Dropping Frames Problem and Solutions

Since videography started it has been based on the premise that a video is an assortment of still pictures played consistently to resemble a moving picture. Regardless of how you shake it, this is still valid for recordings today, though on an undeniably more perplexing level. Perhaps the most well-known issue that decorations experience is Frame Drops. The most widely recognized reason is that the source you are streaming is creating a bigger number of edges than the encoder is designed to. To Fix Frame Drops in OBS, you need to make a few concessions you would say.
All things considered, the disadvantages of having dropped outlines aren't too negative. It essentially causes the video playback for your crowd to feel somewhat less refined and expert. In case you are engaged with cutthroat ongoing interaction for cash, here we've gathered the means to do as such. To fix outline drops in OBS when you are gushing on Twitch or some other Step besides, you need to coordinate with your render outline rate to that of your streaming framerate at a 1:1 proportion. So if you somehow happened to stream at 60 fps, and can deliver over 60 fps in-game, then, at that point, you need as far as possible your game to 60 fps.
Solutions to OBS Dropping Frame Ambiguity:
Each picture that happens in your video or 'arrangement' is the thing that we allude to as an edge. The more edges show up inside a specific period, the smoother the picture will look to the watcher. Casings are normally estimated in FPS or Frames Per Second. The higher the FPS, the higher the quality. 30FPS is viewed as the base OK quality in the present current market, with the inclination being 60FPS.
Way 1. Update The Network Driver
"OBS dropping casings" can be likewise brought about by an Obsolete organization connector driver. In this way, you can have a go at refreshing your organization's adopter driver to dispose of the issue. How to refresh network adopter driver on Windows 10? The instructional exercise is beneath.
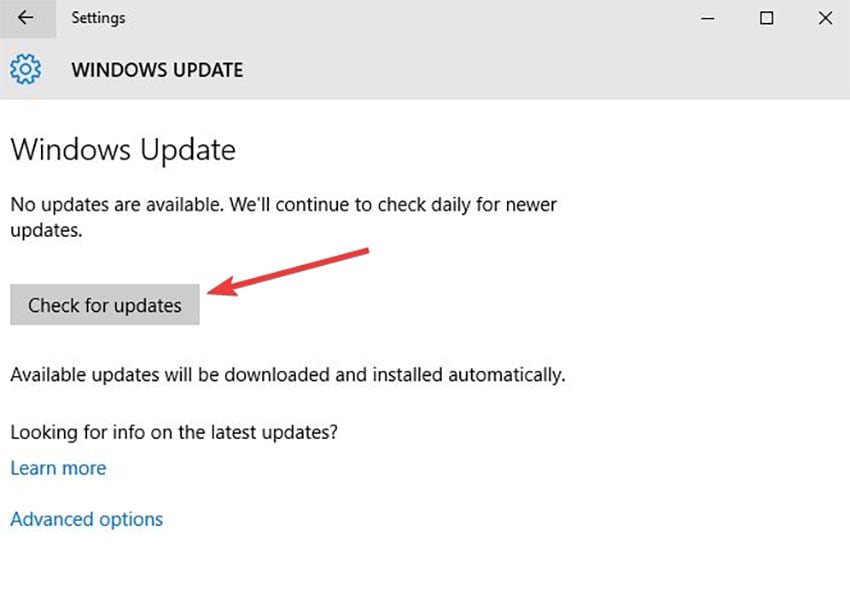
Step 1: Press Windows + X to get to the Windows menu and afterward pick Device Manager from it.
Step 2: Once the Device Manager window opens, grow the Network connectors classification and afterward right-click the thing in the rundown to pick Update driver.
Step 3: Choose Search consequently for refreshed driver programming.
Step 4: Follow the on-screen guidelines to complete the refreshing.
Way 2. Try Lowering Bitrate
One of the demonstrated answers for the OBS dropping edges issue is bringing down the Bitrate. The bitrate is liable for the nature of the video and sound that we watch on the web. On the off chance that the high Bitrate is the issue for your situation, attempt to change the Bitrate settings (bring down the video Bitrate) to tackle the issue for you. For doing as such, follow the means given beneath,
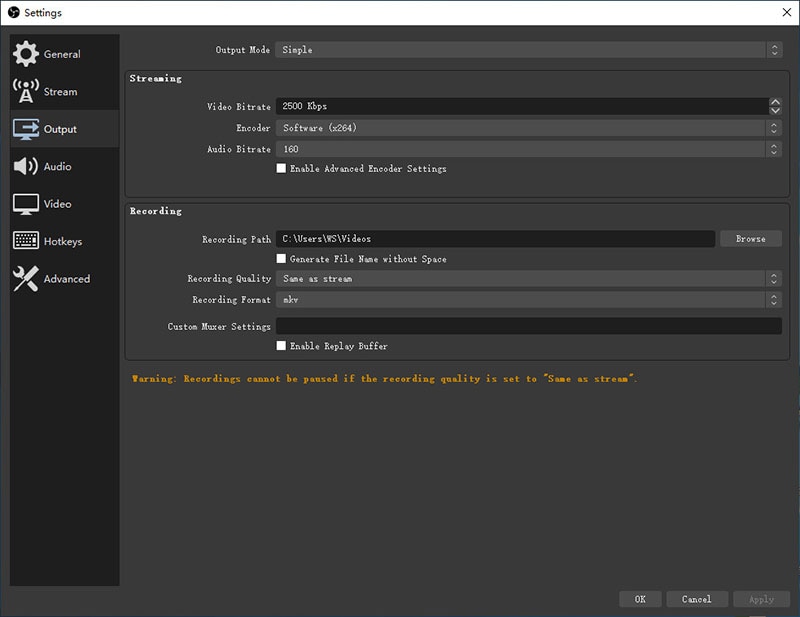
Initially, open the OBS studio. Then, at that point, go to Files, which you can see at the upper left corner of the screen, and select Settings starting from the drop menu.
Presently in the Settings window, from the left-sheet select the Output tab. Then, at that point, under the Streaming segment, from the right-sheet, bring down the video Bitrate and snap-on OK button to save the changes.
For the situation of OBS Studio 24, the inbuilt element, Dynamic Bitrate permits you to change the Bitrate naturally according to your web network.
Way 3. Change Servers
There might be a shot at setting off the OBS dropping edges issue when you are associated with and utilizing the default servers. In this situation, to dispose of the issue you need to switch the server and attempt it once. To do as such, follow the means given beneath,
Open OBS and go to Files then, at that point, select the Settings choice from the drop menu.
Presently from the left-sheet menu select the choice Stream. Then, at that point, pick the help you need to utilize and tap on the choice Connect Account. Further, sign in utilizing the username and secret key. When the login cycle is finished, from the server drop-down list, change the server and snap-on, OK to save the changes.
You can likewise attempt diverse accessible servers till you get one that you can stream without a hitch. The OBS Dropping Frames issue is certainly not a genuine one and it tends to be tackled yourself without the assistance of any specialized hands. The reasons for the said issue might be a few and each comprises a particular arrangement too.
Way 4. Check Firewall/Router / Antivirus
Not just the switches and drivers, even the firewall and introduced Anti-Virus are liable for the OBS dropping casings issues. Along these lines, it is a superior plan to be on/off the firewall and hostile to infection at whatever point you face this issue. For doing as such, follow the means given underneath,

Right off the bat, in the work area search bar type Windows firewall and open the Windows Defender Firewall from the query item.
Presently in the Windows Defender Firewall window, from the left-sheet, select the choice Turn Windows Defender Firewall on or off.
Then, in the recently opened window, under the Domain network settings, Private organization settings, public organization settings tap on the radio button other than Turn off Windows Defender Firewall (not suggested) choice and snap on the OK button.
Whenever you are done, check for the issue, assuming it is addressed, add an exemption for OBS32.exe/OBS64.exe to your enemy of infection or firewall. Winding down the windows firewall isn't at every one of the suggested steps since it might make a couple failing thus, in the wake of winding down the Windows firewall, still the issue isn't addressed, then, at that point, reestablish the settings that acted in the Windows Defender Firewall.
Way 5. Check Router And Network Hardware
Live gushing over WiFi can be unimaginably temperamental as the sign strength can change continually during the stream. Take a stab at broadcasting a live stream while utilizing an ethernet link associated straightforwardly to the modem. On the off chance that this stops the edge drops, you probably have WiFi issues. Assuming WiFi is the main choice, it's prescribed to discover a WiFi channel that is the most un-clogged, utilizing an application like 'WiFi Analyzer' accessible on Android. Utilizing an Ethernet link will guarantee a significantly more steady web association. Follow these essential checks,

First and foremost, take a look at the switch. Once in a while, the switch may not work as expected and even sticks the signs at the actual switch, as an answer we need to interface the modem straightforwardly to the framework by skirting the switch in the manner.
Check for the Ethernet link harm. Assuming this is the case, then, at that point, attempt to change the link. At long last, we prescribe you to transfer over a wired association rather than Wi-Fi, as the wired association is more steady than the Wi-Fi association. Also, ensure your WiFi channel isn't set to 'Auto'. At whatever point the "OBS dropping edges" issue triggers, the main activity that you need to perform is investigating the equipment issues. Indeed, investigating will take care of you to discover in case there is any equipment issue. After following the above arrangements, still, you confronting the OBS dropping edges issue, then, at that point, follow the following arrangement which might be the justification for your issue.
Way 6. Use a Stable Frame Recorder
Dropped outlines in OBS can be amazingly baffling, however as we showed you above, there are ways of fixing that. Fortunately, the 5 hints above can assist you with for all time addressing these issues and put you in good shape in your streaming vocation! Such a lot of being said, there will be substantially less weight on your framework in case you are a 'simply talking' or 'music' decoration. A difference in the direct center maybe all together if another arrangement isn't acceptable for you. Consequently, you need a tool stash like Wondershare DemoCreator to settle this issue. DemoCreator is an across-the-board PC screen recorder that accompanies its implicit video supervisor. It doesn't make any difference in case you're a fledgling or a high-level client. DemoCreator screen recording and altering capacity permit everybody to make a video in the manner in which they need.
What is extremely instinctive with regards to the product is that it's anything but plain recording programming like others. It offers highlights like Screen Drawing and Spotlight to bring inventiveness during recording. The two of them can be immediately utilized with console alternate routes, which are valuable to keep the mouse in the center. The product likewise offers completely configurable settings, for example, catching framework sound, mouthpiece recording, including webcam, and setting the goal before recording. If you need to utilize the Screen drawing apparatus, make a point to flip it before recording. There's even a selection of cursors to assist with directing your watchers' eyes to significant pieces of the show. Subsequently, your recordings become more intelligent and less like a study hall.
Steps to Record with DemoCreator
Since frame dropping is a vital issue with OBS, the DemoCreator solution brings you out of it completely. To begin recording your videos right from the DemoCreator recording solution, here are the steps involved in doing so:
 Secure DownloadSecure Download
Step 1: Install and Launch DemoCreator
For that, simply refer to the DemoCreator site and download its installer for your PC. You can have this software in the specified versions, either its Windows or Mac respectively.

Afterward, open the installer right away and have it installed by default installation setup. Now, as the installation is finished, you can launch it from your PC and initiate the recording procedure with the upcoming steps hassle-free.
Step 2: Setup your Screen
Inside the DemoCreator window, you can see the following interface, where you need to select the single option out of the various ones available. For recording purposes, you need to click on the Capture button to proceed with capturing your video screen:
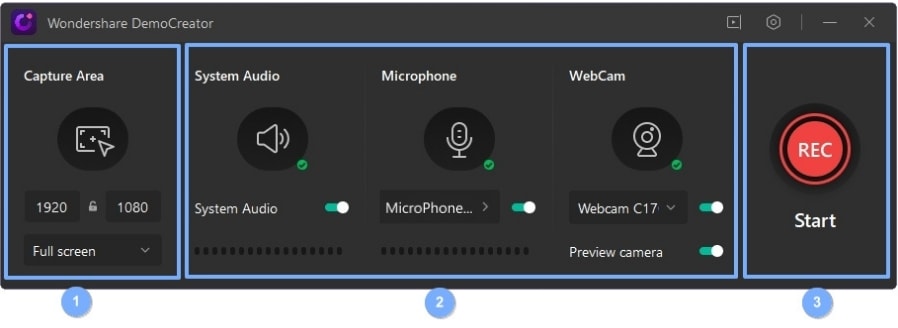
On the screen area, you can specify the interface which you want to capture in your final video. After selecting that, you can handily customize the settings of your recording at the corner settings box as shown in the interface. Just click on the tab and be with the customizations of your videos as you want. You can also enable the Webcam as well as the audio options so you can record the webcam and audio along with the video as well.
Step 3: Start/Stop Recording
In the main step, after you are done with the customizations, now you need to start the recording. For that, just hit the Start Recording button inside the recorder window as follows. Now your screen capturing will be started after giving you a 3-second timer.
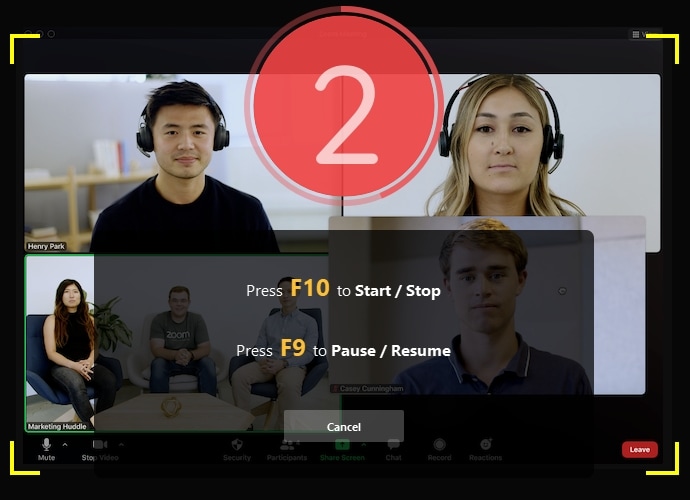
On the other hand, to stop as you're done with the recording hit the Square shaped red button and it'll make your recording stop on-spot.
Step 4: Export/Share to YouTube
In the final step, if you want to export the recordings right away, simply hit the Export button at the top of the video editor interface and be with it. Furthermore, if you want to share your recording on a social platform like YouTube, then hit the YouTube menu bar from the list and sign in to your channel to share it handily. You can also save it in your desired format as well.
Conclusion
As we recently referenced, diminishing your framerate may appear to be a Step of course. In any case, if the compromise is intended for a watchable stream, this is certainly the way forward! DemoCreator is an across-the-board answer for make astounding video instructional exercises, demos, introductions, and so on This simple to-utilize and straightforward UI-based screen recording programming will make eye-getting recordings in minutes. Its inherent video manager will make your errand a lot simpler. You don't have to put additional weight on your PC/Laptop by introducing a substantial video supervisor when DemoCreator as of now has this implicit component.


