How to Record GoToMeeting as Attendee?
Generally, GoToMeeting has its built-in recorder but with such a drawback you might be seeking efficient and featured software where you can record a GoToMeeting webinar as an attendee. Now if you are attending a useful lecture on GoToMeeting, an important session where you can't afford missing a bullet point, want to save all the live activities and useful comments including the questions asked by the other attendees, you are just a slow picker in understanding concepts, or it's just you need to know how to record GoToMeeting as an attendee. Then you are at the right place!
With a tool having a powerful capability to record webcam in GoToMeeting, you can save your efforts as it makes your work simpler and more efficient. Here we have brought such convenient steps with the help of which you can record GoToMeeting not organizer but as an attendee. So if you're panicking on how do I record GoToMeeting as an attendee for free, then here we have provided you with this solution as well.

Part 1. How to Record GoToMeeting as an Attendee?
The limitations with the built-in GoToMeeting recorder has brought you here seeking a viable solution which can allow you to freely continue your recording GoToMeeting as a participant, without any limitation and inconvenience, which doesn't have the limitation of 100 MB recorded file, where output is being offered in as many as you like formats and which can keep the highest quality of the GoToMeeting ensured. This emanating tool is Wondershare DemoCreator which has a powerful built-in GoToMeeting recorder.
You can now record on GoToMeeting with Wondershare DemoCreator more effectively than ever. You can easily capture your GoToMeeting webinars without any limitations with this powerful tool. Wondershare DemoCreator provides easy-to-use access to the recording features it has embedded naturally, so even if you have no previous experience in GoToMeeting recordings, you can easily get used to this software. Here's how you can do it:
Step 1. Download the Wondershare DemoCreator Program
Recording your GoToMeeting sessions is fun and handy with this masterpiece by Wondershare, with doing so the very first start is downloading the software. So, if you haven't already, These below downloadable links will do it for you:
After the download of Wondershare DemoCreator gets completed, follow these steps to install this software on your PC:
 Secure Download
 Secure Download
- Locate the downloaded file and open the setup .exe file which you have downloaded from the above links to install this GoToMeeting recorder
- Advance with the default options of installations if you are a beginner. However, you can also do customizations in installation with the demonstrated instructions.
- After the Wondershare DemoCreator gets installed, simply open this software right from your desktop where its shortcut has been created.
Step 2: Adjust the Capture Parameters
Meanwhile, In the Wondershare DemoCreator software interface, the next step is to initialize the capture screen of your GoToMeeting video capturing, and you can do that with the help of the below steps:
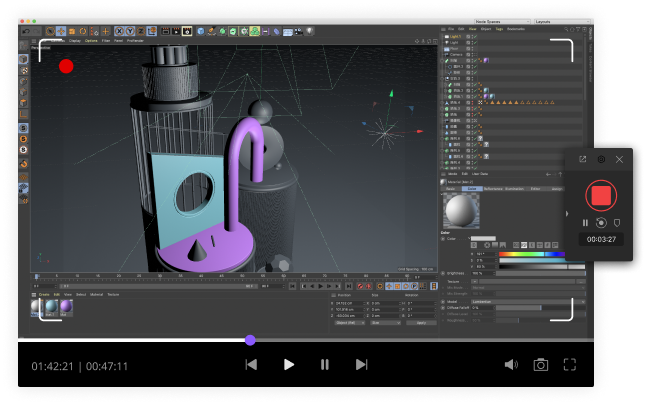
- With the initialized interface, opt for the Capture button, which will direct you to the intuitively designed screen recorder of Wondershare DemoCreator.
- Now in this new window just opened over the software interface, you can see the different features which are having the straight forward functionalities you can choose.
- With the opening of a new window, you can see the lighted screen which has parameters visible for you.
- Now, indicate the capture area of your live GoToMeeting and here you need to change the parameters of this captured screen, so you can focus on your GoToMeeting webinar efficiently and After all, you can get a clear and cropped GoToMeeting webinar recording.
Step 3. Record the GoToMeeting Webinar
Now the main part occurs as you can record your GoToMeeting sessions in this step. Head to the following steps below.
- This capture screen has brought a lot of enriched features where you can do a lot of customization for you to be recorded GoToMeeting webinar:
- Now the best part is, the important buttons are displayed with the red circled button as Start recording, Red Squared as Stop Recording.
- By hitting the red circled button, as you want to start your screen recording of GoToMeeting, your GoToMeeting session is being captured now with the captured area.
- Now you can easily do your GoToMeeting webinar with keeping in mind that your screen recording has been going on until you stop it by hitting the red squared button.
Step 4: Edit your GoToMeeting Webinar Video
Here comes the best part of Wondershare DemoCreator, where you can do your editing magic on your GoToMeeting webinar videos. Just follow the step-by-step guide below to do editing on both of your video and audio part of the recorded file:
- As soon as you stopped the GoToMeeting recording, the just recorded file comes in your media library of Wondershare DemoCreator.
- To edit this session recorded video, drag and drop the file from your media library to the timeline of Wondershare DemoCreator
- Your audio and video files have separate sections from there, you can do editing on both of your recorded files right in the timeline.
- To edit the video part, just click on the video, which shall open the editor on the right side of your editor. However, you can also add Annotations, Stickers, Effects, and much more along with the basic video editing.
- To proceed with the audio part, all you need to do is just click on the audio file from the timeline and do audio enhancements from the audio editor opened on the right side of your DemoCreator screen.
Step 5. Save the Result in Any Format
After the audio and video part of your GoToMeeting recording has been done, now is the time to save the file to your system so that you can use it further or upload it for your audience.
- Just click in the top right corner button of your Wondershare DemoCreator screen named as Export:
- Now that button has opened up a new window which includes the properties of your GoToMeeting recording.
- From there, you can customize your output file format as well as the quality with plenty of options available for each section
- Hit the Export button below as you have done all the customizations of your GoToMeeting recordings, this will directly save your file to the destination on your system.
 Pro-tip
If you want to get more screen recorder >> to learn more details.
Part 2. How to Record GoToMeeting as a Host or Organizer?
Scheduled GoToMeetings often have this anomaly of attending the audience. As of today, with the interlinked network of people around the globe, if you're from another region and your audience is from another, then there's this challenge of matching the time zone as you have a conflict with the time zone. But here's the kicker is you can record your GoToMeetings on their cloud recording feature which seemingly solved this query of matching the time zone and priorities of the end user's audience of your meetings online.
So, if you're an organizer of a GoToMeeting, you certainly have the access to record your meetings for your users so they can make use of it later. This can be done by only Account Administrator of GoToMeeting hence if you're not a host, then you can let your host know about this step-by-step guide which is of GoToMeeting recording for organizers only.
- Login to your GoToMeeting account or signup for the one if you are about to host a meeting for your audience.
- You can directly go to the Admin Center right after logging in to your GoToMeeting account
- Now in User Settings navigate to the end-users with whom you want to share the recordings and add them accordingly
- In the features menu, navigate to the Record Meetings and select the Cloud Recording option as follows:
- In the final step hit the Save button, and now you can schedule your meetings as you have enabled the recording feature which is built-in for GoToMeeting.
Now after the GoToMeeting has been done, you can head back to your Meeting History where you can find the links of your recordings so you can now share or delete it accordingly.
 Secure Download
 Secure Download
Conclusion
A well-performed webinar with its audience satisfied is the aim for every GoToMeeting schedule, but it's not practically implacable due to priorities and differences in the time zone. Furthermore, internet connection also plays its part in that. But what is viable is a better recorder like Wondershare DemoCreator which has the overall improvements of such necessities being an audience of a live webinar on GoToMeetings requires. Hence, if you want your webinars to perform well on expectations, you can directly provide the recording feature with the best GoToMeeting recorder available in the market.
The bottom line of this article includes that it doesn't matter if you're an audience or a host to a webinar at GoToMeeting, you can do the best part of recordings with scheduled meetings more effectively than ever. With Wondershare DemoCreator, it's handy now to make a featured recording of your GoToMeeting decently and effectively.


