How to Fix Powerpoint Not Recording Audio Mac

No matter in what rabbit-hole you are living in, you must have heard of the application MS PowerPoint. The tool is one of the best products that users will get included in the Microsoft Office franchise. Be it students or working professionals, it’s a tool that is widely used to present any data in the form of attractive slides.
Now, the tool has got multiple enhancements and you will get to pair it up with Microsoft Excel to include the necessary stats to your slides. It’s also the application that one will have to encounter when it comes to anything that you are learning online.
Though it’s generally included in Windows machines, users can buy the product to use on their Mac. The functions and features that you will get will all remain the same and the interface that you will get is quite intuitive.
Now, along with presentation tools like MS PowerPoint, users will also need a set of tools that will help in easing out all the workflow. The most important one of all will be a screen recorder that can give users an option of keeping the screen activities safe. These recorders will also be needed to given the necessary permissions to record the audio.
While you are recording the screen and also narrating simultaneously, you may face some errors once in a while. The most common one of all is you are facing the issue of PowerPoint not recording audio Mac, there is nothing to be worried about as we are compiling the list of all troubleshooting techniques in this guide. MS PowerPoint will use the inbuilt microphone; however, if you want to record professional audio, you can always add an external microphone.
5 Fixes for Audio Not Recording in PowerPoint Mac
In case you are facing some technical glitch and aren’t able to record any audio even when every cable seems to be connected properly, there are high chances that there is some error on the software side. You have landed at the right place and the tips that we are going to discuss here will be in detail and you will not need to seek any professional help. Let's dive in right now.
Fix 1. Let PowerPoint Access Your Microphone
For starters, it’s the most common issue where users don’t know that the application will require users to first enable the microphone. This extra step is done by Microsoft in the wake of some serious privacy concerns.
Users will need the app that puts their privacy on the priority and an extra step where they get to disable the camera and mic will be a very good security feature. Microsoft PowerPoint will give users a very intuitive dashboard. All you need to do is follow the steps below in chronological order to be able to start recording.
A majority of laptops that are coming these days sport a dedicated mic button. If yours have not one of those, the following steps will help you in allowing the mic access.
1. Once the system fully boots up, you will need to go to the Settings app. Click on the Start menu and you will get a Settings icon above the Power menu.

2. Find the Privacy menu and you will get multiple options on the left hand.
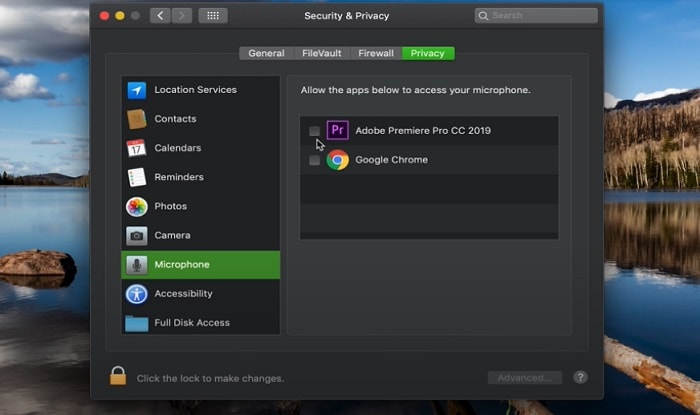
3. Under the App Permission head, you will need to click on the Microphone icon. On the top, you will get the Change button to set the default mic. Tick on the MS PowerPoint.
4. Below it, you will get a toggle to turn it on. Now, when you will launch the MS PowerPoint, it will be able to access the microphone, automatically.
Fix 2. Reset PRAM
When you are using macOS, some things are a bit different from the Windows laptop. For a Windows machine, you will get the BIOS, and the PRAM will be for the Mac machines. It is a system on which the macOS will run and you can fix a major set of issues from it.
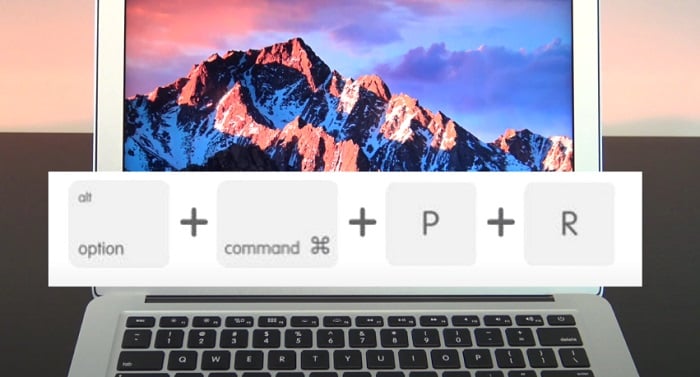
Tweaking few things in the P-RAM will give you the option to troubleshoot some issues. The interface will also allow users to tweak the screen resolution and also the color depth. It will be easily operated by 4 keys, P, R, Command, and Option. Resetting the P-RAM will fix a major set of issues that you are facing in your system.
Here are the steps you will need to follow to access the system core interface. Apple will also keep providing the software updates that will tweak some core features. Let's dive in.
1. Shut down your Mac and power it on again. Once the Apple logo appears, you will need to keep all 4 keys pressed, Command, Option, P, and R.
2. It will trigger the P-RAM interface. You can know it as soon as the chime sounds for 2nd time.
3. Once the system fully boots up, find the System Preferences tab and then go to the Sound settings.
4. Here, you can find the microphone options and check if the system is detecting your voice input.
Fix 3. Use Safe Mode
When it comes to Mac, there are very few problems that you will face. However, there are a few things that you need to know. There will be times when you will need to find some troubleshooting methods. The issues and misbehaviors that are there are generally caused by some apps that are not well developed. Certain issues are also caused by unwanted cache files.
Multiple apps are running behind and cause system slowdown. Now, the brand has offered the system to boot in the Safe Mode. It is the mode where the system will only start basic system options and in case if there’s an issue, the safe mode will probably fix if the glitch is on the software side.
If you want to exit the mode, all you need to do is restart the system. It will boot into the regular mode. You must note that the time taken in the booting up in the Safe Mode will be a bit longer than the regular boot.
Key advantages of Safe Mode
- It will clear all the existing directory issues and when you boot up, it will only fetch the kernel extensions that are needed.
- If users have installed any font from an external source, you will not be able to access them in the Safe Mode.
- It will also clear all the cache files that are created over time.
- By turning off all the system start-up apps, Mac will also most probably fix the issue of audio not recording in PowerPoint Mac.
Fix 4. Remove the Cache Files
You must have heard of the cache files that appear up automatically. These are the files that are created by the browser and the application that works over the internet. A cache file will also be created whenever you visit a website for the first time. It will store some data so that it can easily load up the next time you visit it.
What it means is that the next time you will go to that particular website, the browser will fetch its content from the saved cached file, rather than requesting the DNS server every time. Over an extended period of time, if you have not cleared the cache, it will slow down your system quite significantly.
Now, once you've understood the working of cache files, it's important to know their importance. Having a large chunk of cache files stored on your device will not only consume your storage space but will also affect your RAM.
- Once you clear the cache, the page will load afresh. It means that all the new content will load up if added by the host.
- There is also a significant privacy threat that comes with storing the cache files. It will also save content like login credentials, name, and mobile number along with other sensitive information.
- Another significant advantage that you will get is enhanced system performance. In a majority of cases, the cache files that are stored on the device will not be highly useful and you will only be able to unload the system.
Steps to remove the cache files for Microsoft PowerPoint:
1. Once the system fully boots up, go to the Library.
2. Scroll down to the Group Containers and then opt to find the folder Microsoft.powerpoint.
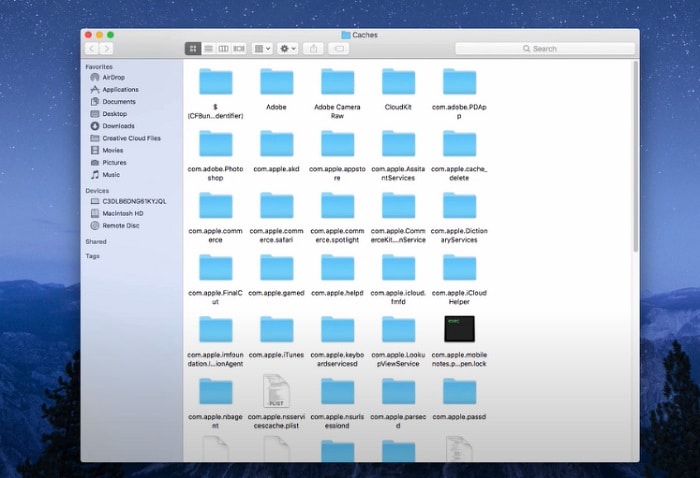
3. Delete this file and all the cache for MS PowerPoint will be cleared.
Fix 5. Install the Audio Recorder/Advance Screen Recorder
Once you have tried all the methods and you are unable to fix the issue, there are high chances that there is some bug in the application. You can easily try out an alternative screen recorder that comes with a diverse set of options.
Students will also need the advanced set of tools to record their lectures and to be able to make a presentation to their school. Everyone has shifted to the online mode of study and students will need to keep the lectures saved with them so they can get references anytime they want. A screen recording tool will also help content creators to create video guides and tutorials for their online audience.
Having a very feature-rich screen recorder like Wondershare DemoCreator will give users a wide range of options. It is one of the screen recorders that have an integrated editor. If you are looking for a tool that can provide you a one-stop solution, this one is here to satisfy all the video requirements.
The software application will allow you to record the screen in high resolution where you will also be able to add a range of transition effects. When it comes to installation, Wondershare DemoCreator will also not take any large space and you will be able to complete the installation in no time. Before we go through the process of recording your desktop, it’s important for you to know all the features that are present on the app.
Key features:
- Add mouse effects: While recording a guide, creators will need to record a guide that is able to showcase everything properly. A major part of the process is that you are able to showcase your clicks along with resizing the pointer. Along with tweaking the pointer appearance, the editor will allow you to add click sounds.
- Preloaded text templates: In a guide, it's quite important for the creator to add appropriate texts. Wondershare DemoCreator will provide users with a set of preloaded templates that they can use to maintain a consistent design.
- Multiple annotations & callouts: This feature holds a special place for the teachers and the artists. The application offers a range of callout designs that creators will get to add to their videos. There will also be an option to add straight lines and arrows to bring the viewer’s attention to a particular point.
- Transitions & effects: If you have recorded more than one video, you will need to add a smooth transition between the two files to give your video a professional look. The editor will also allow you to detect a green screen that is also highly important when you are recording a webcam.
- Adding audio: In any screen recording that you are going to share with your online audience or if you are making any presentation, you will need to have crisp audio. The application will allow you to add an external mic and you will be able to resolve any issue related to PowerPoint mac cannot record audio.
- Speed settings: The video that you have recorded will be saved in its original form. However, the footage can be edited and tweaked in the Wondershare DemoCreator editor. Users will be able to adjust the speed of the video. It will be helpful in fast-forwarding a boring process so that your viewers don't get bored.
- Multiple formats to export in: If you are wondering whether the editor will support the format you are looking for, there is nothing to worry about. Wondershare DemoCreator will give you a wide range of supported formats to export in.
Note: The application will only need 2GB RAM to operate.
Now, without any further adieu, it's time to go through the steps you need to follow to start recording the audio and video of your desktop.
 Secure DownloadSecure Download
Launch the app and based on your system configuration, it will take a couple of moments to load up. A small dialog box will appear up where users will get two options, New Recording and Video Editor.

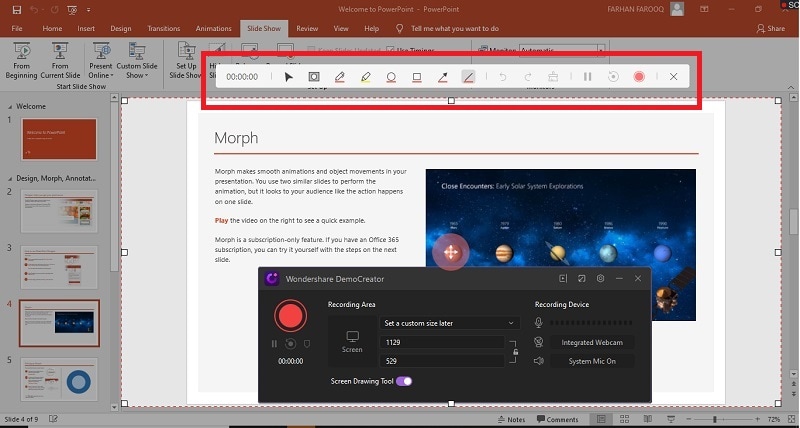
Once you will click the New Recording button, a new dashboard will appear up. Here, a range of options will come up.
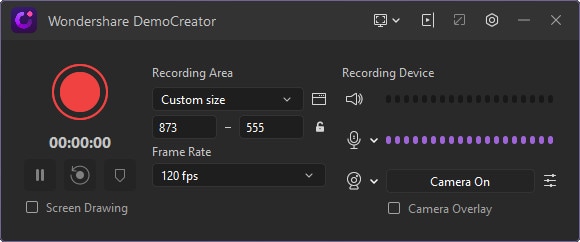
- The dashboard will give you the option to tweak settings like the area to capture.
- Next up, you will also get to enable/disable the webcam and mic. Make sure you are turning the mic on if you want to solve the PowerPoint Mac insert audio recording not working issue.
- The dashboard will also allow you to adjust the video's framerate. If you are shooting something that has a lot of action, make sure that you are setting a higher framerate.
If you want to have better controls, Wondershare DemoCreator will also allow you to set up the hotkeys. For example, you will be able to use F10 to stop the recording and F9 to pause/resume. Once you stop the recording, the interface will automatically take you to the integrated editor.
After you have done all the tweaks, it's time to finally export the file. The interface will also allow you to directly share on YouTube or to any of your social media handles.
AI Presentation Maker
Conclusion
After all the issues that you are facing, we hope that this article must have been a bit helpful to all of them related to the PowerPoint Mac cannot record audio. There are various advantages that you will get when it comes to having a recorded presentation with crisp audio. You must also not worry about the glitches, most of the times these issues can resolve on their own.
However, if not, you can implement any of the aforementioned troubleshooting methods. There is also another option you can go for. Try an alternative recorder that can offer you a range of advanced features. Wondershare is one of them and you shouldn’t also worry about the interface as it’s not complicated, at all. We wish you all happy filming.


