Mouse Recorder for Windows 10

When making a screen recording of a product demonstration, for example, you may want to include mouse movements (cursor movements) in the recording. This can make it easier for you to point to the aspect or section of the product that you are trying to demonstrate, therefore making it easier for your target audience to follow along with the video.
There are various ways that you can achieve this on Windows 10, but perhaps the best way to do it is to use a dedicated third-party video recording program designed to help you do that. We will share with you a tool that we feel is perhaps your best option. But before we do that, let's take a look at how you can capture mouse movements if your mouse has a Macro record button.
Record a Macro
If the mouse you are using on your computer has a Macro record button, you can record any number of mouse movements when running a program or playing a game. You can then very easily edit the recorded Macros using the Macro Editor found in the Microsoft Mouse and Keyboard Center.
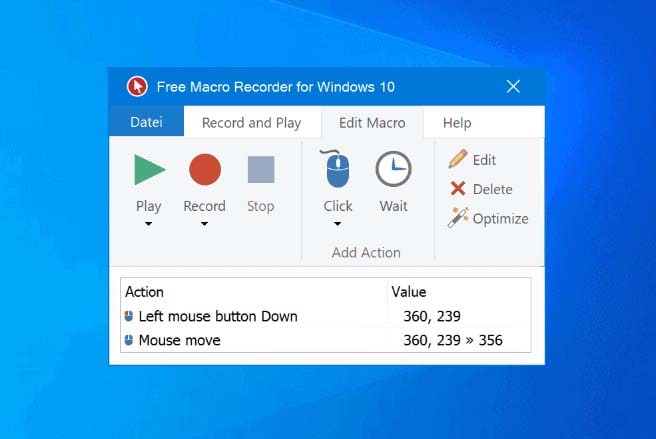
Let's begin with recording a Macro. Just follow these simple steps;
Step 1: Open the application or game where you want to record the macro mouse movements
Step 2: Press the Macro Record button on your mouse. The button will begin a steady glow and the LCD on the mouse will show the "Press Target Mouse Button" icon.
Step 3: Press the mouse button that you want to assign the macro. The Macro Record button will blink and you should see the "Recording Now" icon on the mouse LCD.
Step 4: Now, just perform the actions that you would like to record and the Mouse Recorder will capture these actions. Some of the actions that can be captured in this way include keystrokes, mouse clicks as well as any delays there may be between the actions. The Macro Record button will blink during the recording.
Please note that the Macro recording will stop if there are keystrokes or mouse clicks in 60 seconds. You can however set up longer delays in the Macro Editor Settings.
Step 5: When you are finished with the recording, press the Macro Record Button again to complete the process. The macro will be saved and both the Macro Record button and the LCD will turn off.
Edit a Macro
If you want to edit the Macro that you have just created, follow these simple steps;
Step 1: Click on the button or key that you've configured to run the recorded macros
Step 2: You should see a list of all recorded Macros. Choose the one you would like to edit
Step 3: Select "Edit" to open the editor
Step 4: You should see a number of options to make changes to the Macro
Step 5: Click "Back" to save the edited Macro and go back to the previous screen.
Alternative Way to Record Mouse Movements
If your mouse doesn't have a Macro record Button or you would like additional options such as the ability to record the screen, audio and mouse movements at the same time, you can use Wondershare DemoCreator. This is a third-party video recording and editing tool that is designed to create the kind of product demo and how-to videos that might require the inclusion of mouse movements with the recording.
The program has numerous features to facilitate the recording of all kinds of videos quickly and easily, without compromising on the quality of the vide. These features include the following;
- It can be used to create high quality presentations, tutorials and training courses by recording the screen
- It supports numerous video formats
- It comes with a basic editing suite designed to help you enhance the videos you record
- It can be used to record webcam footage
- It is ideal for gameplay recording since it allows you to set the frame rate and easily select the game that you would like to record.
- It can be used to record and edit audio, making it the perfect solution when you need to add narration to the video
To use DemoCreator to record the screen and mouse movements as well as audio or even webcam as needed, follow these simple steps;
 Secure DownloadSecure Download
Step 1: Install the Program
Begin by downloading and installing the program on to your computer. Once the program is correctly installed, open it and then click on "New Recording" in the main window.

Step 2: Configure Your Settings as Needed
In the next window, you will see 4 tabs that you can use to customize the recording process and settings.
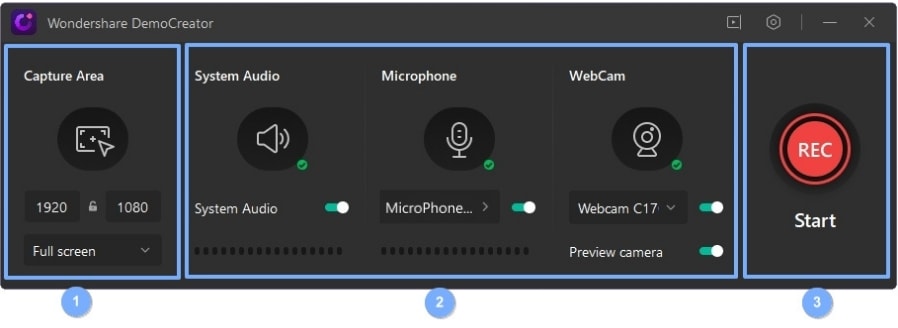
Click on the "Screen" tab and here you can select whether you want to record the full screen or just a section of the screen. You will also be able to choose the frame rate and indicate if you are recording a game or not.
Next, click on the "Audio" tab and here you can decide if you would like capture the "Computer Audio", the "Microphone" or both.
If you would like to capture both the screen and the webcam, click on the "Camera" to enable "Capture" and customize the frame rate as well as the frame rate.
Step 3: Start the Screen recording
When all the settings are just as you want them to be, click on "Start Capturing" or hit "F10" on your keyboard to begin recording.

Step 4: When the recording is complete, hit "F10" again to stop the recording and the video will be saved on your computer.
This program also has editing features that you can use to make changes to the recording in any way you want.
Related FAQs About Mouse Recorder
- What is Mouse Macro?
Macros refer to a sequence of events or actions that you take on your keyboard including keystrokes, mouse clicks and even any delays between these actions. These actions and delays can be recorded and then played back as a way to perform repetitive tasks. As you can probably guess, this can be a good way to play a game that follows a predictable sequence of actions on the keyboard or mouse.
- Is it Easy to Record Mouse Movements?
As you can see from the steps we have outlined above, the process can be relatively simple. It is much simpler if you have a Macro Record Button on your mouse as you only need to press it to begin the recording process. In this way you can easily capture the keystrokes and mouse clicks and edit the recording later.
The process is just as easy when using a screen recorder like DemoCreator. The key difference is that DemoCreator allows you to include mouse or cursor movements into the video and audio recording, making it the best option you have if your goal is to create a how-to or demo video.
- What Does a Mouse Recorder Do?
The mouse recorder allows you to record your actions by tracking the mouse pointer's path as you move it around. Most recorders will also have an algorithm designed to analyze the path the mouse pointer takes to make playback much faster.
- Can I record Cursor Movements in PowerPoint?
Yes, it is possible to record cursor movements in PowerPoint. To do it, hold down the Ctrl Key on your keyboard and then hold the mouse button. Use the mouse to control the laser pointer. You will notice that when you release the mouse button, the laser pointer (cursor) will disappear. This is an ideal way to increase the engagement with PowerPoint presentations that also include narration.
- How Do I Assign a Macro to a Mouse Button?
Macros are assigned in the control panel. Just open the Control panel and double click on "Mouse" and then click on the "Buttons" tab. Here, you should see the "Button Assignment" option where you can click on the box to which you would like to assign a function. Repeat this process as many times as you would like for all the buttons you want to assign and then click "Apply" and "OK" to complete the process.
Whether you are recording mouse movements for the purpose of playing a game or to create a how-to or demo video, the solutions above can help you do that very easily. The process is much easier if you have a mouse with a Macro Record Button, but even if you don't, a tool like DemoCreator is a good alternative.
We hope that we have covered all aspects of this subject. If we missed something or there is something that you would like us to clarify, let us know in the comments section below and we'll do our best to answer all your questions.


