How to Cut video in iMovie [iPhone/iPad/Mac]

We all make videos on our iPhone and iPad devices and sometimes we need to edit them. This editing could be anything, such as add the interesting effects, transition effects, add stickers and so on. But cutting and trimming the video may be one of the basic functions. And iMovie is a great video editing tool suited for Mac, iPhone and iPad.
If you have a long video and want to cut a part of it, then you need to find how to cut video in iMovie. This article is going to help you in understanding the process. But along with this, I am going to help you guide through the process of how to cut a video in iMovie iPhone/iPad and Mac.
Part1. How to Cut Video in iMovie on iPhone/iPad?
I will tell you first about how you can cut videos in iMovie on iPhone/iPad. So, after you have recorded a video through any of your devices whether iPhone or iPad, you can go to Photos. This section contains all the photos and videos present on your phone.
You can easily select the video from the given list and can trim it. There is no particular difference between the iPhone and iPad trimming of videos in iMovie. Apart from trimming, you can cut out parts of a video in iMovie. Below are the steps on how to cut video in iMovie iPhone.

- Simply open your Photos built-in app on iPhone/iPad, now select the video which you want to cut/trim.
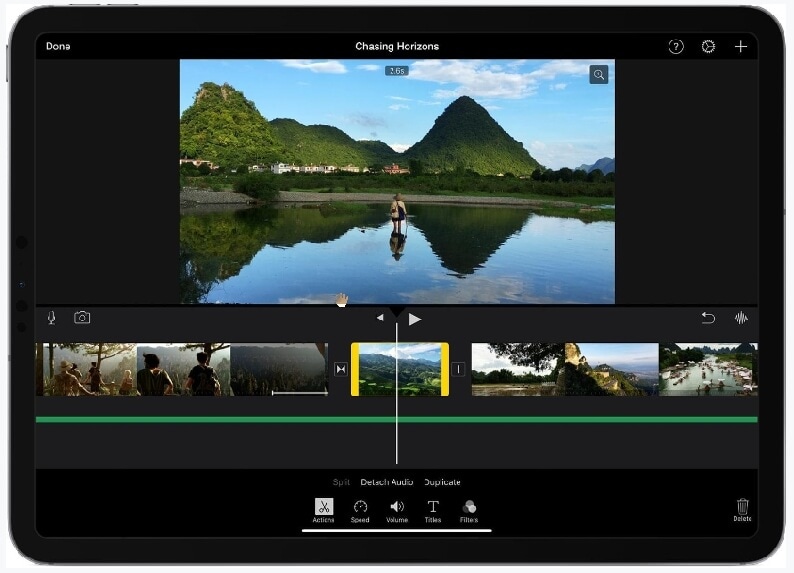
- Open the video and you can see an Edit option in the top right corner of your screen. Click on the edit option and it will open a new window on your iPhone.
- Now you will see a Yellow color window has appeared on the video frames. You can now move the yellow window arrows to any side from where you want to edit the video.
- If you move the arrow to the center from the right side, it will trim the end part of the video.
- Similarly, if you move the arrow to the center from the left side, it will cut the start of the video.
- Or you can move both arrows one by one according to your need and trim the video.
- Once done, you can simply save the video in the Photos as a New Clip.
Part2. How to Trim Video in iMovie in Mac?
The process of trimming the video in iMovie in Mac is a bit different from the iPhone and iPad. In this part you can also know how to cut parts of video on iMovie. After you add video clips and photos to the timeline of your project, you can make a clip longer or shorter. And you can also change the sequence of clips, or split a clip into two separate clips. Let's take a look at how to trim the video in iMovie in Mac.

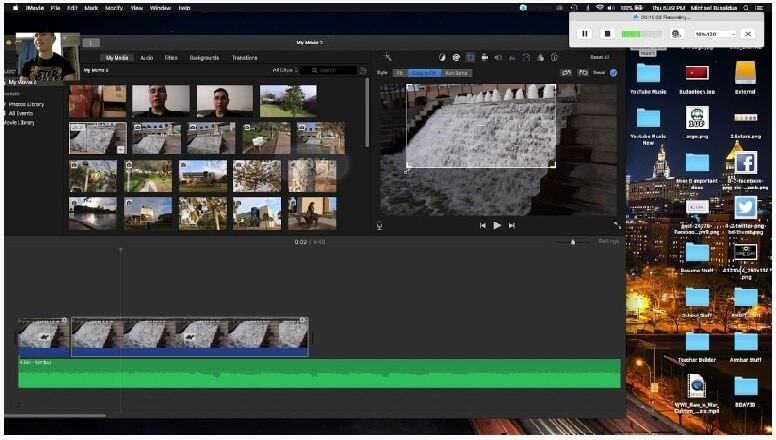
- Open your video in Mac. You can zoom in and out to see more and fewer details respectively in the video.
- Just hove your pointer over the beginning, you will see an arrow point.
- If you want to trim the video from the start, move that arrow point towards the center of the video.
- But if you want to trim/cut the video in Mac from the end, go to the right side arrow point.
- From here, you can bring the arrow point to the center to trim the last parts of the video to any extent.
- After that, you can save the video and it will be stored in your Mac.
Part3. Top 5 Editing Tips in iMovie
Split Video Clips into Separate Parts
To split a video into different parts is an easy task. Whenever you split a video into different parts, you have the power to adjust the duration of every video clips. Moreover, you can then remove the unwanted sections and can add different titles to each split video. Let's take a look at the procedure.
- Open the video and go to the edit option.
- Scroll the timeline to that position at where you want to split the clip.
- You can zoom in on the video to see it with more details.
- The details will help you in splitting the video at the right point.
- After splitting the video, save it, or you can choose to modify the option and save it.
Add Transitions
There are various kinds of transitions that you can add to your videos. You can add transitions between clips to smooth or blend the change from one scene to another. You can have a clip fade in or out, dissolve into another clip, zoom in to another clip, and so on. Moreover, there are both automatic and manual ways to add transitions.
- Go to the iMovie app on your Mac and open your video in the timeline.
- Select the transition from the app which you want to add.
- If you want to preview the transition, just skim it.
- You can add transition now both between the clips and at both ends of the clip.
- A transition icon will appear between the clips for its indication.
Assemble Video Clips
Apart from trimming and splitting video clips, you can also assemble the clips. The procedure is simple: let's have a look at it.
- Open the iMovie app on your Mac.
- Select an event in the Libraries list containing the clip you want to add to your video.
- The clips are present on the right side of the browser.
- Drag that clip and place it where you want to add it in the video.
- After that, save the video and the clip will be assembled.
Crop Unusable Footage
Cropping up clips in iMovie in Mac is an easy task. Cropping is also useful if you have photos or video clips that don't fit within your movie's aspect ratio. In such cases, you can crop the photos or video clips so that they fit.

- Open the iMovie app on the Mac.
- Select the clip in the timeline.
- Click the Crop option to see the options.
- Clip the button and adjust the frame to the extent which you want to include it in the video.
- Resize the frame until you are satisfied.
- Apply the crop by clicking the apply button, and it will be saved.
Delete Unwanted Clips
Most of the time, some of the clips that we have made during our event sessions are useless and unwanted. To do so, you need to mark the video as "rejected" to move it to the Trash, and then empty the trash so that the video is deleted from your hard disk.
You can simply remove them by following the process that I am going to write below:
- Open the Event Library and click to select the event you want to delete the video from.
- In the Event browser, you can select the frames or clips which you want to remove from the event.
- After that, press the delete or click the reject button, and it will be done.
- Move the rejected clips to the trash folder.
- From here, you can permanently delete the clips so that they do not occupy any space.
Part4. DemoCreator - Faster Way to Cut/Trim Video Clips
DemoCreator can be your go-to video editor if you speed in your life when it comes to editing. This editor helps in trimming the videos faster than any other software. You can get the trimmed video in simple steps.
It comes with amazing features that contain not only video trimming, but audio editing, audio enhancement, adding colors, and other transitions to the video clips. Let's have a look at the trimming process of DemoCreator.

The All-in-One Screen Recorder & Video Editor
 Secure DownloadSecure Download
- Launch DemoCreator, and then select the clip which you want to trim.
- Click on the Next button and arrows on both sides of the clip will appear.
- Select the point from where you want to edit the clip and keep moving the cursor to your desired duration.
- Moreover, it will also tell you the time to which you have trimmed the video.
Conclusion
If iMovie is compared with DemoCreator, then you won't be surprised to hear that DemoCreator is far better than iMovie. DemoCreator offers various facilities to you to edit the videos. Some features are audio editing, snapshot, scale videos, time stretch, freeze frame, and much more. You will not find these features on iMovie, that is why DemoCreator is a great software to be used for video trimming and cutting. DemoCreator comes in both free trial and paid options and you can try the free one before paying for the exclusive features.


