How to Cut/Trim Video on Mac

If you are a video editor or YouTuber and want to remove some unwanted parts from your video or clip, several tools are available to do so. But the question is how to cut video on Mac. Most people are unaware of how to trim video on Mac or cut the tape on Mac. Don't worry, as we have come up with some of the very best tools and software that can bring you the desired results for cut video Mac.
To trim video on Mac, you need to read this article entirely, as we have mentioned three tools to trim videos. But you will have an option to choose which one better suits your requirements and the best one. All the tools are explained with the images, so you don't need to worry about it.
Part1. Cut/Trim Video on Mac with DemoCreator
Wondershare DemoCreator is a video capture software and editing tool as well. It has various functions such as capturing gameplay footage, recording your screen, capturing camera footage, and audio capture features.Moreover, it supports the Windows and Mac systems. If you want to trim video quickly on Mac, then DemoCreator is a nice Mac video trimmer for you.
Key features:
- Quite a flexible recording can be done and edit the video straightforward with this tool.
- Trim video in easy steps, fast and efficient.
- It has the compatibility of taking screenshotsand snapshots.
- You can cropany videointo the desired sizeusing this tool.
- Other additional features include Sticker Effects, Cursor Effects, Transition Effects, and also Caption Effects.
How to Trim a Video Using a DemoCreator?
Step 1: First of all, download and launch DemoCreator.
Step 2: To select the video to trim, click"Import" to choose the media files you want to trim. Then drag the media files to the timeline. It can be video, audio and images.
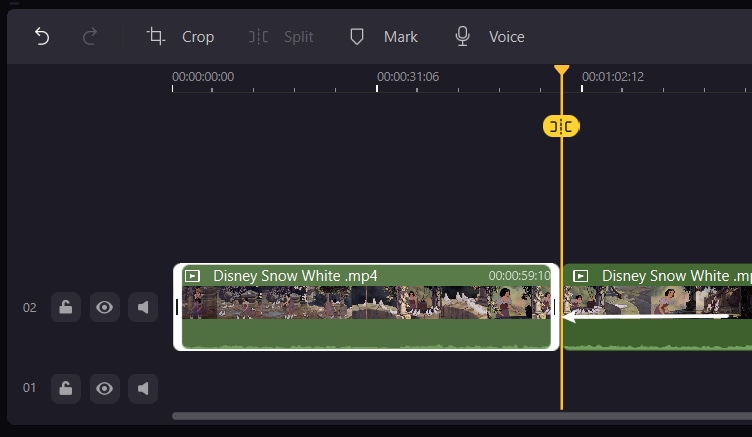
Step 3: To trim the video, select the clip and then cursor to the clip edge until the icon below appears, then drag it forward or backward to cut off the unwanted start or end.
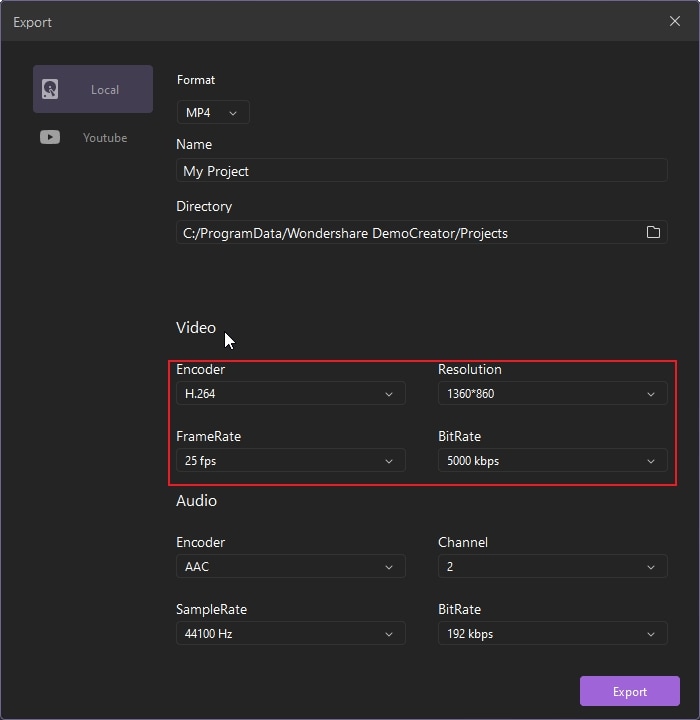
Step 4: You can export your trimmed video in MP4, MP3, or MOV format after concluding the trimming procedure. Apart from setting the video's directory, you have the autonomy to set the resolution, frame rate, bit rate, and specific video settings in the Export Window.
Part2. Use QuickTime Trim Video on Mac
If you want to know how to trim QuickTime video on your Mac, use the QuickTime Player app included on your computer. You can easily cut a video on your Mac using the free application QuickTime Player. QuickTime Player allows Mac users to play, edit, record, and share videos and images.
Key features:
- It can deliver synchronized graphics, sound, video, text, and music.
- QuickTime provides an easy interface to edit.
- Images can also be viewed through this software.
- It can also work as an audio player.
- The tool offers live streaming, Internet TV, and radio through a web browser.
- One can also use it as a Virtual Reality (VR) tool.
How to Trim Video in QuickTime?
Step 1: Launch QuickTime to trim video.

Step 2: Once QuickTime launches, click "File" and then "Open File" from the top menu bar of QuickTime. Select your video from the location on your Mac.
Step 3: With the video open, select "Edit" from the top menu.
Step 4: In the dropdown menu, select "Trim" or hold "command" + "T" on your keyboard.
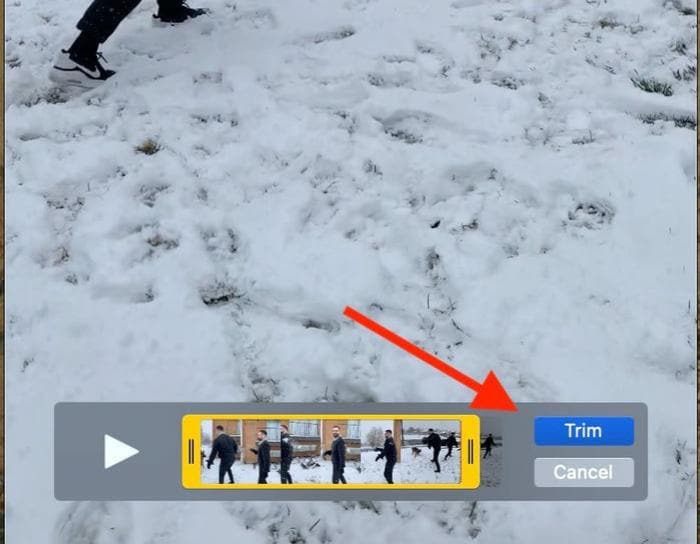
Step 5:A yellow trimming bar will appear around the length of your video at the bottom. Drag the "handles" to trim out the parts that you don't want. Everything inside the yellow bars will remain. Use the handles to trim your video.

Step 6:After you've trimmed your video, select "Trim" on the right. You can also preview your video by selecting the play icon at any time during the editing process. You can also learn how to trim the middle of a video on QuickTime by following these steps.
Step 7:To save your finished movie, click "File" and then "Save..." from the top menu bar.
Select "Save..." from the dropdown menu. Name your trimmed video, select where to save it on your computer, and then click "Save."
Part3. Trimming Video on Mac Using VLC
VLC is a free, open-source media player. Tt's a streamlined tool that's easy to use and plays everyvideotype. These features make it a popular tool for anyone who watches videos on their computer and doestrim video VLCon Mac.
Key features
- It is a free software to create Audio and Video Effects.
- You can also trim a video after editing is done.
- Users can also record videos on the desktop.
- Any video format can be converted with this tool.
- You can stream all types of videos.
- You can also take a snapshot during the video.
How to Trim a Video Using VLC?
Step 1: Start VLC and open the video that you want to trim.
Step 2: Head to the point in the video where you want to start your clip.
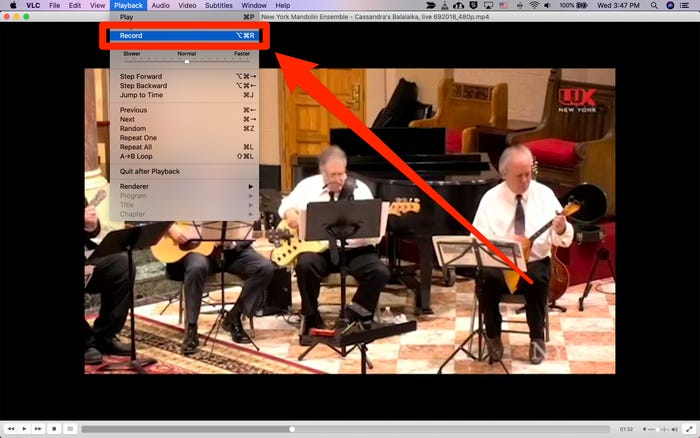
Step3: In the menu bar at the top of the screen, click "Playback," and then click "Record." You can press Option + Command + R to start and stop recording.
Step 4: Start playing the video again. Play it until you want to end your cut, and then click "Record" in the menu bar. Or, if you want to include another clip in the same video, you can also skip to the start of that clip and continue recording.
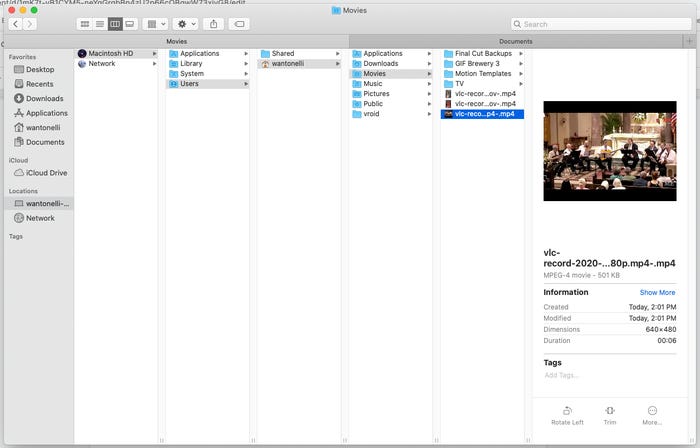
Step 5: Once you click "Record" the second time, this will save your new video to your Mac's "Movies" folder. It'll be named "vlc-record." You can also change the location where you have saved recordings through VLC's "Preferences" menu.
Part4. DemoCreator vs. QuickTime vs. VLC - Which One is Better for You?
Those three tools both own great key features, but did you really know which one is better for you. QuickTime focus on being able to handle many digital videos, media paragraphs, etc. But it will be limited if you want to edit or record more. VLC as an open-source media player, for ordinary users, it may be relatively difficult to use, but simple video processing is feasible.
DeomoCreator emphasizes more in screen recording and video editing, those 2 big features can use used simultaneously. If you want to trim a small section, don't want to download the video, you can use the DemoCreator to record the sections that you want. So consider all the features that if you need a simple and efficient trim video tool, DemoCreator may be better for you.
Conclusion
You can see the difference between all the tools listed above. Now you can choose which is best according to your requirements. All of the software can be accessed easily on Mac.
Trimming, cutting, or editing videos is something that everyone needs nowadays. We have described every tool available on Mac. Please don't waste your time trying out different software as we have mentioned all the steps with images to make it clear to you.


