Top 4 Easy Tricks to Remove Black Bars from a Video

Its not fair when you have a bigger screen size but cannot see your desired video in full screen. It often happens when you start watching a video on your television or PC. There are awful black bars on both sides, right and left, sometimes even on the screen's top and bottom. This usually occurs because you are trying to play a video of 4:3 aspect ratio when your device (High definition TV and PC monitors) has a 16:9 aspect ratio. However, video black bar removal from the video fills in space beside the video.
 Secure DownloadSecure Download
Top 4 Tools to Remove Black Bars from a Video
Dont get frustrated with the black bars beside; you can remove it by only using some video tool or video editor tool to give that pleasure of full screen. As there are several video tools available online, you need to look for the top black bars remover. There are tools like Beecut, Moviemaker, Filmora, DemoCreator, any others that resolve the problem of black bars in videos. The top 4 tools are given below with a detailed description of how to use it.
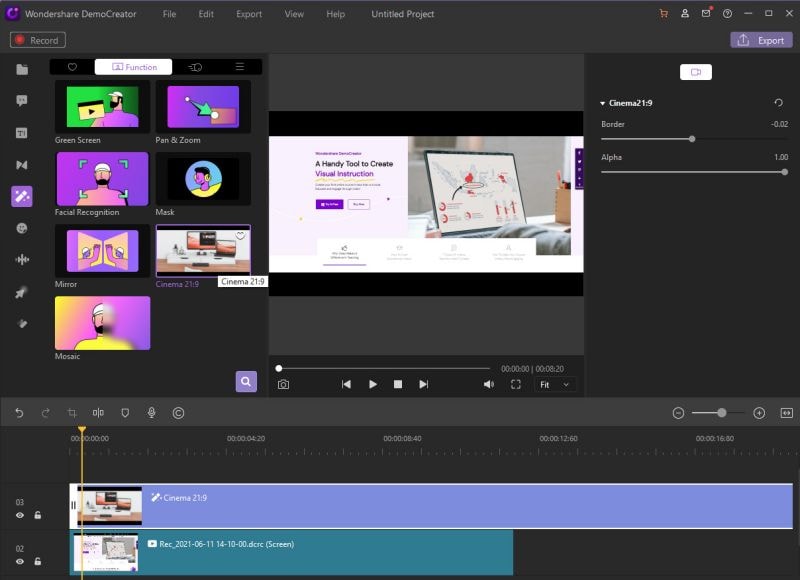
Wondershare DemoCreator:
This one of the easiest to use video tools compatible with both Windows and iOS. You can capture and record videos from your computer screen or even webcam of tutorials, presentations, online classes, gameplays, or any other video. Edit your recorded videos easily and instantly. This lets you see the videos at your time and ease. Resize the clips, remove black bars, or save them in other formats, everything can be done through this all-in-one video tool.
Lets have a better look at the pros and cons of this tool:
Pros
- Download it for free. It allows all the users to have free access, which will enable you to use all the features it but no tech support or upgrades.
- Record from your played video's computer screen on tutorials, presentations, or online tuition classes with limited access to see it later or work on it. You can even record from the webcam in case you Want live record something.
- You can edit the videos in many ways. Crop black bars; remove black bar method, change speed (frame per second), etc.
- Extract the video files in any format you prefer, like GIF, MOV, MP4, etc.
Cons
- There are no such cons for this tool except the watermark. You can remove the watermark by buying the subscription plan of $23.99/year or $47.99 forever with a perpetual license.
Freemake Video Converter Gold Pack:
This is the most convenient yet basic video editing tool that does most of the work itself. This tool comes with many advanced features like auto backup and auto black bars remover. This is the premium version of the Freemake video converter, so a Gold pack is beside the name. Just like its name, it provides you some gold features that can brighten up your recorded video editing one step further. Lets check its pros cons.
Pros
- There is no app branding or advertisement for the Gold pack, unlike the regular Freemake Video Converter. Edit videos without any interruption of watermark or branding.
- Removing black bars from the videos is even easier now with the advanced automatic black bar remover present in this tool.
- There is a creative option for DVD menus, which gives Hollywood's fantastic effect when buying a DVD. Set pictures and text to create a Hollywood movie styled DVD menu.
- The auto-backup option is a lifesaver, which saves your work automatically. No worries of accidental data loss. Keep your work in progress safe and return to your project anytime.
Cons
- This gold pack of Freemake Video Converter is not free; its a payable premium version. However, the cost is very less ($19 for unlimited, $9 for one year).
Since the gold pack comes with an auto black bar remover, you usually dont have to remove that. Open this tool, select your video file and go to Black bars from the top bar. You can keep or delete the bars, and you will be able to see a preview. If you want to know more about removing black bars tricks, you go through the steps mentioned below:
- Start the tool and add the required video by clicking on the ‘+Video button.
- Now go to files and click File > Option > Black Bar, then select ‘delete black bars.
- You can choose the preferred video format from the bottom like MKV, MP4, AVI, etc. (high-quality output)
- The conversion takes very little time (high-speed conversion) depending on your file size.
VirtualDub:
This is one of the classic tools to edit video components, that comes in 32-bit and 64-bit versions. This is useful and recommended by many users, which makes it stand in the top list. This tool is unique and has its terms of compatibility. It only supports AVI files and MPEG-1 format. Lets have a look at its pros and cons:
Pros
- This is a completely free tool where you dont have to spend a single penny.
- Both video and audio compression can be done here.
- There are some advanced features like Noise reduction, optimized disk access, verbose monitoring, fractional frame rates, and many more, which helps you do every kind of editing of a video.
Cons
- As it only supports AVI files and MPEG formats; if you want to work on MP4, MOV, or any other format, you have to convert it to AVI first.
- It could be a little complex for the beginners; however, it's convenient when you get into it.
Now that you know about the features, its time to know how to use it. The steps to remove black bars from video by using this tool are given below:
- Download and run this program on your computer.
- Drag and drop the required video file (converted into AVI format) directly to it.
- Click Video > File > Add > Null Transform > Ok, to crop the video file. You need to click OK to save every change you make or want to make.
- Another window will be opened to set your borders to crop. Set the borders in a way so that the video black bars get removed, and the actual video size remains.
- When you are done with cropping, go back to Video again.
- Choose ‘Compression to set the necessary codec for your video. The codecs will be installed on your computer automatically.
- In case you need some audio compression to make, you can do the same process by going to ‘Audio, and eventually to compression.
- Now that your video is ready for decoding, click on File > Save as AVI to get your video in AVI format without any video black bar.
XviD4PSP:
One of the unique video tools made for special video and audio components. Its advanced features like filters, color coding, audio, video encoding, etc. make it stand out. Its a free and easy to use application which helps the user much. It is an intelligent program that does most of the edits automatically, saving users' time instead of manually. Lets see the pros and cons of this tool to get a better idea:
Pros
- It is a free tool and supports multiple languages. This allows all kinds of users to get access to it.
- It has a user-friendly interface to edit videos with ease.
- It supports most of the video formats AVI, DV, MP4, M2TS, MKV with , MPEG2 video, etc. AAC, MP3, AC3, and other audio formats re supported too.
- You can convert from one format to any required format as it supports all the formats. The High-Speed Conversion takes only a while even to format bigger files.
- Colour correction and filters are there to retouch your video files and make them even more visually pleasing.
- High-quality output for better resolution.
Cons
- Even though the output quality is good, sometimes the videos get pixilated depending on different video players. The playback quality is excellent with a VLC media player, Mplayer, etc. It gets worse with windows media players, Divx and others.
Removing black bars from the video can be done pretty quickly with the help of this tool. You can get it done automatically or manually if you like.
Automatic process:
- Run the program and add a video file by clicking on ‘Open. Select the video, and it will appear on the tool.
- Now click on the ‘Video and choose ‘Delete Black Borders from the drop-down menu.
- The tool will automatically remove the black bars and provide a preview to see.
- Now you can choose your required output format, codec, and Click ‘Encode to get it done.
In case you want all your videos without black bars and crops often, you can click on Settings > Auto Crop > All files. This will automatically remove all the black bars whenever you open a video.
Manual Process:
Click on Video > Resolution/Aspect to crop top/bottom and left/right by pixels. But its not easy to crop by pixels so you can point with grey lines to crop an area, and then click ‘OK. Then encode your video like mentioned above.
Comparison
Here is a comparison table of the top 4 video tool depending on the significant aspects of it:
|
Software Name
|
Speed
|
Complexity
|
Quality
|
Input/Output format
|
|
Wondershare DemoCreator |
High |
Low |
High |
Many/many |
|
Freemake Video Converter Gold Pack |
High |
Low |
High |
Many/many |
|
VirtualDub |
High |
High |
High |
AVI, MPEG-1/AVI |
|
XviD4PSP |
High |
Medium |
High |
Many/many |
Conclusion
As there are a plethora of video editing tools available online, people often get confused about which tool to use. To remove blacks bars from the video, users are recommended to use easy and convenient tools and free ones. You dont want to spend money just to watch your daily video on a bigger size. Try to use the automated video black bar remover since it saves a lot of time and avoids the precise manual effort to make pixel-perfect video crops.


