

How to Record Screen as a Video without Watermark?

These days, screen recorder computer platforms are getting increasingly mainstream and being applied to numerous cases. On market availability, many screen recorders can assist you with how to screen record a video with sound, record ongoing interaction, and record some different happenings on your PC without any problem. In any case, you will find that there consistently will be a watermark on your recorded video documents in the wake of recording. In some cases, you might be irritated by those watermarks, which will make the video practically futile. Plus, you can also face copyright issues if you're about to upload the record screen to video to your specified platforms. But worry not, here we come up with the solutions for you. Stick with us.
Many screen recorders can assist us with recording interactivity, video calls, and other screen exercises, yet you may locate that after recording a screen with some free screen recorders, there is a watermark in your recorded recordings. There are many screen recorders on the lookout, that can make record screen video mac more effectively than ever and that's only the tip of the iceberg. That will make your video looks somewhat odd. On the off chance that you need your chronicle video with no watermark, you may require an incredible screen recorder with no watermark restrictions. To catch whatever, you are doing in your work area, you need a screen recorder. With regards to screen catching software, a free recorder will consistently be your best option.
The Best Screen Recorder & Video Editor: Wondershare DemoCreator
For the individuals who are looking for one apparatus which is simple and allowed to utilize and the answer to how to record screen video in windows 10, DemoCreator Screen Recorder should be their savvy decision. It is a handy application that you can use on the two Windows and Mac OS. What's more, it upholds recording video and sound from your PC at the same time. With an easy to understand interface, you can discover all the choices without trouble. There are a few discretionary modes for you to take. Any piece of or full screen can be recorded.
You can likewise add a web camera into the screencast together. Sound from the framework and receiver are both upheld during recording. Furthermore, you can choose one framework altogether and its codec also at the time of exporting your masterpiece with this toolkit. Without limitations on recording time and inconveniences of watermarks, you can catch recordings the same number as you like.
Special Features:
- An implicit sound and video supervisor.
- Share recordings to online media locales like YouTube.
- Sleek interface for usability.
- Annotation adding, cursor featuring, and screen captures during recording.
- Output the various number of mainstream video high-quality formats, for example, MP4, WMV, MOV, AVI, MP3, and so forth.
- Support to record any region of the screen, webcam, sound, and ongoing interaction.
- Compatible with both Windows and macOS.
How to Record Screen as a Video without Watermark?
The best favorable position of this screen recorder is that the activity can be very simple, particularly for a beginner. At that point for the individuals who need all the more additional capacities, DemoCreator Screen Recorder is worth an attempt. Notwithstanding the capacities referenced above, it additionally covers screen capture and undertaking scheduler capacities. Peruse the steps below and you will know it better.
Step 1: Download and install the DemoCreator program
Before we dive into this powerful video editor and screen recorder, you need to install this software so you can get used to it on time. To proceed with the download, hit the below links to get the software right within your PC.
 Secure DownloadSecure Download
Step 2: Click the "Capture" button and set up your recording preference
In the next step, as soon as you open the software, hit the Capture button to get into the recording interface by this software which is for sure a handy and prompt interface for a beginner.
Step 3: Start recording
This step is the key as it'll start your recordings as soon as you hit the Recording button which is situated as a red-dotted button in the recording interface.
Step 4: Recorded Video Clip
After you hit the stop button, now your recording will be added to the software interface promptly so you can enjoy the preview of the video as well.
Step 5: Choose "Fast Export"
In the last step, you can easily export your recorded video to your required format well according to your expectations with this software. To go for the Fast Export option, right-click on your recorded video in the software and select the Fast Export option which will directly export your video to your required destination with fingertips.
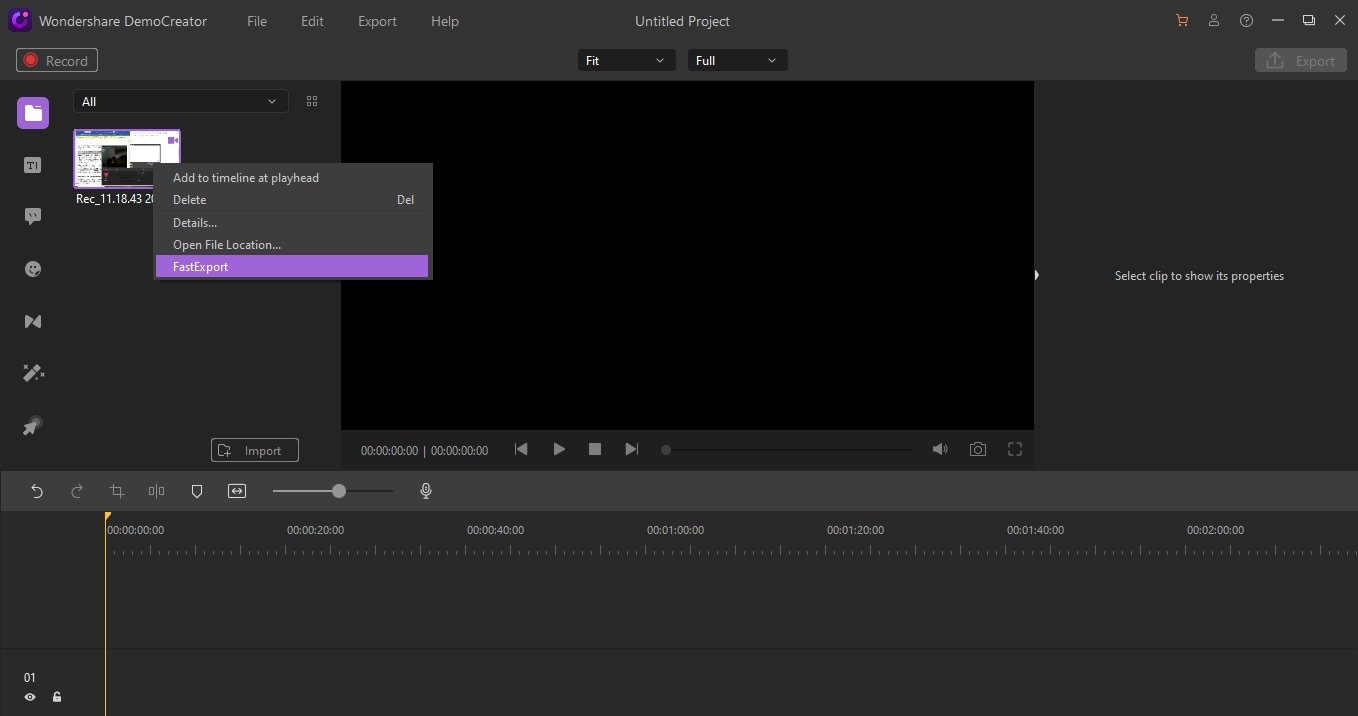
You can export your recording video without a watermark for free by following these steps. However, this feature is limited to recordings of less than three minutes. Hence to avoid this issue and for long-tail recordings, you need to configure the following steps for your videos without a watermark and this will only be possible with the paid subscription of this software which also comes with a cheap rate.
Secure DownloadSecure DownloadNow as you'd have bought the subscription of Wondershare DemoCreator, now you can freely record the screen without watermark for your given number to unlimited time and with all the software special features. Follow the steps below to learn how can you do that.
Step 1: Download and install the DemoCreator program
Before you embark on your first recording project with this software, download the software from the below links and install it with some clearer instructional set as soon as you open the downloaded file.
Secure DownloadSecure DownloadStep 2: Click the "Capture" button and set up your recording preference
Now as you've opened the software after the prompt installation, you shall face the starting window which asks you to select the purpose. Hit the Capture button from the options available on the screen which will take you towards the recording interface of this software without any delay.
Step 3: Start recording
Now you need to start the recording by simply hitting the Start recording button which is the red dotted button available clearly on the software recording interface.
Step 4: Recorded Output File
At this point, when you've hit the stop button to your recording, your screen recorded clip has been added to the software media files section within no time and from there you can now proceed towards the further editing process.
Step 5: Drag and drop the recording clips on the timeline
Now to proceed with the editing of the recorded masterpiece, you need to add it to the timeline which is the editing environment of this software.
You can edit video, audio and add as many effects as well as titles and annotations to your video with effectiveness and promptness.
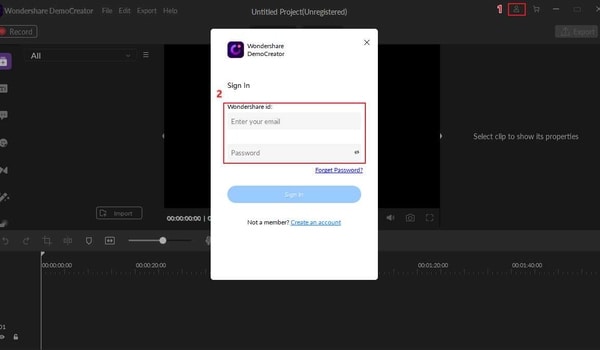
Step 6: Log in with your Wondershare ID
On the software screen, you can see at the top-right corner a login button to the Wondershare account, which provides you the entering interface to this software's full-featured altering abilities. Which also includes the unlimited minutes of recording and editing of your recorded screen.
Step 7: Export with your wanted format
In the final step, hit the Export button in the front of the software interface which also allows you to make necessary enhancements to the output format of your video which means you can easily change the format and the dimension of your video accordingly.
You can also export it directly to your associated YouTube channel with just a few clicks right within the Export button interface. This means you can easily upload your watermark-free project file to your online platforms quickly and efficiently. As this method comes up with no recording time limitations.
Conclusion
We need a screen recorder in our day by day life to make instructional and fun-filled recordings, record ongoing interaction or video call with families or colleagues. Nonetheless, there is an excessive number of screen recording tools available for you to pick from. You may choose one of them alternatively. At that point, you frantically found that there is a watermark which makes the record screen as a video futile. To liberate you of the difficulty, we select the best free screen recorder Wondershare DemoCreator without a watermark in this article. Which, fortunately, comes up with the options for you to opt for your suitable one.
In the above article, we've already explained both the methods which have their specifications, the trial version although allows you to get used to of the software, with limitations of time and other recording features as well but with the cheap subscription of this software, you can make a big difference with the time as well as the recording abilities and the powerful features. Hence, we recommend buying an easy subscription to this software so you can enjoy the software recordings and powerful watermark-free high-quality videos.


