


Top 8 Video Editor with Zoom in Effect (How to Use)

Video editing tools are one of the most important software used in the video production process. While most of these tools are developed for specific purposes, others are multifunctional. In this article, we will be looking at a few video editing software with a zoom-in feature. This feature allows you to magnify any part of your video quickly and easily. Here are the top 8 video editors with zoom-in effects.
Part1. Wondershare DemoCreator
If you need a simple, but yet powerful video editing software with a zoom-in video effect, then Wondershare DemoCreator is the perfect choice to make. This software does not only help in video editing but it is also used in the magnification of images/video clips. Wondershare DemoCreator can be used to add text, audio, music, and filters to videos. Most award-winning videos are produced with this software, hence, it's imperative you add it to your video editing tools.
With the latest update, Wondershare DemoCreator introduces Smart Zoom, an AI-powered zoom-in animation tool that enhances video clarity and engagement. This feature automatically tracks mouse clicks, movements, and interactions during screen recording, then intelligently applies Pan & Zoom effects in post-production. Unlike traditional zoom effects that require manual adjustments, Smart Zoom optimizes focus areas dynamically, making it ideal for software tutorials, "How-To" guides, data visualization, and product demonstrations.
You can click here to get the detailed Zoom in Effect Guide with Wondershare DemoCreator
 Secure DownloadSecure Download
Compared to competitors, DemoCreator’s Smart Zoom ensures a smooth, professional animation effect by dividing the recording area into multiple sections, preventing erratic mouse movements from disrupting the viewing experience. Additionally, users can fine-tune the zoom area, duration, and intensity after recording, significantly reducing manual editing time while maintaining high-quality instructional content. This makes DemoCreator the top choice for educators, trainers, and content creators looking to streamline their workflow and enhance video engagement.
Steps to Use Wondershare DemoCreator and Its Zoom in Effect
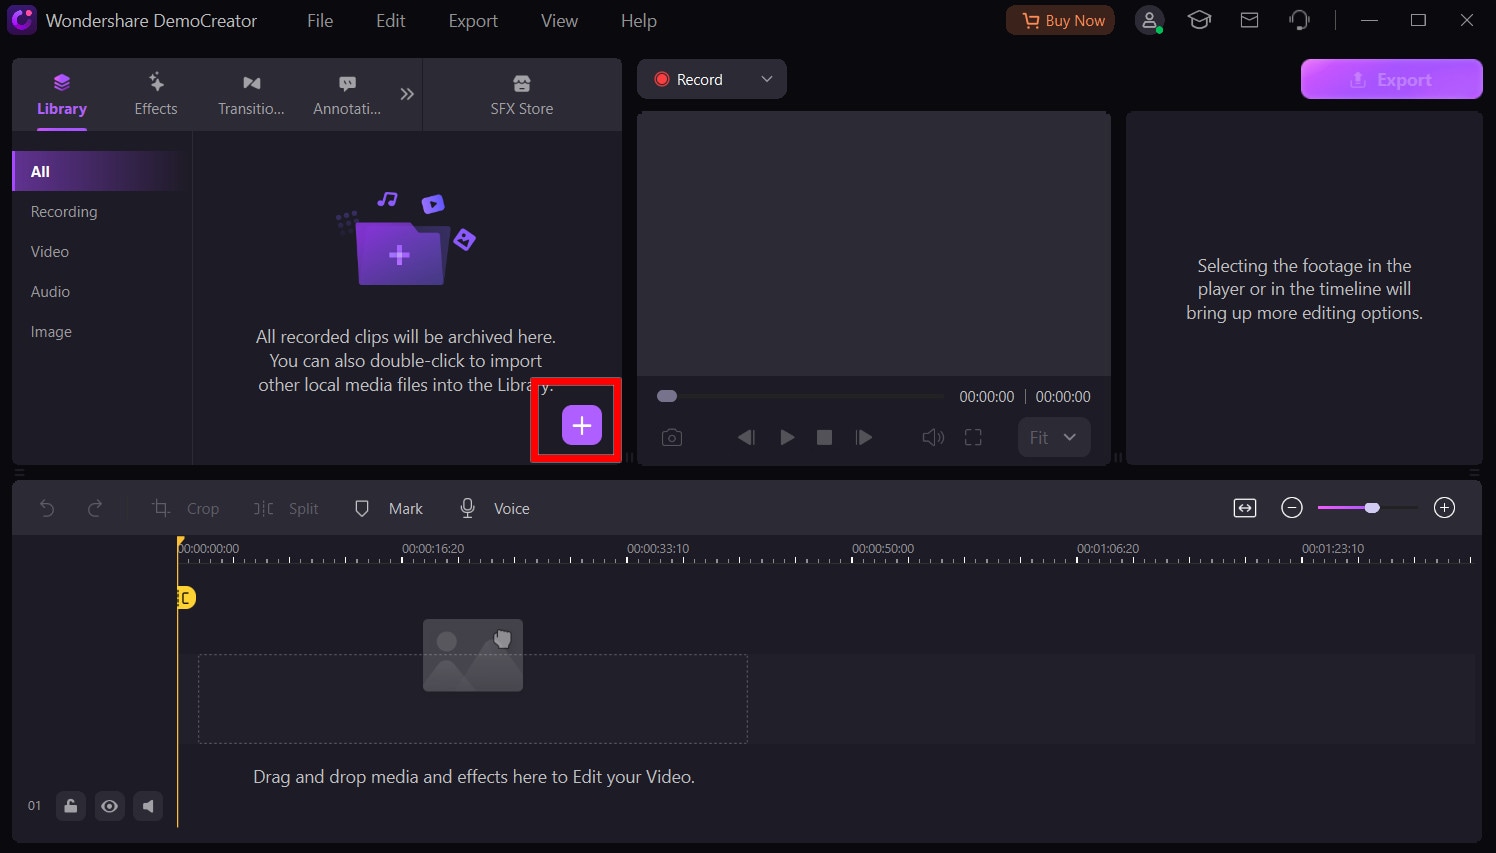
Step 1: Import the Files
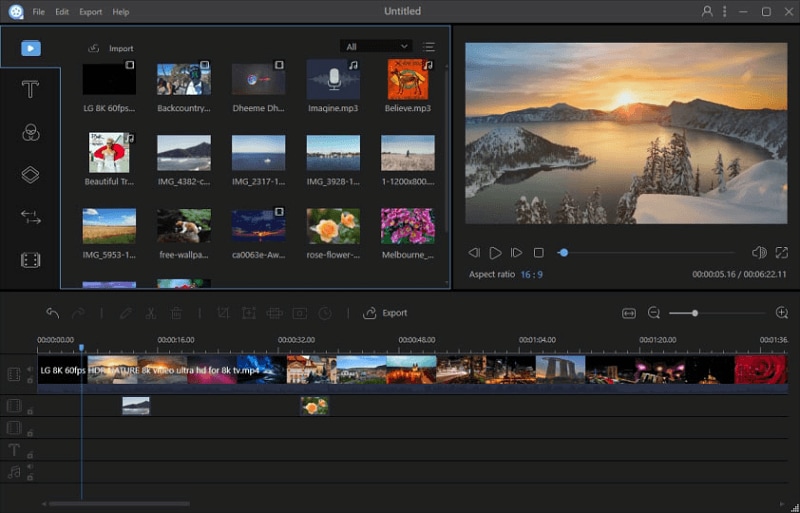
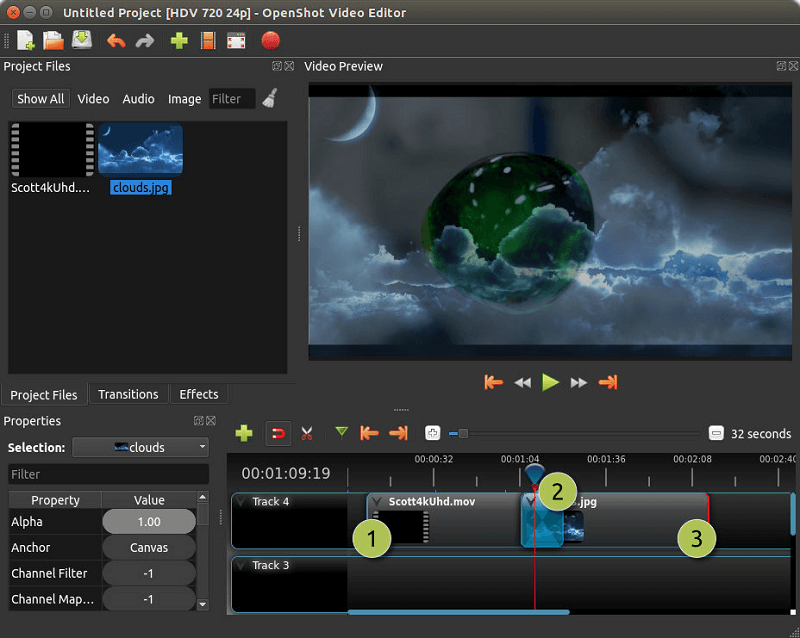
Your next step is to run DemoCreator from the Start menu of your PC. You will be astonished by the intuitive UI of DemoCreator, as seen here:
Step 2: Edit Your Video and Scale It
Simply drag and drop your imported file into the timeline to begin basic changes like resizing and composition.

Step 3: Zoom In
To add a Zoom effect from the menu, examine the transitions and choose the Zoom transitions that you can sample. After choosing your favorite, just drag it into the timeline and enjoy. To do so, go to the transition menu and choose your favorite to preview in the preview window.

Step 4: Video Preview
Then, by clicking on the effect you just added to the timeline, you can see the effect you just customized.
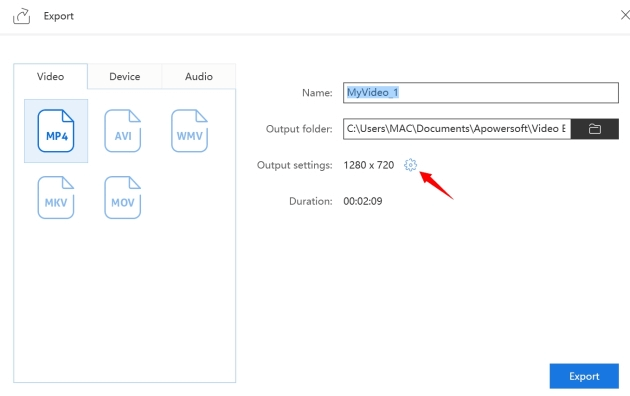
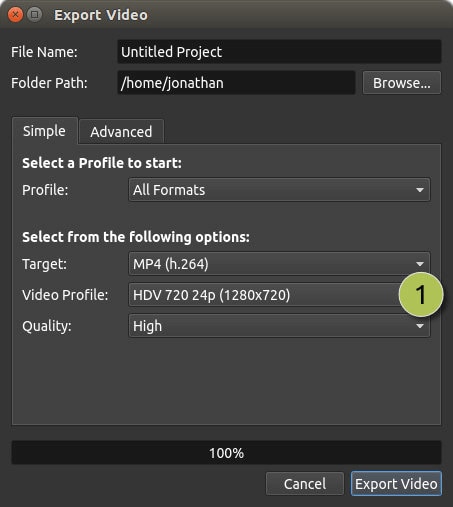
Step 5: Export
After applying your preferred Zoom effect, you may now store and share straight. To begin exporting, click the Export button in the upper right corner of Wondershare DemoCreator.


The Best Video Editor
Secure DownloadSecure DownloadPart2. DaVinci Resolve
DaVinci Resolve is also one of the sophisticated free video editors and color-grading tools utilizing which you may edit and produce videos like a professional. It contains loads of extensive video editing features that can be used to trim, insert objects, slip/slide numerous frames, superimposes, swap/shuffle edits, overwrite/append edits, and so on. Not only that, but it also combines hundreds of additional capabilities like optical re-framing, optical flow retiming, lens correction, keyframe control, transitions, transformations, scaling, etc. One of the nicest things about this video editor is that it also gives the “Zoom” tool to assist you to zoom certain video segments with ease.
DaVinci Resolve is a web-based program designed for a variety of photo/video editing purposes. Some of the functions of this software include; the addition of texts, music, audio, and videos, conversion of photos to videos, adding of effects, filters, and many others. It can also be used to zoom in on video clips. If you need to create an award-winning video, then you should consider using the DaVinci Resolve video editor.
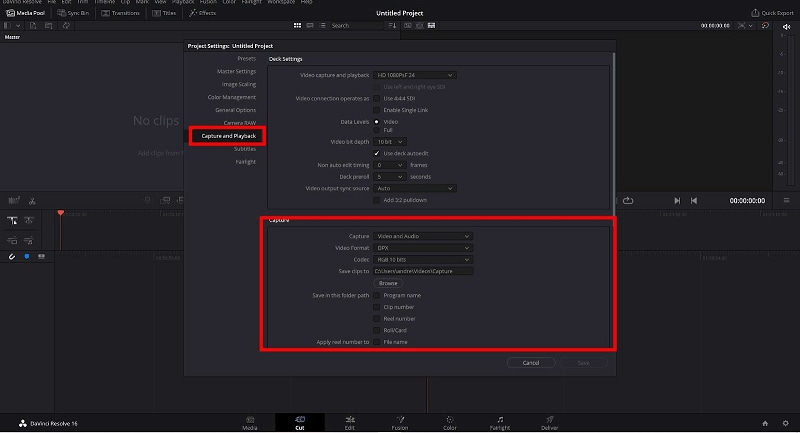
Step 1: Launch the Program
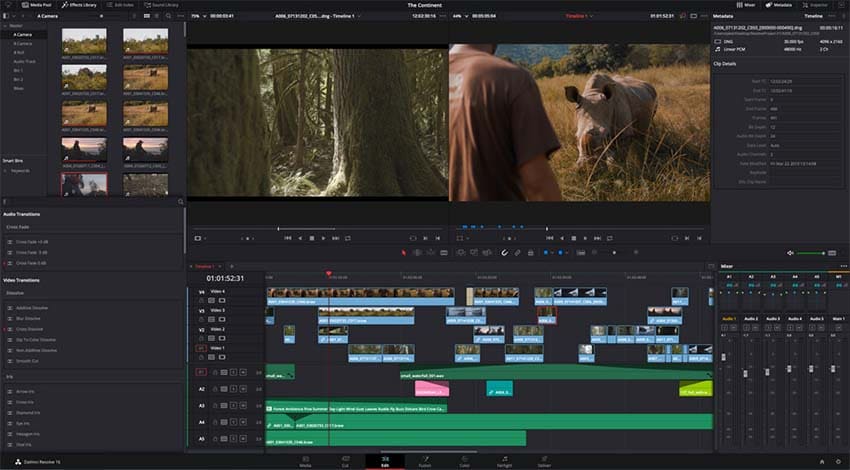
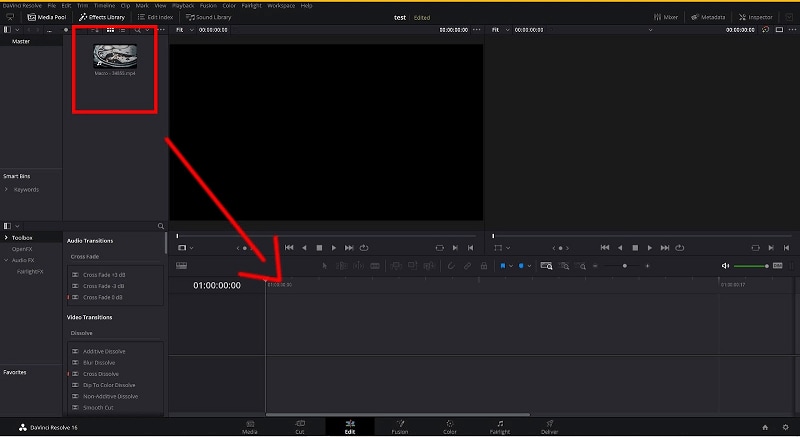
After launching DaVinci Resolve, click on the “Media” tab and then browse your discs to import a video or just drag & drop a video file. When you’re done importing a video file, just pick the “Edit” tab at the bottom to bring up the editor. On the left of the editor, you will see the imported video which you would need to drag & drop on the timeline.
Step 2: Add the Recording
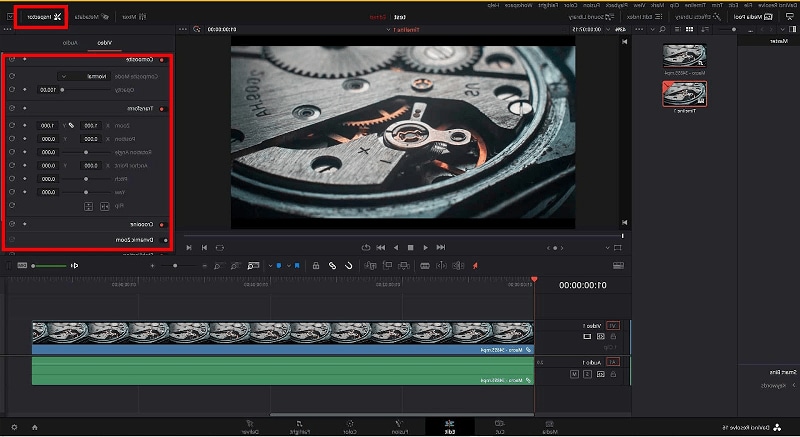
After that, just choose the movie on the timeline and then tap the “Inspector” button at the top of the editor. As soon as you do so, numerous editing parts will emerge including Composite, Transform, Cropping, Retime & Scaling, etc. Under the “Transform” section, you will notice an option titled, “Zoom” coupled with an X and Y field.
Step 3: Edit with Zoom Effect
Now, all you need to do is put the marker at the beginning point of the video segment on the timeline. Choose the video clip you want to zoom in on, then open inspector. After that, click on the “Keyframe” button on the right of the “Zoom” option to add a keyframe to the starting position. Scroll down to find the dynamic Zoom icon and turn it on. Select the effect of your choice. Once you do that, drag the marker to the end location of the video segment that you want to magnify.
Step 4: Export the Edited Content
After that, you can go ahead and alter the value in the X and Y box connected with the “Zoom” option and click the Enter key. As soon as you do so, the zoom effect will be applied to the chosen video segment based on the X and Y values supplied by you. When you’re done adding zoom to the video segment, you would need to alter the X and Y values to their default values so that the remaining video would play as usual. For this, just insert the marker anyplace after the finish position and then only modify the X and Y value.
After you’re all set, you may save the altered movie which will have the zoom effect applied by you. To save the video, just go to the “Export” page and then pick any of the accepted formats like MOV, or AVI.
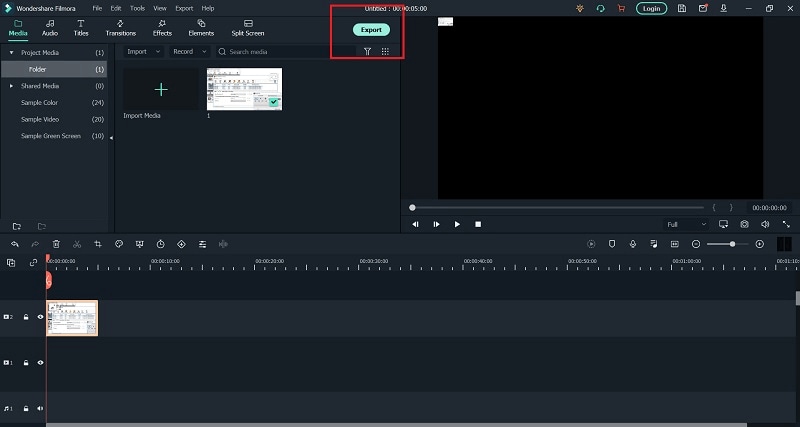
Part3. Wondershare Filmora 12
Wondershare Filmora 12 is another powerful video editing software created for editing videos. It has a zoomed-in video effect which is often used to zoom any specific part of a video or photo. The tool has an intuitive user interface that can be navigated around by novices and professionals in the tech industry. Wondershare Filmora9 also supports text addition, filter, audio, and effects.
Step 1: Download and Install Filmora.
Install the recorder after downloading the installer. When the installation is finished, your recording interface will be launched automatically.

Step 2: Choose the Editing Video.
Choose whether you want to record the entire screen or just a portion of it. Create your recording zone with the mouse.

Step 3: Configure/Export Your Edited Video
Right-click on the video you want to zoom in on your timeline then choose crop and Zoom from the submenu or use the Alt+C key on your keyboard.
You will find the Crop button in the middle of your PC screen. Click on it and open the editing window where the video you want to zoom in, then crop the part and crop out the part you don't need.
Depending on the type of video you want to make, choose whether to edit or export the Zoomed video. The purpose of the video is the most important factor in deciding which model of audio recording to use.
Part4. Windows Movie Maker
Windows Movie Maker is a basic video editor which enables you to make attractive movies from your photographs and videos. Apart from enabling you to generate videos, it also gives some basic editing tools with which you may add music to movies, add animation transitions, add visual effects, etc. It also comes with some animated zoom transitions utilizing which you may zoom into any certain area of a movie.
This is an excellent video zoom program designed for zooming in videos for free. One of the most outstanding features of this tool is its zoom effect. You can use it to magnify videos and photos without tampering with the quality. The attractive user interface in conjunction with quality visual effects are superb features found in this software. Windows Movie Maker is being faced with a challenge which is its inability to store files in different formats (WMV is the only format supported).
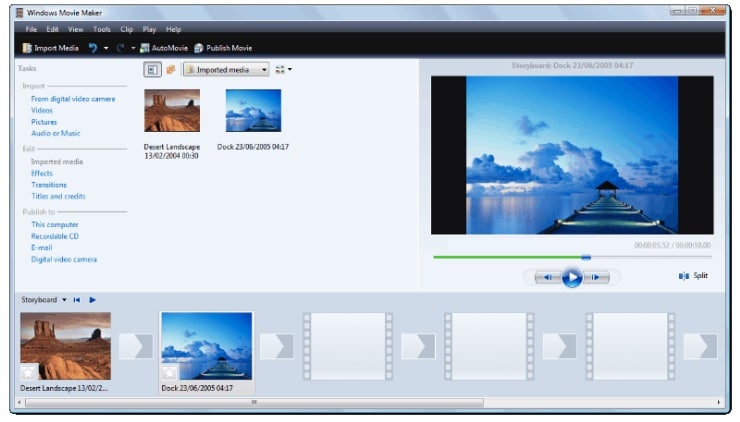
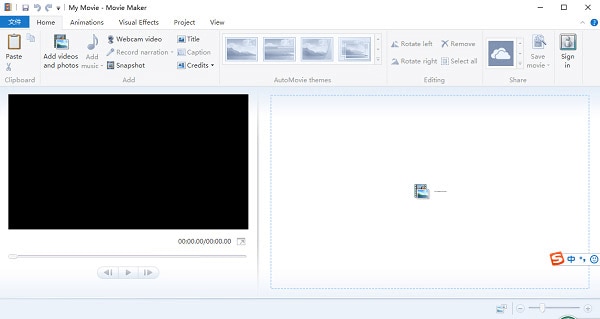
Step 1: Launch Movie Maker
After launching Windows Movie Maker, go to the "Home" tab and choose the "Add Videos and Photos" option to import the source video to be edited. When you do this, the complete video will appear as frames on the right side of the window.
Step 2: Load the Files for Zooming
Import the video clip you want to zoom in on by clicking on the add videos and photos button in the toolbar to move the media file to Movie Maker.
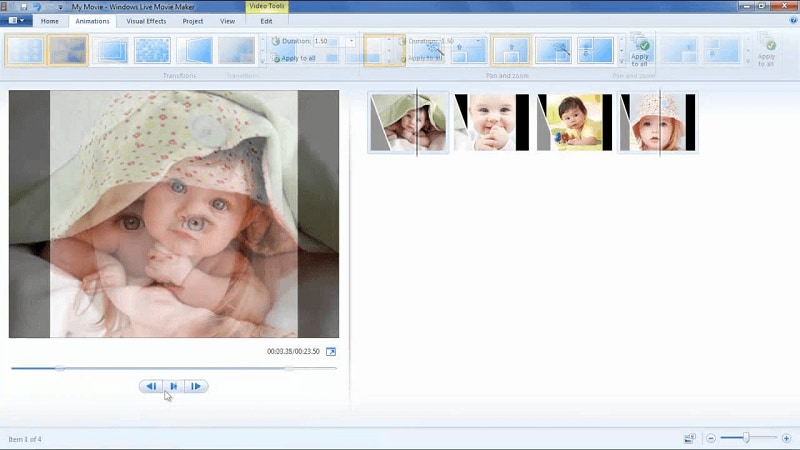
To position, the marker, click on the start point of the video frame into which you wish to zoom. After that, right-click on the frame and pick "Divide," which will automatically split the chosen frame from the other frames at the start. Similarly, you must click on the endpoint of a certain video frame and then divide it so that the full video frame is separated for zooming.
Step 3: Apply Pan and Zoom and Export
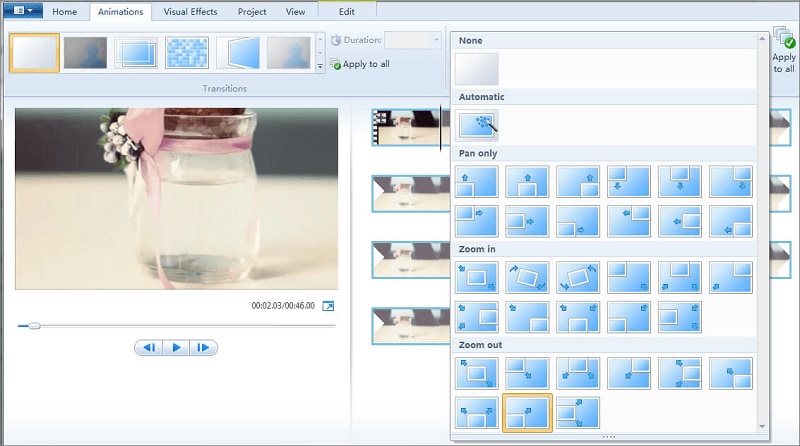
Now you have to select a target zoom-in effect. Simply go to the Animations tab, then switch to the Pan and Zoom section. Select a suitable pan and zoom effect.
Once you've separated the desired video frame, pick it and go to the "Animations" tab at the top, where you may choose any of the "Zoom" choices under "Pan and Zoom." The zoom effect will be applied to the chosen video frame automatically. You may now save the final movie to your PC, which will include the zoom effect you applied. Even though it is a basic video maker, the zoom effect will be seamless.
Preview and save the video in any format of your choice.
Part5. Apowersoft Screen Recorder
With Apowersoft Screen Recorder, you can zoom in and out your video clips while the quality is still maintained. This software is free to use so you don't need to bother about subscriptions. Some of the key features of Apowersoft Screen Recorder video editing software include; audio capture from the computer, full-screen recording, scheduled shutting down, and many others. However, this software comes with a disadvantage which is limited video format. The video format supported on this app is limited and this will affect its compatibility with most PCs.
This is a free app that can easily capture your Windows 10 computer screen. It allows you to record your computer screen in only a few clicks. Furthermore, it supports a variety of output formats such as MP4, AVI, WMV, FLV, MPEG, GIF, and VOB, among others. It also allows you to record audio while recording your desktop screen. When video chatting with family, friends, or co-workers, users may utilize their cameras.
How to Utilize Apowersoft Video Editor and its Zoom Effect
Step 1: Download and Launch Apowersoft Recorder
Get the program. First, download the program. After installing it, click the "Record" button to start recording limitless movies on your account.
Step 2: Load your Recordings
Personalize your recording space. Drag your mouse to choose the location you wish to record. As soon as you confirm the area, your recording will begin. For a full-screen recording, drag it to suit your screen. If you want to produce instructive films where your viewers can see you, you may add a camera overlay.

Step 3: Apply the Effect
Real-time edit your video. As you continue to film, you may add annotations, call-outs, comments, and other objects to your video. This will increase engagement and make your viewers want to watch your films more.

Step 4: Save the Video
Pause the recording and save the video. To terminate your recording session, click the "Stop" button. You may either download the video and store it on your local disc or save it to the cloud. You may also upload the movie to your YouTube or Vimeo accounts. Send to Google Drive and a variety of other online storage services.
Part6. OpenShot
OpenShot is well-known as one of the most powerful free video editing software, owing to its plethora of free features. It is also a multi-platform program that is available for Windows, Mac, and Linux. OpenShot, like Shotcut, supports a wide range of video, audio, and image formats. This video editor's custom watermarks, time mapping, and speed up / slow down features are undoubtedly useful.
This free version video editor can also function as video magnifying software. OpenShot is used for the production of stunning video clips. It has a built-in editor which is often used for adding text, videos, music, audio, and filters to images and videos. An OpenShot video editor is a great tool with nice zoom effects. You can post videos directly on social media without asking for the help of a technician. It works perfectly with Windows and macOS devices.
To zoom in on videos with the OpenShot video editing tool, you can type CTRL+Scroll Wheel and you will be able to zoom into the video timeline.
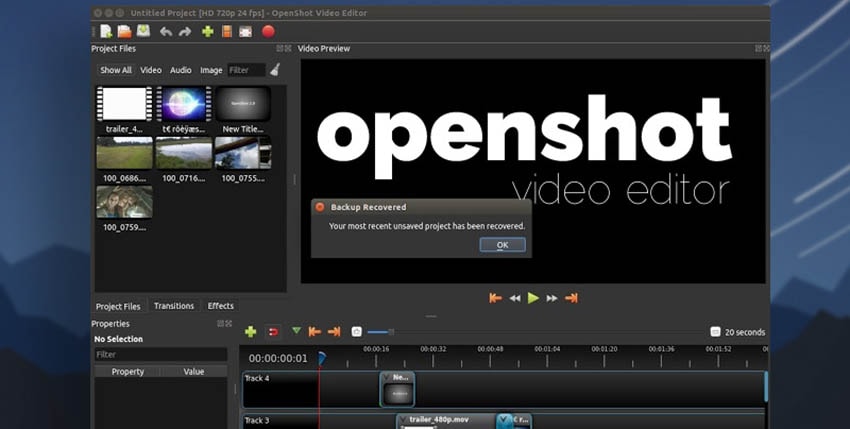
Step 1: Launch OpenShot
Some of OpenShot's features are so simple that video editors will love them. Simply launch it from the Windows program and add your files to it as shown here:
Step 2: Add Keyframes for Zooming
There are keyframe animations, a massive number of layers, drag-and-drop images and audio, 3D tiles, over 400 scene transitions, and a plethora of effects available.
Step 3: Edit and Export
It's the feature set that drew us in, and the program also does the basics well. Clipping, scaling, rotating, and scrolling are all simple to use for both beginners and prosumers. Hit the Export button and go ahead with it.
Part7. Lightworks
Here is another wonderful non-linear editing system developed for Linux, OS X, and Windows operating systems. When you need software with multifunctional capabilities, then Lightworks video editing software should be your choice. This tool can convert images into videos, add zoom-in effects to video clips, and post videos directly on social media networks like YouTube, Facebook, and Twitter.
Lightworks is another useful and non-linear video editor that includes advanced multi-cam editing, second monitor output, real-time video effects, visual effects routing, a multi-channel audio mixer, and other features. All of these features are available in Lightworks' free version, but there are many more paid features available, such as timeline rendering, Boris Graffiti, stereoscopic output, and so on. The best part is that this video editor's "Zoom" feature is completely free to use.

How to Use Lightworks to Add Zoom to a Video:
To learn how to use Lightworks to add zoom to video parts, follow the steps below.
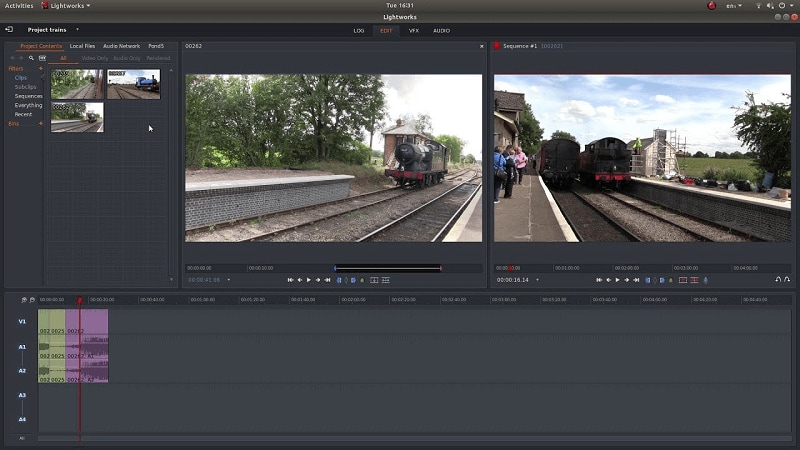
Step 1: Open Lightworks
To begin, launch Lightworks and create a new project with any name you want. Following that, a popup window will appear, allowing you to browse your PC and import the video for editing. When you're finished importing a video, double-click it to open the viewer. To launch the video editor, click the "Insert into the Target Edit" option at the bottom of the viewer.
Step 2: Go to Editor Option
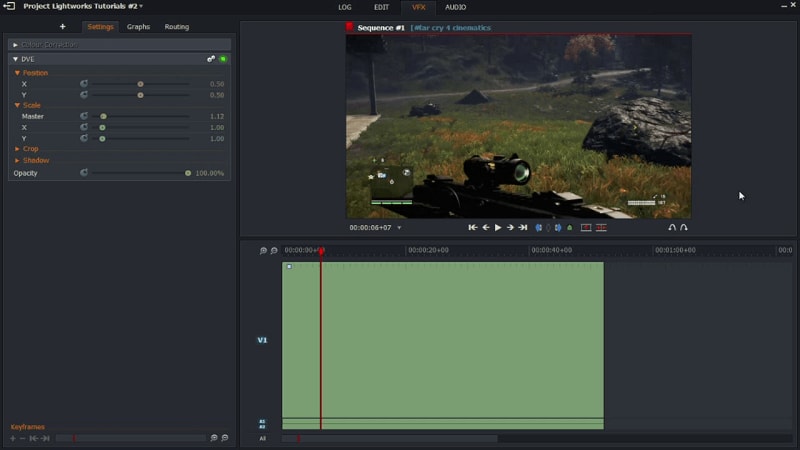
When you launch the editor, you'll notice that the selected video has already been added to the timeline. Now, at the bottom of the timeline, select the "Effects" option, and then select the "DVE" effect from the list, as shown below.
Step 3: Add Zoom Effects
After that, the "DVE Effects" window will appear, with the "Scale" option, which can be used to add zoom to video parts. To begin, drag the marker to the point on the timeline where you want to zoom in on the video. Then, under "Scale," click the "Keyframe" button associated with the "Master" option. When you do this, a keyframe will be added at the beginning of the video part.
Step 4: Export the File
After adding a keyframe to the starting point, simply move and set the marker to the endpoint where you want the video to stop zooming. After you've determined the endpoint, return to the "DVE Effects" window and adjust the zoom intensity by dragging the slider associated with the "Master" option. The zoom effect will be applied to the video segment between the start and end points after you press the Enter key.
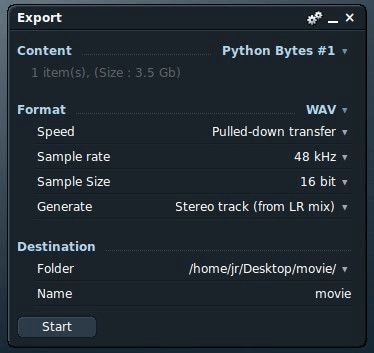
Then, on the left, click the "Export" icon to save the video as an MP4 file in the free version of Lightworks.
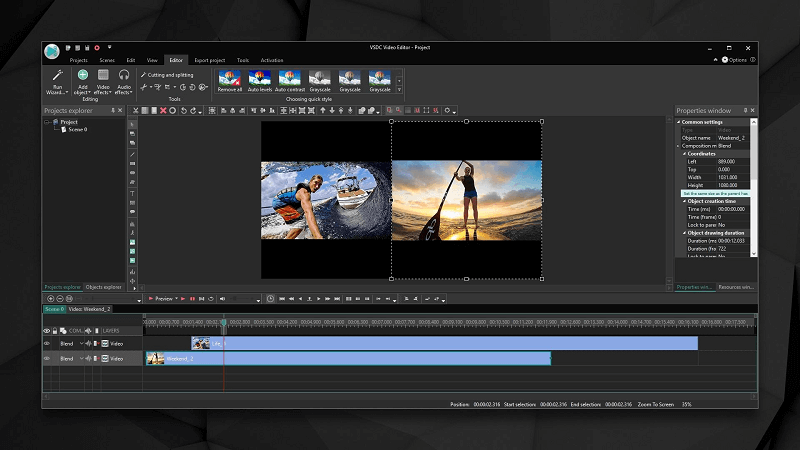
Part8.VSDC Free Video Editor
Lastly, we have the VSDC free video editor on our list of software with a zoom-in effect. This Flash-Integro LLC video editing tool can be used to create a photo slideshow, add soundtrack and text to video clips, convert audios, and also zoom in videos. It is compatible with Windows and macOS only. VSDC lets you apply pop-production effects, live color correction, and motion tracking to video clips in just a few clicks. Try it out today!
VSDC is yet another useful and feature-rich video editor that can assist you in creating videos, editing videos, applying video effects, adding audio effects, cutting and splitting video clips, and so on. The "Video Effects" feature provides a variety of options such as Quick Styles, Filters, Adjustments, Transforms, Special FX, Transitions, and so on to assist you in creating stunning videos. The "Transforms" option includes several components, including "Zoom," which can be used to zoom in on any specific part of a video.
How to use VSDC Free Video Editor and its zoom effect
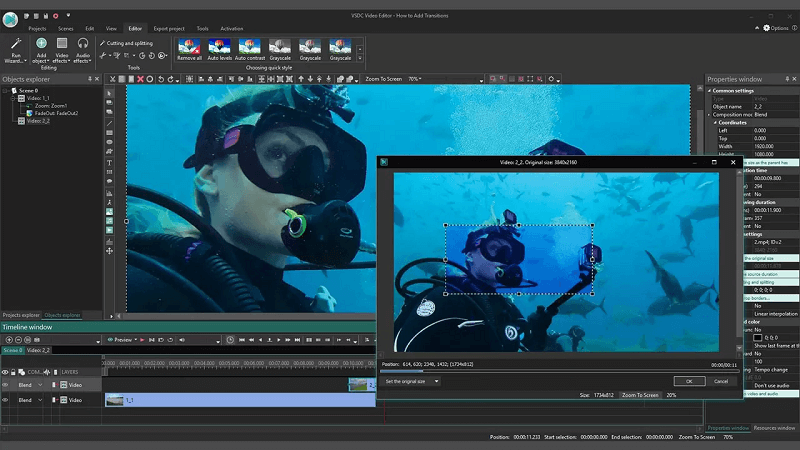
Step 1: Open VSDC Editor
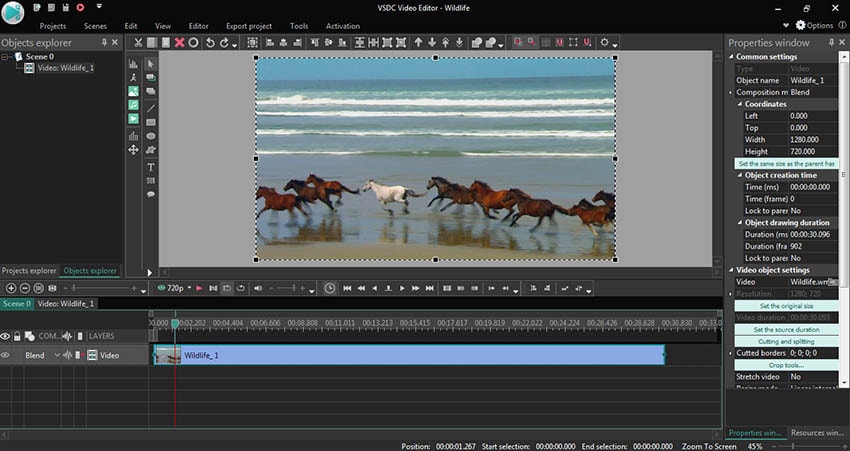
Launch "VSDC Free Video Editor" on your computer and then select the "Editor" tab at the top. When you do this, you will see an "Import Content" button, which you can use to import the video for editing. When you import a video, it will be automatically added to the timeline at the bottom of the editor. Simply right-click the video on the timeline and select "Video Effects" from the menu that appears.
Step 2: Apply Zoom Effect
Once you've successfully added your video to the timeline, place the cursor at the region where you would like the zoom-in effect to occur.
When you select the "Zoom" option, a popup window will appear, allowing you to specify the zoom position and duration. If you want to zoom in on a specific part of the video, I recommend using the "From Manual Position" option. This allows you to select the starting zoom position as well as the duration for zooming in the video segment.
Step 3: Add the Zooming Values and Export
Finally, click "OK" to close the popup window, and a new object called "Zoom" will be added to the timeline. Simply select this object, and a "Zoom Settings" section will appear on the right side of the editor. Now you must expand the "Levels" option under "Zoom Settings." When you do this, you'll see two input fields labeled "Initial Value" and "Final Value" where you can enter the zoom percentage. If you want to zoom the video from 100 percent to 200 percent, enter "100 percent" in the "Initial Value" field and "200 percent" in the "Final Value" field.
Conclusion
Now you have the top 8 video editing software with a zoom-in effect. However, which is your best choice? Well, regardless of what video editing tool you pick from the list above, I'm certain you get the best output in your next video production.
Secure DownloadSecure Download

![How to enable Zoom and Pan for visuals [2025 updated]](https://images.wondershare.com/democreator/article/pan-and-zoom-effect.png)


