- 1. Record your computer screen and webcam simultaneously.
- 2. Allow you to customize screen capture and frame rate .
- 3. Powerful editing tools and effects to enrich your video clips.

Xbox One Screen Recorder: How to Record Xbox One Gameplay

Have you ever had that moment when you are beating the final boss of a video game, and you want to share your achievements with others?
Knowing how to record Xbox One gameplay becomes important considering the culture of game streaming is at its peak these days. Moreover, most of the popular companies like Sony Microsoft, etc are offering rich functionality and features in devices to boost the live streaming abilities. In this guide, we will show you 4 incredible ways to record and share Xbox One gameplay on YouTube effortlessly.
- Method 1: Using built-in features of Xbox One
- Method 2: Using the Game DVR
- Method 3: Using Recording Software
- Method 4: Using a Capture Card
This is a tutorial on how to record your Xbox One games. If you want to record high-paced online gameplays, consider DemoCreator game recorder which is a powerful but easy-to-use screen recorder & video editor. Some of its main features include recording high-paced games at up to 120 fps and recording screen and webcam simultaneously. Apart from that, it's also a handy video editor tool, with which you will be able to do basic editing, add annotations/text/callouts, and more. Download the free trial version below.
 Secure DownloadSecure Download
You may also like:
Top 10 Game Video Recorders for YouTube Gamers >>>
Method 1: Using built-in features of Xbox One
Microsoft has embedded so many interesting features into Xbox One. The latest Microsoft upload application with Xbox DVR makes editing, sharing, and recording much easier even for beginners. There are three different methods to capture gameplay and share on YouTube using Xbox:
- Simply say "Xbox Record That" and your tool will immediately initiate its recording operation. A game clip of 30 seconds will be automatically saved.
- Double-tab on the sandwich button will now work effectively as when players press Y- it will record 30-second gameplay and for X- a screenshot will be recorded.
- Users can adjust video length as per their needs from the End Game Clip option.
Method 2: Using the Game DVR
In case if you are thinking of making a shorter or longer video clip while recording your gameplay then you must have a Game DVR application. Follow these steps to start your recording:
Step 1. While enjoying your game, simply double-tap on the Xbox button that is present at the center of the controller.
Step 2. From the sidebar, you need to select the "Snap an App" option and then further select Game DVR.
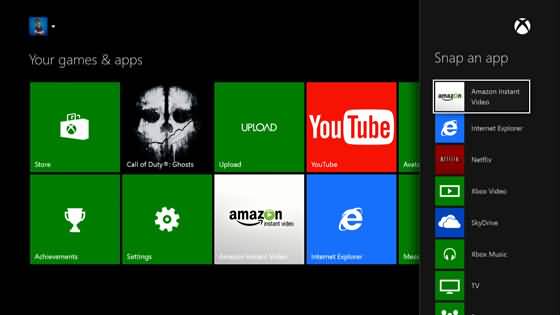
Step 3. In case if you have Kinect then simply say "Xbox, snap game DVR". Your intelligent device will soon perform the right action.
Step 4. Once your desired recording length is over then select the End Clip Now option from the screen and your game clip will be created.
Step 5. Share on YouTube.
To switch between different snapped applications you simply need to double-tap on the Xbox button at the controller and then with the help of a directional pad or left stick, you can select any desired app from the bottom portion of the screen.
Don't forget to save your collection in the end, you can select the recorded videos and then save them to the desired location.
Method 3: Using Recording Software
You can use advanced software tools to record classic videos from Xbox One. The streaming and capturing needs are solved by the incredible features of Open Broadcaster Software (OBS) and that is why professionals recommend this software program for every game. To capture your gameplay on a real-time basis you may need the following hardware:
- Good network connection
- A capture computer along with Open Broadcast Software (OBS).
- A TV or Display.
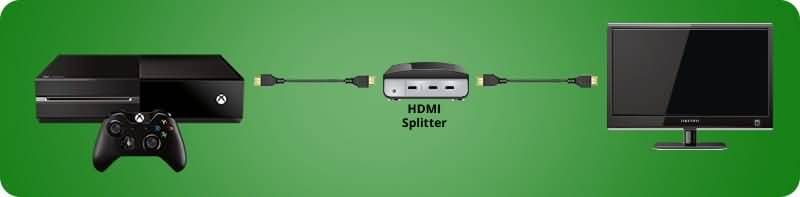
- Three good quality HDMI cables.
- One HDI splitter.
- AV.io HD
- Xbox 360 or Xbox One
The steps to be followed for initiating the recording process are:
Step 1. First of all, you need to connect your TV to the Xbox One platform. Now you have to connect AV.io HD between the capture computer and HDMI splitter.
Step 2. Start OBS as your capture software.
Step 3. It is time to configure your screen capture software program by using some specified settings.

Now you must add AV.io directly to the OBS as a global resource, making AV.io your scene's source to start capturing. Then the preview stream button will allow you to check your recording.
Step 4. Start Recording
Step 5. Configure OBS to start YouTube live streaming.
Method 4: Using a Capture Card
In case if you are interested in generating a high-quality game video, and want to edit and publish the gameplay footage on social media then it is good to try some advanced techniques. Professional gamers or YouTube lovers record their content using Capture Card which results in high-quality recording.
To capture your gameplay using a capture card you may need:
- Elgato Game Capture HD
- Xbox One console
- Two HDMI cables
- USB cable
Here’s the tutorial video on how to record your Xbox One gameplay with the Elgato Game Capture HD:
Step 1. Connect Elgato Game Capture HD to the Xbox One using HDMI.
Elgato Game Capture HD connects to the Xbox One using HDMI. It can pass through video to a TV set also using HDMI. An HDMI cable is included in the box.
Step 2. Set up the Elgato software to record the gameplay from Xbox One.
Step 3. Start to record gameplay.
Step 4. Share on YouTube.
Wanna share your Xbox gameplay videos with friends on YouTube? Just use one of the best video editing software to edit the gameplay video for YouTube with Wondershare DemoCreator. You can add some special cool effects, and filters to the gameplay video by drag-n-drop, and cut out the unwanted clip with ease or adjust the speed of video recorded. Download our video editor Wondershare Filmora below now.
Secure DownloadSecure DownloadFaqs About How to Screen Record on Xbox
1. How do you record longer than 10 minutes on Xbox?
To record longer than 10 minutes on Xbox, you need to use an external hard drive. Set the capture location to the external drive in the capture settings, allowing recordings up to 1 hour.
2. How long does Xbox screen record?
Xbox can screen record up to 10 minutes on the internal storage or up to 1 hour on an external hard drive.
3. How to stream on Xbox One?
To stream on Xbox, use the Twitch app available on the Xbox Store. Install the app, log in to your Twitch account, and select 'Broadcast' to start streaming your gameplay.

Other Popular Articles From Wondershare


