Why Use Screen Capture for Tech Support

When things are going good, nobody contacts tech support. There is no need for assistance if everything operates smoothly and there are no issues.
Most of the times, the standard answer to a tech support request may be to type out the steps required to solve a user’s problem. However, the more complicated the instructions, the harder it can be to write to the support that is simple to follow and understand. Fortunately, there is a better way.
Screen capture can offer a simple-to-understand and often much quicker method to offer that data. Below are some reasons why your tech support team must be employing screen capture to offer customer support.
Reasons why use screen capture for tech support
Here are some reasons as to why use screen capture for tech support:
Eliminate confusion
When you show rather than tell, communication is much clearer. Prevent back-and-forth follow-up questions and emails. Employing visuals lets you to boil down your interaction to what is important. In addition to this, as per the research, people following directions with illustrations and text do 323% better as compared to people following directions without visuals.
Save time
For most of the users, making contact with tech support is the last resort to solve a problem. This means they have already spent time, and the quicker the resolution, the better. Nobody wishes to sit on the phone or answer to an email to ask “What am I looking for, again?” or “Where do I find that button?”
Avoid extra irritation for your users by assisting them solve their issues faster. Employing a screenshot saves time on both ends. It is quicker for the tech support personnel to mark up a screenshot as compared to typing a long email. It also saves the users’ time by offering a simple-to-follow response.
Overcome language obstacles
If your company serves users all over different languages and cultures, effective communication can be even more difficult. While Google Translate is an optimal resource, adding images into your tech support responses makes it simpler to get the point across effectively and quickly. There is less risk of losing meaning in translation.
How to make tech support videos
Apart from taking screen shots you can also make videos. Tech support team members can also make videos about how to solve general problems, thereby solving issues of a huge amount of users.
In order to make tech support videos, you can use Wondershare DemoCreator, which is by far the best screen recorder in the market. The app allows you to capture your on-screen activities and creates an interesting demo videos for tech support. With this app, it is simple for users to make interactive tech support videos, presentations, software simulations, tutorials, and product demonstrations. Here are the detailed steps that will help you understand the PowerPoint record screen process very easily.
 Secure DownloadSecure Download
Step 1: To record your tech support videos, click on the Capture option in the main menu of the app.

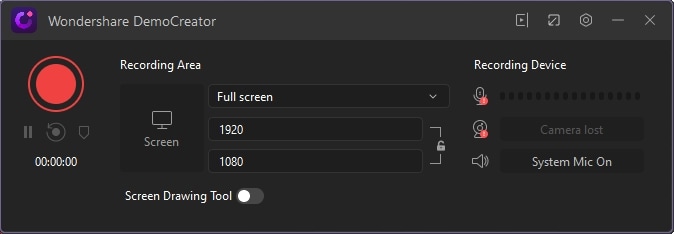
Step 2: In the Settings window, you can modify your recording settings. Users can select their recording area on the screen and frame rate in the Screen window.
Step 3: Press F10 or the big red button on the screen to record screen.
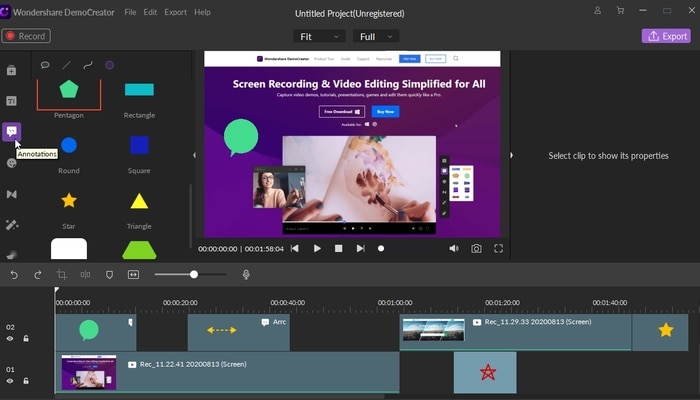
Step 4: To add annotation effects, go to the Annotations tab and select a category that you want. Drag the annotation you like on the screen. You can create funny tech support videos by adding annotations to it.
Step 5: To add cursor effects, click on the lower left of the toolbar. Adjust the settings as per your needs.
Why Wondershare DemoCreator
Wondershare DemoCreator is a tool for recording videos that lets users to easily record the screen and share or edit it as per their needs. This feature of this tool goes beyond just screen editing and recording tools. There is plethora of creative tools that allow users to make enhanced recordings to cater to different needs. Another major highlight of this tool is that it is very simple to use, and you get different features in a single place.
The user-friendly interface makes sure that even the ones with no technical background can use it easily. There is a series of Annotation options such as Lines and Arrows, Dialog Boxes, Shapes, and Sketch Animations that make your recording more interesting.
Select Area and Record
The tool does not restrict your screen recording to a particular screen size you can record. You can record a region that you wish. Users have the right to choose the portion they need to record before recording any activity on the desktop.
Add Webcam Overlay
DemoCreator will assist you capture a video of yourself or around you with the help of the webcam of the device. It captures the live stream of your device’s camera. This means you can simply capture a scientific-practical or a live demo of some calculations and share it with students if you are a teacher.
Annotations and Captions
In the editing feature, this software offer your many types of annotation tools and captions, which will be great for tech support videos. You can add text, arrows to help people understand your videos better.


