How to Record a PowerPoint Presentation with Audio and Video

PowerPoint presentations have long been used as the ultimate and most effective way to report data or even teach a course. When you want to preserve the information on the presentation, it makes sense that you would want to record a video of the presentation to make it available on demand. But most people don't know how to record a PowerPoint presentation with audio and since we can all agree that audio is a big part of the audio-visual experience that video brings, a video with no sound would prove quite useless.
Therefore, the purpose of this article will be to show you how to record PowerPoint presentations with audio. We are going to take a look at some free software to record PowerPoint presentations with audio and show you how to use them to create a stunning video. We are also going to share with you a unique tool that can be used to record and edit such videos to get that extra magical appeal added to your presentation.
How to Record PowerPoint Presentation with Audio on Windows
Windows 10 users also have the benefit of using free software to record PowerPoint presentation with audio, it’s the in-built Windows 10 screen recorder. To use this feature to record your record PowerPoint on Windows, follow these simple steps;
Step 1: Open the Presentation that you would like to record. Once again, we recommend that you queue it to start about 5 seconds before the beginning of the slideshow.
Step 2: Now click on “Start” and the type in “Xbox” in the search function. When the results appear, click on it to open the app.
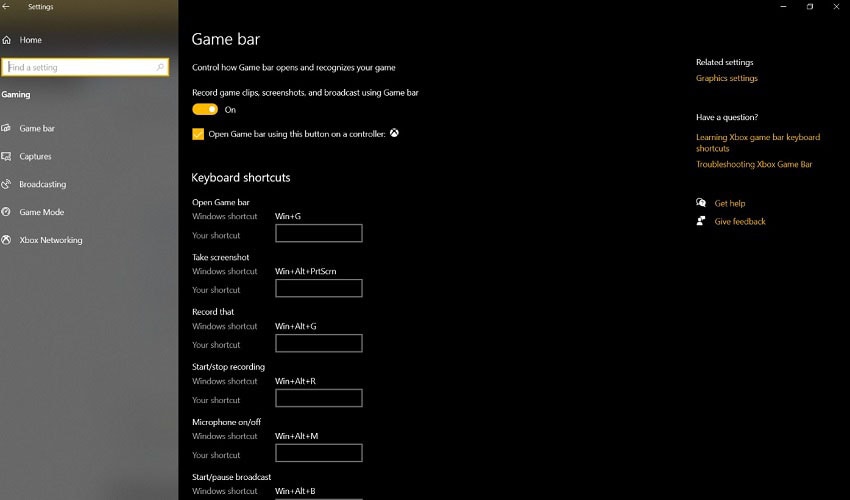
Step 3: In the Xbox app, you can begin the recording of the screen in numerous ways. One of the most effective is to simply type “Win +G” on the screen that you want to record. A popup will appear on the screen asking you if this is a game. Click “YES”
Step 4: To begin recording, click on the “Start Recording” button, and then start the slideshow. Click on the “Stop” button to end the recording, and the video will be automatically saved in the C/Users/Videos/Captures path.
AI Presentation Maker
Record PowerPoint Presentation with Audio and Video on Mac
One of the best ways to record PowerPoint presentations with audio on Mac is to use the built-in QuickTime screen recorder for Mac, and not just because it is completely free to use. Quick Time is very easy to use and very reliable. But before we show you how to record PowerPoint presentations with audio using QuickTime, we must let you know that you will need to install an extension to your Mac to help you record the audio. This is because QuickTime itself doesn’t come with a built-in audio recorder.
The following simple step-by-step tutorial will help you use QuickTime Player to record the PowerPoint presentation with audio;
Step 1: Install an audio recording extension known as Loopback audio to your Mac. It is completely free to download and use.
Step 2: Now open the PowerPoint presentation that you want to capture. We recommend starting the slideshow at least 5 seconds before you are ready to begin recording the video. This will make it easier for QuickTime to hide the playback controls and make sure they don’t appear in the final video.
Step 3: Before you begin playing the slideshow, go to System Preferences > Sound and then select Loopback Audio in the “Output” tab. Don’t worry if you don’t hear any sound from any of the applications on your Mac.
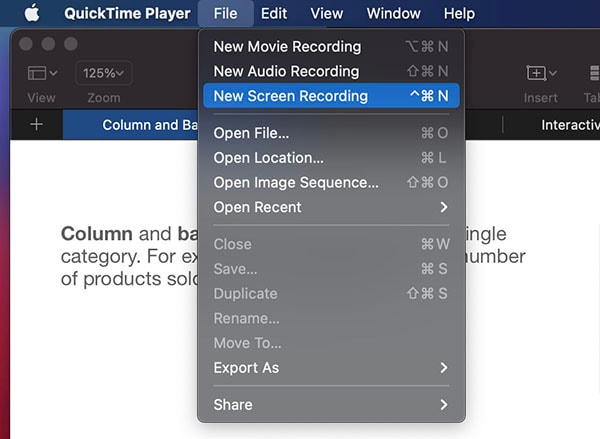
Step 3: Now go to the QuickTime Player app and then click “File > New Screen Recording
Step 4: Choose if you would like to record the whole screen or just a section of the screen and when you’re ready to begin, click on “Record”
Step 5: Click on the “Options” menu to choose the audio source as “Loopback audio” and then go back to the PowerPoint presentation and press play to begin recording the presentation with audio.
Step 6: When the presentation is complete, click on the black square at the top of your screen to stop the recording and save the recording.

Now you can go back to System Preferences > Sound to change the “Output” tab back to the Internal speakers.
Record Powerpoint Presentation as Video with Sound on Win and Mac
The built-in Windows 10 recorder is very easily accessible, but you have very few options when recording the presentation. For example, you may not be able to turn on the microphone during the recording process so that you can add narration to the video. Such features remain in the purview of third-party screen recording tools.
One of the best tools to use when you want to record a PowerPoint presentation as videos with sound is Wondershare DemoCreator. With this tool, you can easily choose if you would like to record the whole screen or a specified section of the screen on your HP, ASUS, Lenovo laptops. It also allows you to choose if you would like to turn on the microphone and record the webcam at the same time. This is on top of its numerous and easy to use editing tools that allow you to trim, cut, and even delete sections of the video.
The following simple steps show you how to use DemoCreator to record your PowerPoint presentation with audio;
Step 1: Download and Install
Begin by installing the program on your computer. It is important to note here that this program does come with a free trial version. But if you want to have access to all the program’s tools, we recommend purchasing the full version.
 Secure DownloadSecure Download
Once you have installed the program on your computer and gone through the registration process, launch the program.
Step 2: Select the Region you Want to Record
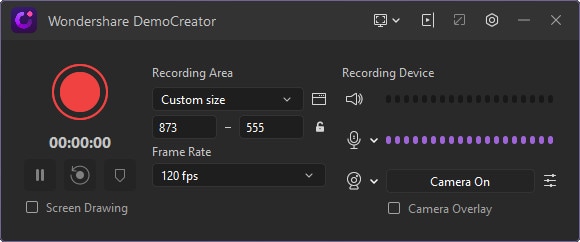
Click on “New Recording” in the program’s main window and in the window that opens, you will be able to set your preferred settings.

Click on the “Settings” icon to open these settings, and the first thing you want to do is select the area that you want to record.
To do that, click on the drop-down menu next to the “Screen Capture” option and then choose if you would like to record the “Full Screen”, “Set a Custom Size” or you would like to “Select Target Window Later”
Step 3: Adjust the Camera Settings
Like we mentioned before, DemoCreator allows you to capture the screen as well as the webcam footage at the same time. To decide if you would like to use both or either one, click on the “Camera” option and choose the camera you want to use from the drop-down menu next to “Choose a Camera”
Here, you can also select the resolution of the video you want to record in the “Resolution” drop down menu and the frame rate you would like to use. DemoCreator allows you to use a frame rate from 30-120 FPS.
Step 4: Adjust the Audio Settings
Since you want to record your PowerPoint presentation with audio, we recommend that you click on the “Audio” section of the setup window to set both “Computer Audio” and “Microphone” to “Capture”
Step 5: Start Recording the Screen
Once all the settings are as you desire, click on “Capture” to exit this setup window.
Now go back to your presentation and begin the slideshow. When you’re ready to begin recording the screen, click on the “Record” button to begin recording the presentation.

You can add markers to the presentation during the recording process. To do that, click on the “M” icon and then select the markers you want to add in the widget that opens.
Step 6: Save the Video
To finish the recording, click on the “Record” button again.
You can then use the numerous editing tools that DemoCreator has to edit the video to your desired specifications.
Don’t forget to save the video once you are done editing. You can also upload the video to several sites from directly within DemoCreator.
Conclusion
One of the best ways to create a screen flow video is to start with a PowerPoint presentation and then use a screen recording tool to transform the presentation into a video. The quality of the video that you get will ultimately depend on the tool you use to create it. QuickTime and the in-built screen recorder in Windows are great solutions, but if you would like a professionally created video, then we recommend using a tool like DemoCreator that gives you a number of options to create the video just the way you want it to be with no limitations.


