
How to Record Audio on Windows 10

While working from home, even basic users now require advanced tools to get their work done. The people who are now confined in their rooms will need to have a basic set of applications that will make them capable to give a presentation or record a meeting. Creators will also need the recording tool so that they can create a guide or a tutorial in high-definition.
Apart from the screen recording applications, one might also need to record only the audio for a voice memo or give an already recorded video a voiceover. If you are wondering how to record audio on Windows 10 PC, let us tell you that you have landed exactly at the right place.
We have tried to cover everything in detail and the best part is you will not need to install any third-party application. Microsoft is now offering a range of tools integrated with Windows 10.
Yes, you will get a number of third-party apps that are quite feature-packed, and users will get advanced tasks done in no time including audio mixing and tweaking signatures. The native recording app doesn't offer any such feature and it's time that we dive into the details.
How to Install the Windows Voice Recorder
The native app for audio recording is a very lightweight app that will not require huge space to install. It can also be recorded right from the Microsoft Store and you will not have to worry about fetching any malware through APK installation.
If you are using an older machine, there are slight chances that the app will not come pre-installed. It also depends significantly on the OEM.
Here are the steps that you will need to follow to install the app on your PC/laptop. The basic requirement that you need to fulfill is that you must have an active Microsoft account that you will need to sign in to Microsoft Store. Windows will ask you to create an account on the first boot.
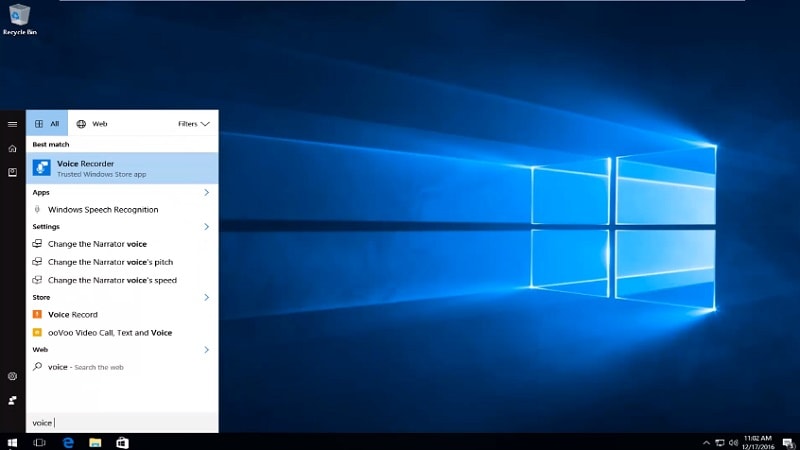
- Press the Win button on the keyboard and enter Microsoft Store. Open the app.
- On the top right, you will get a lens icon to search within the store. Enter Windows Voice Recorder.
- You will get multiple results; find the one that is from Microsoft Corporation. It will be available under the Utilities & tools head.
- It will give you a ‘Get’ button, you will need to click on it to add to your apps. Then, click on Install.
- The app will install on its own and you will not have to give any more permissions.
- Once installed, you can click Open from there or you can press Win+S to search on your computer.
Steps to Use the Native Voice Recorder
The app comes with a very unequivocal dashboard where users will be able to navigate through it quite easily. If you also want to record screen with audio Windows 10 will give you a native tool for that as well, in the form of Game Bar. If you have a separate screen recording and you want to add a voiceover to it, this native audio recorder will be one of the easiest ones you can use.
Moreover, if you are using a laptop, there will be an inbuilt microphone. However, for all PC users, a separate microphone will be needed. Users will also get to use an external microphone on the laptop, as well.
If you are worried about the setup, there is nothing to take stress about. Let's dive into the steps that you need to follow to navigate through all the features available on this native recorder application.
Press the Win button and type Voice Recorder. You can also directly get to the search window by pressing Win+S.
Open the app and on the bottom-left, you will get a Record button. Click on that to start the recording. If you don't want to use the mouse, you can press Ctrl+R on the keyboard to start recording audio.

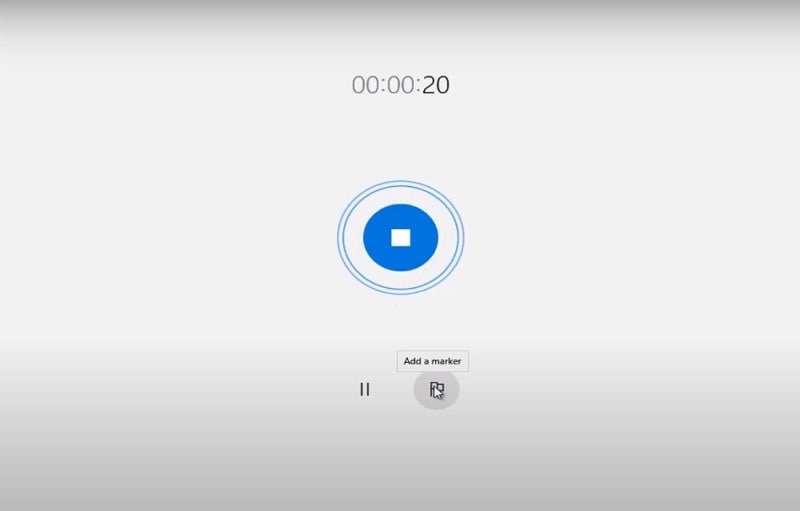
While recording, right below the timeline, you will get a flag icon. You can press this every time you want to mark a time. It will not add any sound effect or any interruption to the ongoing recording.
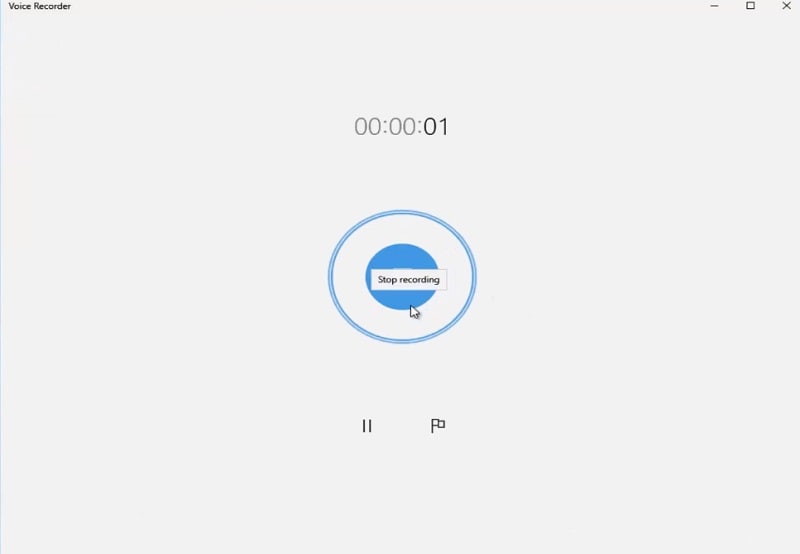
Right next to the flag icon, you will get to pause the recording. It will let you take a break from the recording session and resume from there without creating two files.
Once done, press the Stop button.
The default path will be the Documents/Sound Recordings. The file that will be saved will be in the .m4a extension and all the creator applications support this format. To get better audio in terms of clarity and quality, we recommend investing in an external mic.
Users will also get to access these recordings from the recorder itself. Follow the #1 step and on the left, you will get a list of all the recorded files. Click on the one you want to listen to, and then press the Play button in the middle.
How to trim the recording
Moving on, it's time to understand the basic functionality of the recording application. The native application will allow you to tweak the recorded in very basic terms. Let's first discuss the trimming. You will need to use this tool in case there is something extra that has been recorded and you want to get rid of it.
However, you can also trim/add audio in the post, but you will get the feature here if you just want a voice memo to share with someone. The process is quite straightforward and you will understand it in just one go.
- Open the recorder and then click on the recording you want to trim.
- In the middle, right below the timeline, you will get multiple options. Click on the second one and it will add two pins to the timeline.
- Use these pins to drag and drop to the time up to where you want to trim.
- Once fine-tuned, you will need to click on the Save button. You can either save a copy of this trimmed version or update the existing one.
- We recommend selecting the Save a copy option so that you don't lose any data.
How to rename the file
When you are in the process to Record audio Windows 10, you might end up having multiple files. The default names of these files will not give you any sort of difference and to make things easier for you, Voice Recorder lets you rename the file right after recording.
- Once you are done recording and hit Stop, you will need to click on the Rename icon that's present right next to the Delete icon.
- Enter the name you want to use and hit Rename.
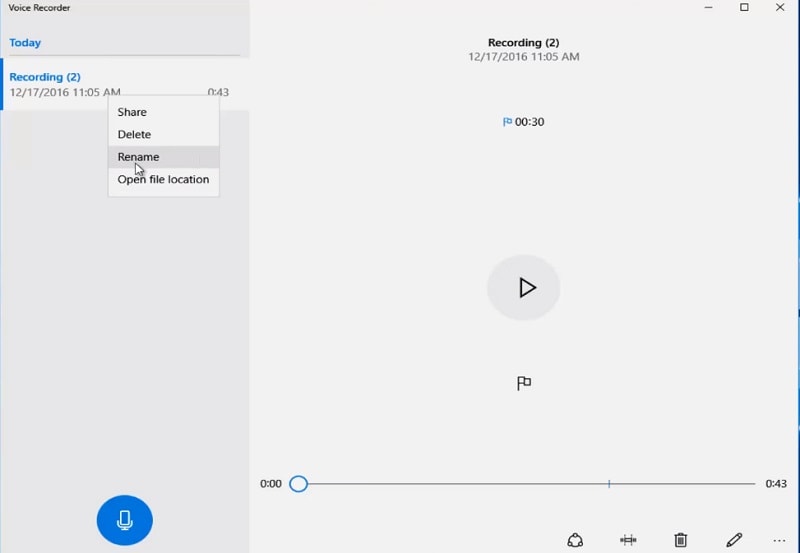
(You can go as descriptive as you want for the name. Don't forget to add underscore as spaces.)
How to share the recording directly
As we discussed above, you might need to have a recorder for a range of purposes. If you are a student, all you need a recorder for is to record lectures or to add voiceover to your virtual presentation. Once recorded and if you want to share the file, this native recorder will allow you to do it directly without any need to copy-paste it. Let's go through the steps.
- Press Win+S and type Voice Recorder. Open the app and click on the recording you want to share.
- On the bottom, where you will get the Trimming and Renaming option. The first one will be the Share button.
- Click on it, a new dialog box will open up.
- Users will get a list of all the apps on which you can share it. Click on the one you need to and the app will give you onscreen instructions to share it, successfully.

Note: If you don't want to share the file using the installed apps, you can also do it by everyone's trustee copy & paste tool. Go to the Documents/Sound Recordings and copy it from there using Ctrl+C.
Fixing the Errors on Windows Voice Recorder
Windows and bugs go hand-in-hand. There is no shock if you are facing some issue with a certain application. These issues can, generally, be fixed with a reboot but if it's unable to resolve, it's time to do some troubleshooting. If the recorder app isn't detecting the microphone or you are unable to record for any reason whatsoever, this section is for you.
First, we will try to re-do the settings manually and check if the system is detecting the microphone, at all.
- Launch the system Settings app by pressing the Win button. You will find it right above the power menu.;
- Find Privacy and then select Microphone from the left pane.
- Here, you will get the toggle to Change the mic access. Click on it and a small pop-up will appear with a toggle.
- If it's turned off, turn it on.
- Scroll down to the list of apps and search for the Voice Recorder app.
- Check if the toggle switch is enabled.
Coming to the more technical method, we are going to troubleshoot the input settings. Follow the steps below to check if everything is fine and it was only due to a minor software glitch.
- Launch Settings and click on the first tab, System.
- On the left pane, you will need to click on the Sound option. It will be right below the Display tab.
- Scroll down to the input head and it will give you a dropdown menu to choose the Input Device.
- Select your mic and then speak something. The bar present below will fluctuate according to your sound signature.
- Below this, you will get a Troubleshoot button. Click on it and all you need to do is follow the onscreen instructions.
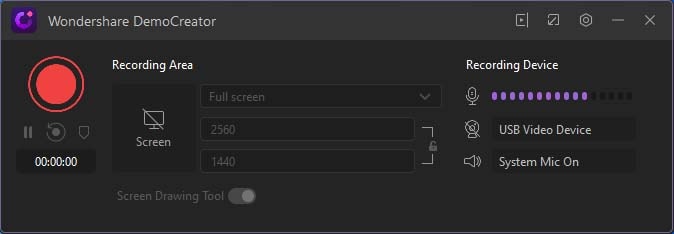
Extra Recommend: Best Audio Recorder Software
If you want to record system audio and microphone sound on Windows 10 at the same time, you can try an audio recorder Wondershare DemoCreator. This program is designed to record video and audio with simple steps. However, you can also use it to capture audio only. Moreover, this software comes with an editor which allows you to edit your audio track to a great level. The audio fade-in and fade-out option is also available in this recorder.
 Secure DownloadSecure Download
Once done, the system will repair anything that's creating issues on the software aspect. If you are still unable to record, there might be some hardware issues. You can also perform a System Hardware Scan to know more about it.
Make sure that all the cables are connected properly. For the wireless mic, also cross-check if the Bluetooth is turned on and the device is connected. We hope that this guide has been helpful to you regarding any issues related to Record computer audio Windows 10 including the tips to fix using Troubleshoot.


