How to Convert PowerPoint to MP4

PowerPoint presentations are a powerful tool for communication, but sometimes you need something more dynamic. Converting your PowerPoint slides to video can help you reach a wider audience, create more engaging content, and share your ideas effortlessly. In this guide, we’ll show you how to convert PowerPoint to video on desktop, with step-by-step instructions and expert tips.
Why Convert PowerPoint to Video?
- Better Engagement: Videos are more engaging than static slides.
- Easier Sharing: Videos can be shared on social media, websites, and email.
- Wider Reach: Videos are accessible on multiple devices, including smartphones and tablets.
- Professional Touch: Adding animations, voiceovers, and music can make your content stand out.
How to Convert PowerPoint to Video on Mac
Using PowerPoint for Mac
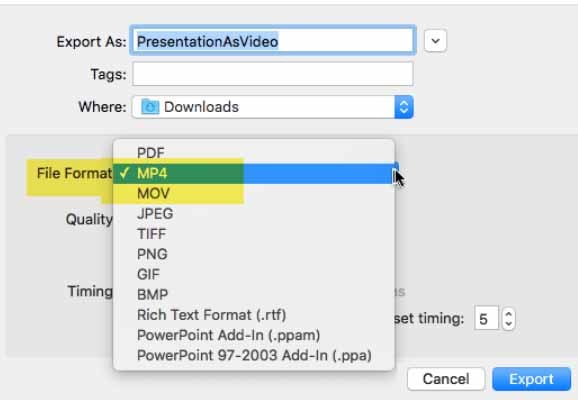
If you’re using PowerPoint on a Mac, follow these steps to convert your presentation to video:
- Open Your Presentation: Launch PowerPoint and open the presentation you want to convert.
- Go to File > Export: From the top menu, click File and select Export.
- Choose File Format: In the export dialog box, select MP4 or MOV from the File Format dropdown menu.
- Set Video Quality: Choose from three quality options:
- Presentation Quality (highest resolution)
- Internet Quality (medium resolution)
- Low Quality (smallest file size)
-
Adjust Slide Timing: Set the duration for each slide or use the timings from your presentation.
-
Export the Video: Click Export, choose a destination folder, and save your video.
Limitations:
-
Older versions of PowerPoint for Mac (e.g., 2016) may not support video export.
-
Limited customization options for animations and transitions.
How to Convert PowerPoint to Video on Windows
Using PowerPoint for Windows
For Windows users, the process is similar but with a few additional options:
-
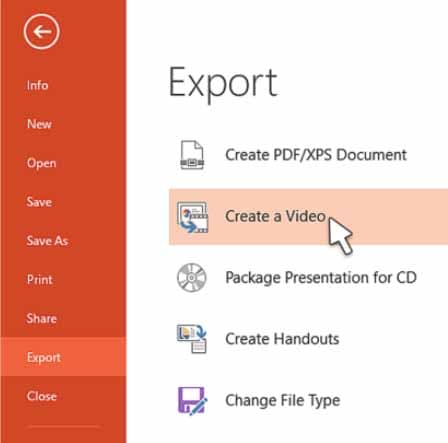
Open Your Presentation: Launch PowerPoint and open your presentation.
-
Go to File > Export: Click File and select Export.
-
Create a Video: Choose Create a Video from the export options.
-
Select Video Quality: Choose from:
-
Ultra HD (4K)
-
Full HD (1080p)
-
HD (720p)
-
Standard (480p)
-
-
Set Slide Timing: Use recorded timings and narrations or set custom durations for each slide.
-
Export the Video: Click Create Video, choose a destination folder, and save your file.
Limitations:
-
Limited editing capabilities within PowerPoint.
-
No advanced features like annotations or cursor effects.
AI Presentation Maker
A Better Alternative: DemoCreator
While PowerPoint’s built-in tools are convenient, they lack advanced features for creating professional videos. DemoCreator is a powerful screen recording and video editing tool that makes it easy to convert PowerPoint presentations into stunning videos.
Why Choose DemoCreator?
-
All-in-One Solution: Convert, edit, and enhance your videos in one place.
-
Advanced Editing Tools: Add animations, transitions, voiceovers, and background music.
-
Customizable Templates: Choose from a variety of templates to make your videos stand out.
-
Cross-Platform Support: Works seamlessly on both Windows and Mac.
-
Easy Export: Save your videos in multiple formats (MP4, MOV, etc.) and share them directly to YouTube, Vimeo, or social media.
 Secure DownloadSecure Download
How to Use DemoCreator
-
Download and Install: Get DemoCreator from the official website.
-
Import Your PowerPoint: Open DemoCreator and import your PPT file.
-
Customize Your Video: Add animations, voiceovers, and music to enhance your presentation.
-
Export and Share: Save your video in your preferred format and share it with your audience.
Advanced Tips for Creating Engaging Videos
-
Add Voiceovers: Record your narration to explain your slides.
-
Use Animations: Bring your slides to life with smooth transitions.
-
Include Background Music: Choose royalty-free music to set the mood.
-
Optimize for Mobile: Use vertical or square formats for social media.
-
Keep It Short: Aim for 2-5 minutes to maintain viewer interest.
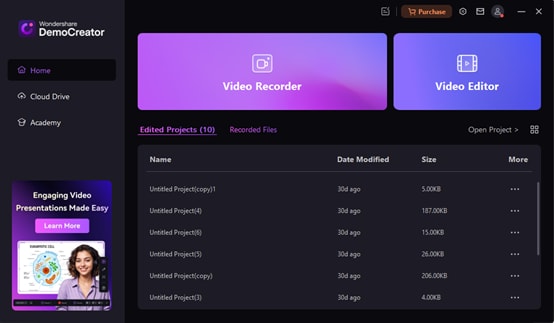
Once you have downloaded the setup file and it's installed, double-click to open it. Based on your system specs, it may take a few moments to load.
The application will greet you with a compact dashboard where you will get two options, Video Recorder and Video Editor.
Click on "Video Recorder" and then you can import your ppt.

Open your PowerPoint file and customize the recording area. You can also delete certain slides based on your needs.Press on the red button to start recording. You can also use the screen drawing tools during converting.
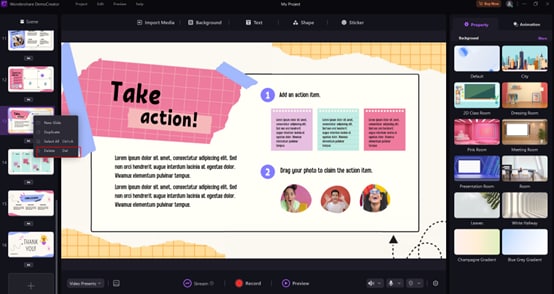
Then the recording ends, the video will be open in the editor automatically. You can add the built-in annotations and effects to make your project outstanding.
Conclusion
Converting PowerPoint to video is a simple yet powerful way to make your presentations more engaging and shareable. While PowerPoint’s built-in tools are a good starting point, DemoCreator offers advanced features and flexibility to take your videos to the next level.
Ready to create stunning videos from your PowerPoint presentations? Download DemoCreator now and get started for free!


