

A Complete Guide to Discord Live Stream Recording

The game chat apps have started to set up the gaming platform and bring professional methods of communication with the players all around the globe. The gamers are gathering throughout the world to set up a voice chat across various apps like discord. The discord app has been evolved more than a chat platform. The discord live stream recording is not just a chat application, and it is much more than that.
Now, discord has its streaming system, which allows the user to capture the applications, desktops, and windows and share it to the feed with friends and viewers. But discord doesn't offer to stream to the twitch, but the features of the client's streaming are a marvelous addition. It will sound crazy, but it's true; turning off the stream is more hectic than turning it on. To help you with the discord live streaming, here are some steps to set up the discord live stream.
Part 1 How to Stream on Discord?
Step 1: Join the Voice Channel
Doing a live stream on the discord will require few things. The applications themselves take care of the most complicated software and hardware decisions, but there are certain limitations. The older graphics cards and processors will not allow you to play nice with the discord streaming feature. You can be surprised by the power it takes to share the games and screens with Discord friends through the application. First, you will have to join one of the server's voices channels.

The voice channels are marked with the speaker icon, and the players might tell them apart from the text channels of the server. The text channels are marked with the hashtag. Double click on the voice channels to move it.
Step 2: Click on the "Stream" button
If the user joins the voice channel, then it’s time to start the streaming. The discord applications have added the dedicated button for streaming which can be found underneath the left corner of the client. It is located above the players' icons of discord settings, headphones, microphone, and display picture. The players must be looking for the monitor with a cut-out of arrow labeled” screen."

If the players have plugged in a webcam, you can also turn the voice channels to face meet-ups. But if they are only looking to share the screen, then the monitor icon will be their preferred choice. By clicking the screen icon will take them to Step 3.
Step 3: Stream a specific section or whole monitor
After clicking on the “Stream” button, it will greet you with the windows, which will allow you to choose the type of streaming you would like to do. The users can pick in between the single sharing application such as Chrome, steam, and other applications that discord and recognize as open. This is how the streaming of discord functions is used, especially when it comes to streaming gameplays.
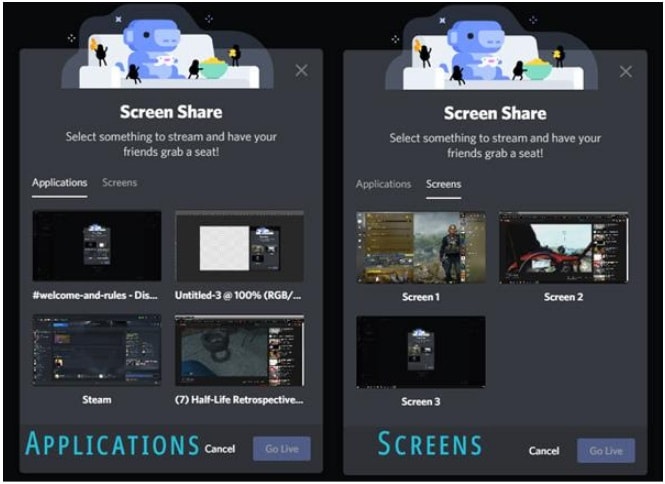
Another option is to share the entire monitor. It means that it will share everything on the monitor including the user's open windows, files, desktop. Viewers can view everything. It will be an easier option if the user is trying to capture the game in the borderless-windowed or windowed mode.
The “Screens” will be an excellent option for explaining the concept, which helps to troubleshoot the friend's computer or friend, which allows them troubleshooting their own through the Discord streaming options. Once the user has selected the application or screen to share, then click on the "Go Live" in the bottom right corner to continue.
Step 4: Choose the streaming quality
After selecting the capture options, it will open up another window and the final streaming options for choosing the players who can start the actual stream. The discord reminds us about the player that monitors, the program streamed, and the discord channel will Livestream. Until and unless the user subscribes to the Discord nitro, premium service, the Livestream will be limited to 720p or 480p. The high-quality streaming is only available on the discord nitro subscription.

The rules apply the same to the frame rate. The free user is limited to up to fifteen and thirty frames per second. The streaming service of discord allows the nitro members to stream at sixty frame rates per second. It is not a big difference, and 720p is ideal for most users.
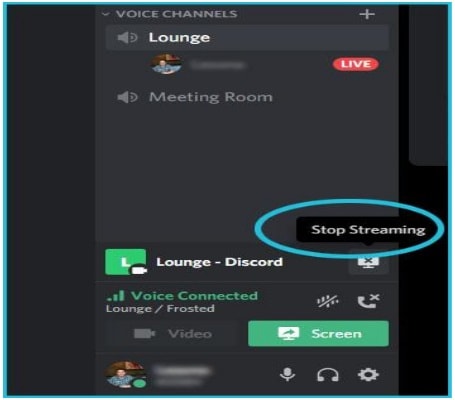
Step 5: How to end the stream?
You might get surprised by knowing that the ending stream is the most hectic part of this process. The users are very accustomed to clicking the "disconnect" button for leaving the voice chat, and they might get tempted to click the same button for ending the stream. But there is a button explicitly designed to end the stream, but most users tend to miss it. The button is just above the discord familiar disconnecting button, and the users will select the monitor icon with the “X” to stop the stream.
That's it! This application's only restriction is that the users can stream only inside the voice channel. All thanks to the in-built limit of the discord to decide how many users can be entered at a single time, which means that discord tills will not be replacing the twitch at any point in time. The streaming options of discord are targeted to the friends and moments which happen in-game. But this might change soon.
Part 2 How to Record Discord Live Streams?
The Wondershare DemoCreator is a powerful screen recorder and video editing software that allows the users to instantly and easily share, customize and capture the videos for educational, commercial, and personal purposes.
This software is versatile, affordable, and easy to use, allowing users to distribute and produce multiple knowledge videos. Examples include vlogs, gameplay recording, demo tutorials, and training courses. You can also record your microphone, system, web camera, and PC screen simultaneously. You can even select the frame rate and specific area for recording.
When it comes to the DemoCreator for recording audios and videos efficiently across the platforms such as discord, it follows straightforward guidelines. Here are some steps for you to determine how to record discord live stream with Wondershare DemoCreator.
Step 1: Download the Wondershare DemoCreator
First, you will have to download the software from the official website. After the downloading is finished, you will have to install the software by following the guidelines. After installing the application, you will be provided with the autonomy for registering yourself on the platform.
For that, you will have to choose either Monthly, Annually, or the perpetual license to have access to the software.
Step 2: Log in to the Discord and Select the Recording Content
On a similar desktop, you can either run the discord across the web browser or install the application. After launching the specific discord application, you will have to log in to the account and select the content you want to record.
Step 3: Select the "Capture" Tab
After the successful installation of the program, you can launch it. You will have to select the "Capture" section out of two options, which are provided on the application's home screen.
Step 4: Enable Audio Recording
With the screen on the front, you will have to configure the required setting before setting the Discord audio recording. You will have to observe the various options and select the "Audio" section on the left panel. Move your cursor across settings and enable “Computer Audio” by changing the setting to the “Capture”.
Step 5: Select the Discord Screen and Record
With the audio setup for the screen recording, you will also need to select the particular area of your screen which you want to record. For selecting this, you will have to access the "Screen" tab on a similar panel to change "Screen Capture" to the discord's particular targeted window.
After you are done with recording settings, you can tap on the “F10” or “Screen Recording" to proceed with the initiation. The software counts to three before starting the screen record discord stream.
Step 6: Drag the Recorded Files on the Timeline
After you are done with recording the live stream, you can drag recorded files to the platform's timeline for editing them. This software offers to edit the video by adding various transitions effects and frame-by-frame editing before giving a final touch.
Step 7: Export the File
After the video recording and editing, you will have to move the file to the export windows to export other files. You will now need to move the audio recording and platform provides you to choose the particular file with the name and location. Set the format to Mp3.
You are also offered various sound options which can be changed easily, including the setting up sampling rate, channel numbers, encoder, and bitrate of file. Tap the "Export" for executing the process.
FAQs
- What is Discord?
Discord is software that is specifically designed for gamers. The platform supports both video and voice sharing along with the specialization of imagery and text.
- Can Discord Recording Be Done with Software?
Yes, you can record the discord with the software. If you love gaming and want to communicate with people efficiently, there is much-dedicated software available.
- How to Record Discord on Windows Pc?
There is much software available on the internet. You can choose them to record the discord on a Windows PC. Configure the audio sources and other parameters. Record the streaming and save it in available formats.
Conclusion
Want to know, can you record discord stream? The above recording and streaming steps will help you to record and stream. Recording the discord is an easy task. You will have to follow up the steps, and it will make your work easy.


