How to Use Nimbus Capture Tool on Chrome
Nimbus is a productivity and workspace management tool, designed for corporate and office environments that are not consolidated in a single physical space. Offered by Nimbus is a capture tool, available as a browser extension for Google Chrome, Mozilla Firefox, and Microsoft Edge for both Windows and Mac OS.
You can use Nimbus Capture tool to record video and audio from your device output, record voiceovers using mic audio, as well as capture screenshots. Moreover, Nimbus also offers basic editing features such as cropping, trimming, and annotating recorded media, as well as drawing tools while recording your screen.
- Part 1. How to Use Nimbus Capture Tool to Capture and Record Your Screen
- Part 2. How to Edit Screenshots and Screen Recording Using Nimbus Capture Tool
- Part 3. How to Upload and Share
- Part 4. How to Cooperate Via Workplace with Nimbus
- Part 5. OCR for Screenshots
- Part 6. How to Record Screen Using WonderShare DemoCreator
How to Use Nimbus Capture Tool to Capture and Record Your Screen
To use the Nimbus capture tool, you will first need to add it to your browser as an extension.
Once added to your browser, Nimbus will require you to sign up or sign in. You can create a dedicated Nimbus account, or sign in with Facebook or Google instead.
Once signed in, the capture tool will be ready to use. You can find it in the extensions menu for chrome here:
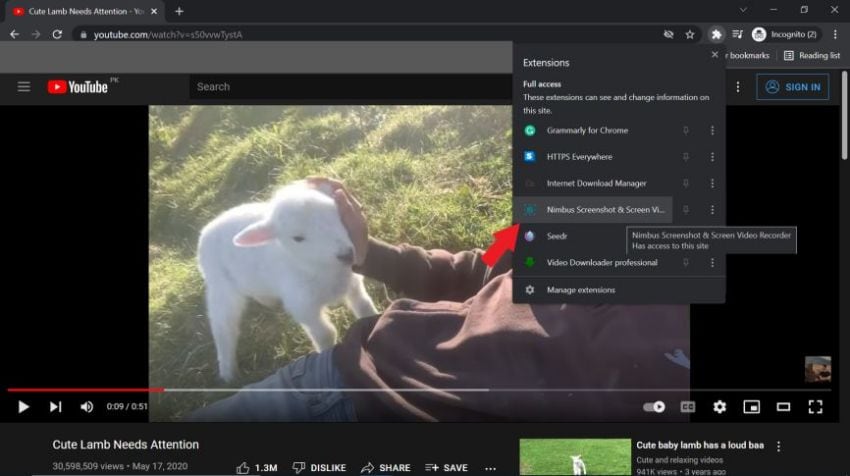
Once you open it, you will be presented with a menu with options to capture or record only part of your screen, the entire screen, or a specified tab in Google Chrome. You can choose to have just a fragment of the window, the visible part of the window, or a custom area.
Once you have chosen just how much of your screen you want to be captured or recorded, you can then pick the action of the extension after capturing/recording has been completed. The options include an editing window where you make changes to the media you just captured, media download, or upload to platforms such as Google Drive or Dropbox. You can also simply upload the file to Nimbus.
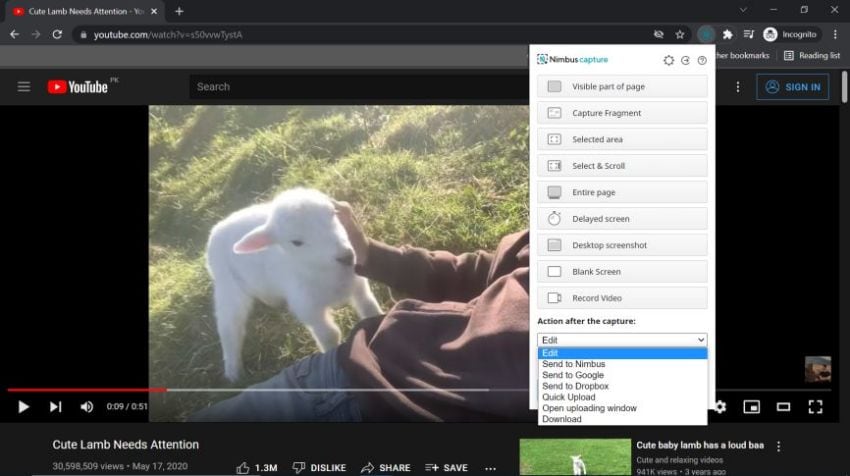
Now, to simply take a screenshot from your browser, simply select “Visible part of the page” or “Entire page” depending on what you are looking for. You can also opt for a delayed screenshot. Depending on what you choose, you will be asked to specify the window or tab you want to take a screenshot of.
If you want to make edits after the fact, choose “Edit” from the drop-down menu under “Action after the capture”. This way, when you take a screenshot, you will be taken to the editing window automatically, which will look something like this:
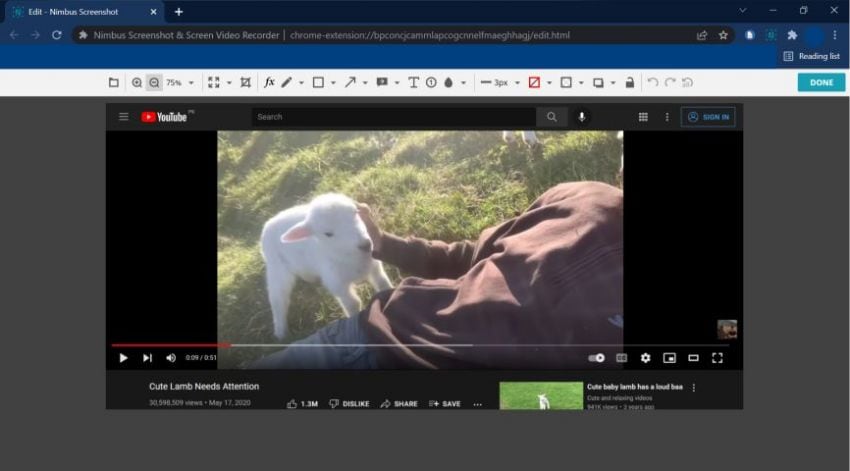
At the top, you will notice a toolbar that you can use to make various edits to your screenshots such as adding shapes and lines, text, text arrows, formulas, blur, and shadows.
To record your screen as a video, there is a slightly different method. From the same menu, you used to take a screenshot, select “Record Video”. This will bring you to a menu with further options for your screen recording.
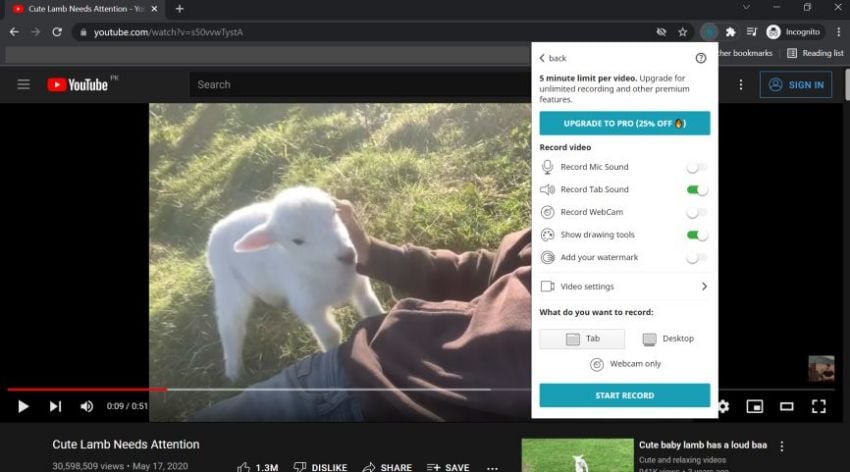
You can record your screen, device internal audio, microphone audio, webcam video, as well as have drawing tools for use while recording your screen. You can also choose to record desktop, a single tab, or solely from the webcam.
Moreover, there are options to set up the resolution of your screen recording, delayed recording start, auto delete drawings, and to specify the webcam and mic you want to use during the recording if you have multiple attached. Once you have set up these parameters, click ”Start Record” to start recording your screen.
The free version only allows five minutes of constant recording. If you want to record your screen for longer, you will have to upgrade to the pro version.
How to Edit Screenshots and Screen Recording Using Nimbus Capture Tool
Once you are done with capturing a screenshot or recorded video, you will automatically be directed to the editing window provided you chose “Edit” from the drop-down menu under “Action after the capture”. Once in the editing window, click on the “Video Editor” button to begin editing your video.
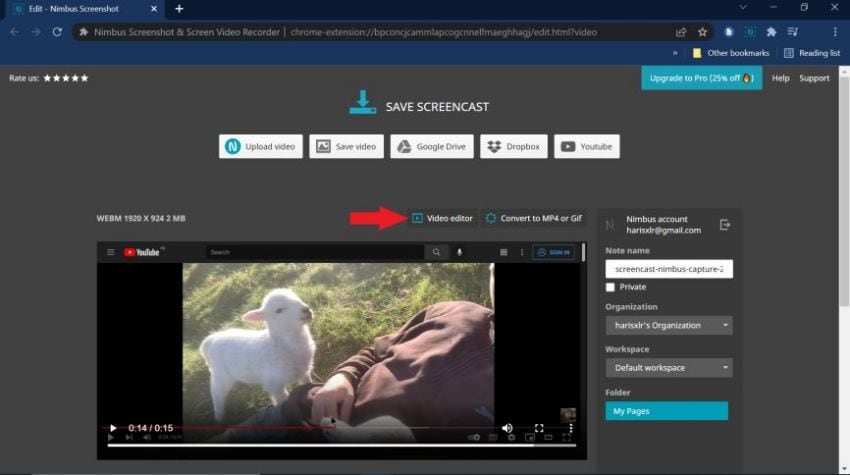
Unfortunately, the video editor provided by Nimbus does not have much for features, meaning you can only crop and trim your captured video. Any drawings, annotations, and text captions will have to be applied while recording your video.
Choose the “Show Drawing Tools” option before you start recording, which will provide you with drawing tools for your video when recording. The drawing tools bar will be found at the lower-left corner of the screen, and will look something like this:
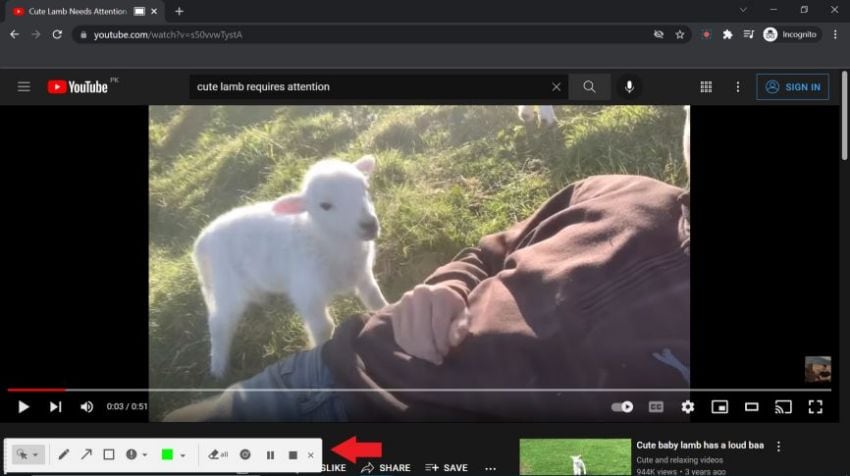
You can use the tools on the bar to draw shapes, lines, and highlight your recorded video.
To edit a screenshot, simply take the screenshot and you will automatically be directed to the editing page, provided you have selected “Edit” from the drop-down menu under “Action after record”. The editing window will look something like this:
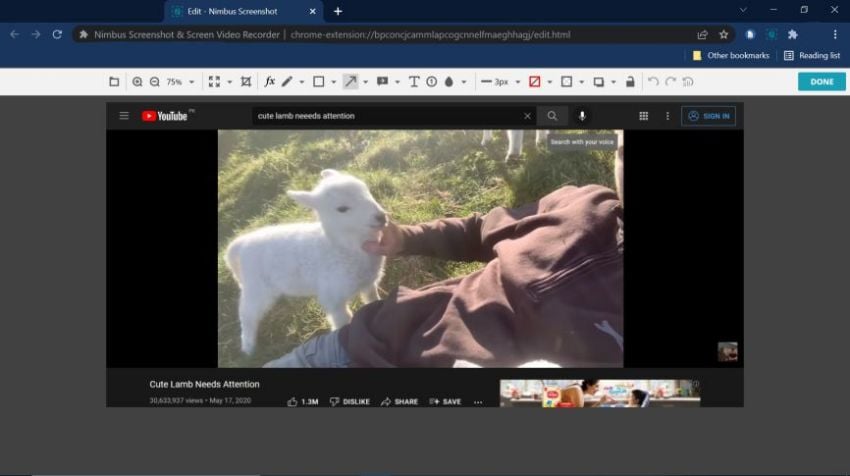
Here, you will have options to edit your photo. These include cropping, resizing, inserting lines and shapes, drawing, blurring, and more. Simply click icons off of the toolbar to apply your desired changes.
How to Upload and Share
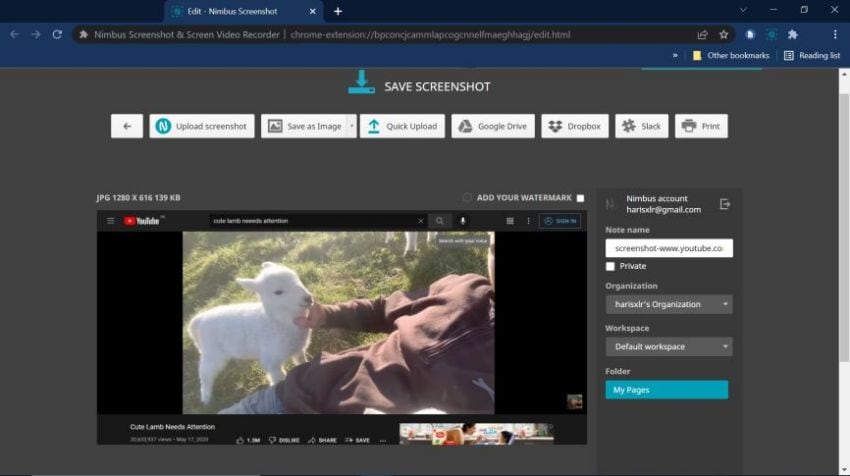
Once done making edits, click the “done” button at the right to go to the upload and share window. You can download your file right away as an image or a pdf, upload it to Google Drive or Dropbox, or directly to Nimbus. You can also print it straight away. The upload and share window will look something like this:
Nimbus is available for download on all major platforms such as Windows and Mac Os on all major browsers such as Google Chrome, Mozilla Firefox, and Microsoft Edge.
How to Cooperate Via Workplace with Nimbus
Nimbus offers productivity tools that you can use to take your workplace management to the next level. One example of such is the note feature, which allows multiple users to contribute to a single document in real-time, allowing seamless integration of contribution to a single project.
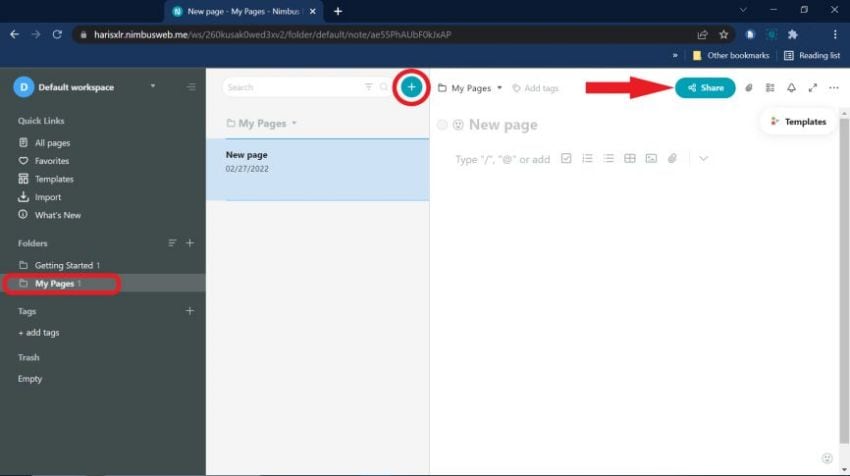
To create a shared note, you will first need to go to “My Pages” from the menu at the left. Create a new note using the plus button, and then click “Share” to get a shareable link. Once created and shared, multiple people can contribute to the document.
OCR for Screenshots
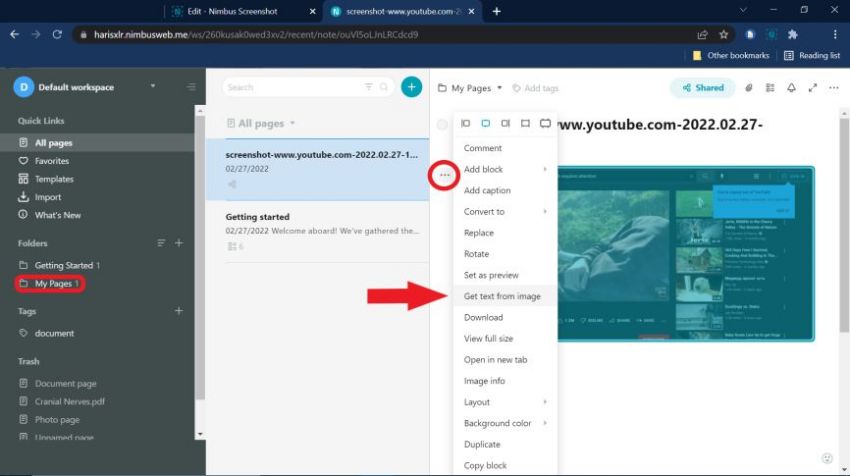
If you would like to obtain text from the screenshot you take using Nimbus, upload it to Nimbus. Once uploaded, go to Nimbus workspace, choose “My Pages” and then the screenshot you took. Click options on the screenshot to obtain text from it. It is important to note, however, that OCR is a premium feature that you will need to have a paid subscription for.
How to Record Screen Using Wondershare DemoCreator
DemoCreator is an all-in-one video editing software that also offers options for screen recording. To use DemoCreator to record your screen, you will need to do the following things:
First of all, download and install the software from https://democreator.wondershare.com
Having done that, launch the software. You will see this window:
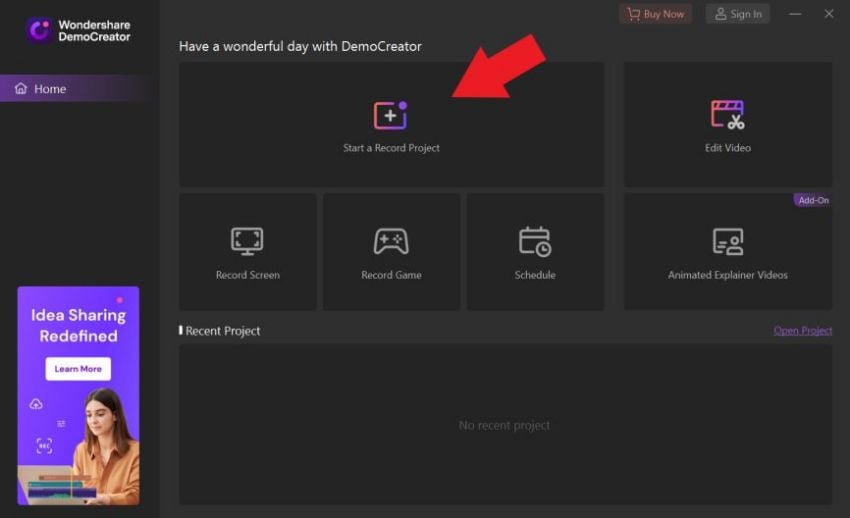


Click “Start a Record Project”, which will pull up a set of controls. You can choose what and what not to include in the project, including screen output, webcam feed, system audio, and microphone audio.
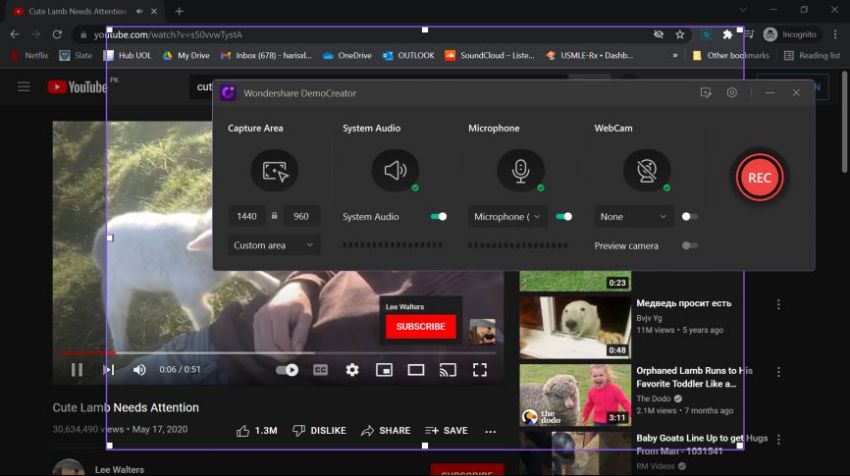
Once done setting up the parameters, click the record button to start recording. While recording, you can draw, annotate, and insert shapes and lines into the video. Once your recording is finished, you can then use the editing window to edit your video if necessary.
Conclusion
Screen recording is a valuable tool for a lot of users, both consumers and creators. Nimbus capture tool is a screen recorder that can be added to your browser as an extension and take screenshots and screen recordings of your browser window. Nimbus also offers lightweight editing tools for your recorded media such as cropping, cutting, and trimming, as well as captions and annotations.
If you would like a different, more traditional tool for recording your screen, you can try out Wondershare DemoCreator which is free to download and use, and is available for use on both Windows and Mac OS. DemoCreator allows screen recording, as well as media recording, using your device’s built-in camera and microphone. And lastly, DemoCreator offers a feature-rich video editor for perfecting your videos, allowing you to take the content you create to the next level.


