

OBS Virtual Camera - How to Set it up and start recording?

If you are in a meeting with many other participants, there will be times when you will have to show your agreement or disagreement to the host. There will be times when you must have witnessed everyone replying ‘yes’ or ‘no’ in the chat every time the speaker asks whether they are audible. The reason why a written answer is necessary is that when there are various participants, it becomes impossible to understand the body language. To solve the problem, you can go for the OBS virtual camera setup that will make things quite easier.
Open Broadcaster Software is the platform that is widely used by streamers and a number of users where they want to display any content on the screen while they are live streaming. It’s an open-source platform and you will have the option to add multiple sources to the stream. Setting up this tool will save you from the hassle of turning on/off the microphone every time you want to answer in ‘yes’ or ‘no’.
Part 1 How to set up virtual camera on OBS?
We are witnessing our workflows shifting from office to a virtual setup and the demand for virtual meeting apps and plug-ins is increasing in a direct proportion. For the beginners out there, adding a virtual camera is a very difficult task and here, we are going to jot down a simple and straightforward guide so that you can do it without any extra effort.
1. You will need to download and install the OBS Studio from https://obsproject.com and before hitting the Download button, make sure that you are choosing the correct OS.
2. Next up, users will need to get the right plug-in for the virtual camera to work. Navigate to the Resources section on the OBS website and search for the OBS VirtualCam.

However, before downloading, go through the instructions and make sure that the plug-in version is compatible with the installed OBS version.
3. Once you have downloaded and installed the setup file, reboot the system.
4. Launch the OBS Studio and you will have to add a scene and a video input.

5. It will display the content on the black screen above and you can use the drag & drop tool to fit it in the full screen. Now, if you are planning to use the virtual camera, you will have to add a green screen and use the Chroma Key.
6. Once you have added the source, right-click on it and click on Filters.

7. A new dialog box will appear and you will need to click on the ‘+’ icon under the Effect Filters tab. Select the Chroma Key option and it will remove the green screen and you can add any scene of your choice. You will have the option of adding multiple layers of Source where you can enhance the overall appearance of the stream. However, if you are just installing it for the virtual meetings, there is no need for these tweaks.
8. Now, go to the Tools tab that is present on the top horizontal menu. You will find the VirtualCam option here, click on it to set it up.

9. Leave the dialog box as it is and hit the Start button.
10. Now, launch the meeting app and there you will need to select the OBS-Webcam as the preferred camera. Also, don’t forget to use the mic source for the input.
Part 2 How to make your webcam look better?
As you might know by now that the OBS virtual camera setup is quite simple and easy to get done with, there are still a few things that you need to tweak to get the best results. Though we would highly recommend going for a DSLR setup to enhance the quality, if you couldn’t go for one, here are the steps you should follow to get better results with the existing setup.

1. Once you have added the video source, you should make sure that it is set to the highest resolution possible. The minimum should be 1080p. You should set the resolution to Custom and set it to the highest from the drop-down menu.

2. Scroll down and set up the audio input. You can go for any external mic for better and crisper audio.

3. Also, scroll to the FPS menu and set it to 30FPS. If you are not going to stream games, this will be more than enough to get done with. Right below that, you will also get to set up the video format along with color space and range.

4. If the webcam that you are using is capturing a wider frame, you can always crop it to your liking by holding the Alt button and drag/drop the corners to set it to your preferred ratio.
5. Those who are using a webcam might be facing an autofocus issue and here, we are going to give you a few steps to follow to resolve the problem.
6. Right-click on the video source and click on Properties. A new dialog box will open up and you will need to hit the Configure Video button.
7. You will get a new light-themed dialog box where you will find multiple sliders to adjust the output. We won’t recommend tweaking these details. However, you should turn off the autofocus by clicking on the Camera Control tab.
8. Uncheck the Auto button against the Focus tab and set it where you find it suitable according to your requirements. Hit Apply to save the settings.
Part 3 How to record screen and webcam with OBS?
Apart from the process of plug-in installation and OBS virtual camera download, we would also like you to go through the process you need to follow to record the desktop screen.
1. As you have already downloaded the OBS Studio from the official website, launch the app and you will have to add scenes and sources.

2. Once you have created a scene, you will have to add sources for it. These sources will be the destination paths from which the Studio will record the content. It will include multiple desktops, folders, windows, etc.
3. Right next to it, you will get the section to tweak the audio. You can use the sliders to adjust the mic and system audio levels. You can click on the gear icon to configure various other settings.
4. On the extreme right, you will get a dedicated Settings tab where you will get to configure a plethora of options related to the audio, video, camera, etc.
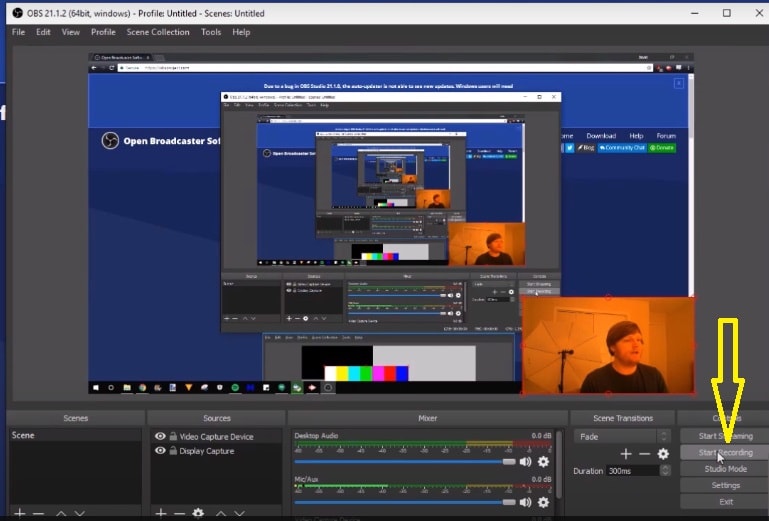
5. Once you are done with the settings and all the configurations, you can hit the Start Recording button to get started with the screen recording.
Part 4 Recommended Tool to Record webcam and screen
The virtual tech isn’t quite easy for beginners and if you are in a confusing spot where you are unable to find the right application, we are here to help you with everything. The tool that is highly in demand is a screen recording one and the ones that come inbuilt with the operating systems aren’t quite feature-rich. We would recommend going for the Wondershare DemoCreator. It’s the software application that comes packed with features. The primary feature that it serves is to record the screen.
The minimum requirements that you should go for are 3 gigs of RAM and 2GB of free hard disk space for smoother installation. DemoCreator is the paid tool and if you are using the free version, it will add a giant watermark on the final export file. The recorder comes with an integrated editor where the users will get to tweak the audio, video, and other aspects to give it the precise look just as you want. The tool will also offer annotation tools that are seen to be quite helpful for the tutors and content creators to establish easy communication with the audience.
Few Key Features:
- The recorder will let you select the specific window or the area of the screen. You can use the drag & drop tool to make the selection. You can also enter the custom resolution to select the screen.
- The annotation tools will let you draw on the screen while recording. It will also allow you to add any external mic or camera for better audio and video.
- Users will also get to enable the system sounds in the screen recording.
- DemoCreator will also let you activate the Chroma Key feature that will allow you to get a clear backdrop using the green screen.
- If you are capturing multiple screens, you will also get to use multiple transitions for a much better video.
- The interface will let you add captions and a voice-over to the recorded video.
Conclusion
There are a few users who have reported the OBS virtual camera not working issue, it can be easily fixed by simply re-installing the plug-in. We hope that the guide has been a little helpful and you are able to use the virtual camera without any extra hassle for the purpose you wanted it for. OBS Studio is a feature-packed open-source tool that you can install on any operating system. It lacks a few essential features compared to the premium tools and to resolve that issue, we recommend going for Wondeshare DemoCreator.


