QuickTime iPhone Screen Recording Guide

We know that there's a built-in recorder for iOS that allows users to capture the onscreen activities on their iPhone, iPad or iPod touch easily. For Mac users, the QuickTime player is usually the first choice. But, how about using QuickTime Player screen recording iPhone? It that possible to achieve? Actucally, the answer is yes! You just need to connet your iOS and macOS together and you'll get the job done.
How to Screen Record iPhone with QuickTime
QuickTime is a screen recording app that comes pre-installed with every mac device. It is available on every version of iOS no matter which device you are using and is remarkably good at recording the iPhone screen without much effort. The simple user interface and ease of controlling every tool are what make this app so popular among every Mac user. You can use it to make video demos, create presentations, or any tutorials which will add more impact rather than just still images.
For classes and educational stuff, it will be more efficient at making the student understand things better. To get started with using QuickTime to record videos on your iPhone, you will need a USB cable too which you can connect your phone with the Mac device. And another requirement for the whole process is you should have an updated OS on both your iPhone as well as the Mac.
So if you have struggled with the "QuickTime iPhone screen recording not working" problem or you have to start recording your iPhone screen with the help of QuickTime on Mac, you will need to follow the following steps:
Step 1: Connect the phone to Mac
To screen record iPhone QuickTime video using the Mac device, you need to connect both of them using a USB cable. This will enable the Mac device to use the QuickTime plugin on your iPhone.
Step 2: Launch QuickTime on Mac OS
Now, after you are done connecting the iPhone to the Mac, you will need to launch QuickTime Player, which can be found in your Mac OS. You can find it by going to the applications where you can select the QuickTime player.
Step 3: Starting recording
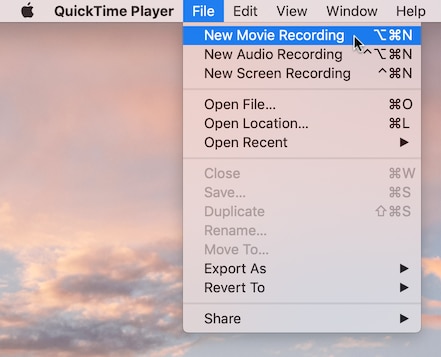
After you launch the QuickTime player, the user interface window will appear, which will have options such as "File", "Edit", "View" and many more. From these bunch of options, you need to select the file menu.
This will open a drop-down list of different options, which includes New movie recording, New Audio Recording, and New Screen recording. You need to select "New Movie Recording" from these options, which will lead you to the recording interface.
Step 4: Choose your device
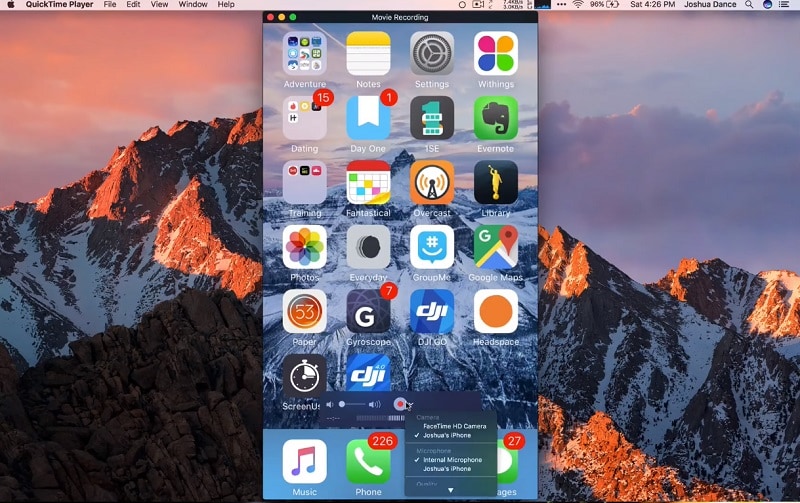
In the interface where there will be options for video recording from the screen, you need to take the pointer to the active window, after which record and volume controls will be visible. From there, you can find the record button with a red icon. You need to select the arrow next to this button that will show you the camera and microphone controls.
There will be a drop-down list after you click the arrow that will show an option for “Connected iPhone”. Click on the "camera" and "Microphone" options and select your iPhone from them.
Step 5: Screen recording on iPhone
After you are done with the previous step, unlock your iPhone as you normally would do, and then on your home screen, you will see a window that shows options to start your screen recording.
You can click on the red button to start the recording, which will start the recording instantly. Now whatever you do on your iPhone will be recorded via QuickTime.
Step 6: Stopping and saving the recording
When you are done with your screen recording process, you can click the STOP button that will be available on the upper right menu of your Mac device. Another way to stop the recording process is to hover your pointer over the recording window, and then you need to click on the stop button (red button) on the screen.
This will end your screen recording, and you will be able to save it to any file you chose.
Step 7: Saving and sharing
To save the video to any desired location, click on the "File" option from the QuickTime player window on your Mac, and then select Save from the menu. The saved video will be in a .mov file. So, by default, whenever you open any .mov file, it will directly open the QuickTime player.
After you are done with saving the video, you can share it anywhere by clicking on the desired file and selecting it to share online or copy it somewhere to other folders.
Additional tools
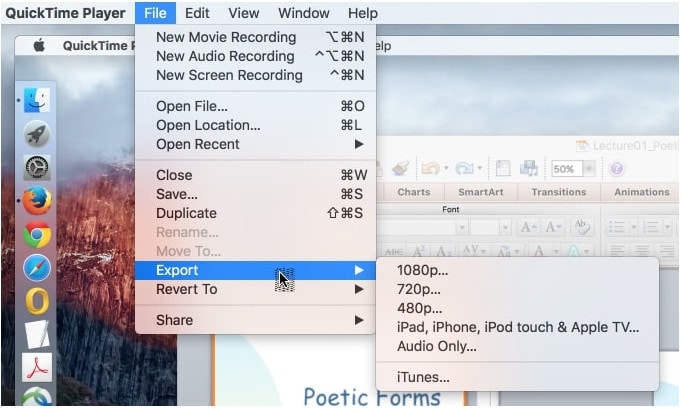
Sometimes users need to use trimming tools and cutting the screen record into different portions. Well, thankfully, QuickTime has inbuilt tools for this very purpose. To do that, the user needs to open the desired screen recorded video or any video in .mov or .mkv format. Then they need to pull the "Edit" menu from the QuickTime player and then select trim.
In case someone wants to use shortcuts, they can use Command+T, and the trim option will be readily available. Then dragging the yellow bars at the left and right corner, the user can trim the video to any desired length. Then clicking on the export button will save the video to any desired location. And that’s it, you are done with QuickTime player screen recording iPhone process.
Related FAQs
Is QuickTime free to download?
Yes, QuickTime is free to use. It is mostly preinstalled on all Apple devices. If, for some reason, your device is missing the application, then you can always download it from the Apple website.
How to download QuickTime on iPhone?
Mostly the application is a default plugin installed on your iPhone. But if it's missing, then you can go to the official website of apple and then navigate to the free download of QuickTime. Then you will need to put your email where you can get your plugin.
Is QuickTime safe to use?
Yes, the QuickTime application is completely safe to use, and there is no danger for threats like viruses associated with the app. You can use the app without any troubles on any of your iPhone devices, and since it's a pre-installed app, you won't have to worry about anything.
How to save or share videos from QuickTime?
After you are done with the screen recording process, the video will automatically be saved to the designated folder under-screen recordings. You can search your required video file and then select it to share wherever you wish to with a few clicks.
QuickTime for iPhones is a really helpful application, especially because it's a default app to work with for iPhone users. Usually, any smartphone user has to download the external application to perform any task related to screen recording. But because of its useful tools and simple user interface, it is one of the most popular applications available on the apple store. There are various tools in the app to explore which any iPhone user must try to complete their requirements and successfully record amazing videos from their screen.
That was all the information and step by step, which can help you record your iPhone screen with the help of any Mac device. You can use these videos to help you with more productive presentations, demos, or whatever you need the screen recorder for.


