3 Easy Ways to Record Streaming Video

For the creators, live streaming service can fetch good amount of engagement on their channel. Well, if you want to keep the session with you, you will need to install a live streaming video recorder that can allow you to tweak some basic settings to enhance the overall video quality and make it more presentable.
Various tools are available in the market and the majority of these applications are paid and you might not be willing to pay for these tools. We have got you covered; the methods that we are going to discuss here will allow you a free approach. These native tools that are available on both Mac and Windows are more than enough to let you record a live session that you are streaming for your audience.
1. Record Streaming Videos on Windows PC
A lot of people have no idea that the PC that they are using has already a recorder built right into it. This native tool is not very feature-rich but users will be able to get some basic tasks done without any hassle. Windows 10 Game Bar is that native tool that we are talking here about and it will allow you to capture tutorials along with gaming streams in high frame rates.
Microsoft is bundling Xbox app right into the operating system and in a majority of Windows 10 machines, you will find it right in. Comparing with the Game Bar version that Microsoft offered when this tool was introduced, it has now gone through some major updates, and now, it allows you to capture GIFs and .png screenshots, as well.
How to record stream video with Game Bar
When you know there is an integrated tool that you have right on your PC all along, you might be wondering how to use it and what the requirements you need to meet are. There is nothing to worry about as we are about to lay it out for you. Let's dive in without any further adieu.
Before we dive into the steps, you need to know that the integrated Game Bar will not work on the apps. It will not record apps like File Manager. It will also not let you record the desktop.
To ensure you are using the tool to its full potential, it's important to tweak a few settings. All you need to do is follow the steps below and you will be good to go.
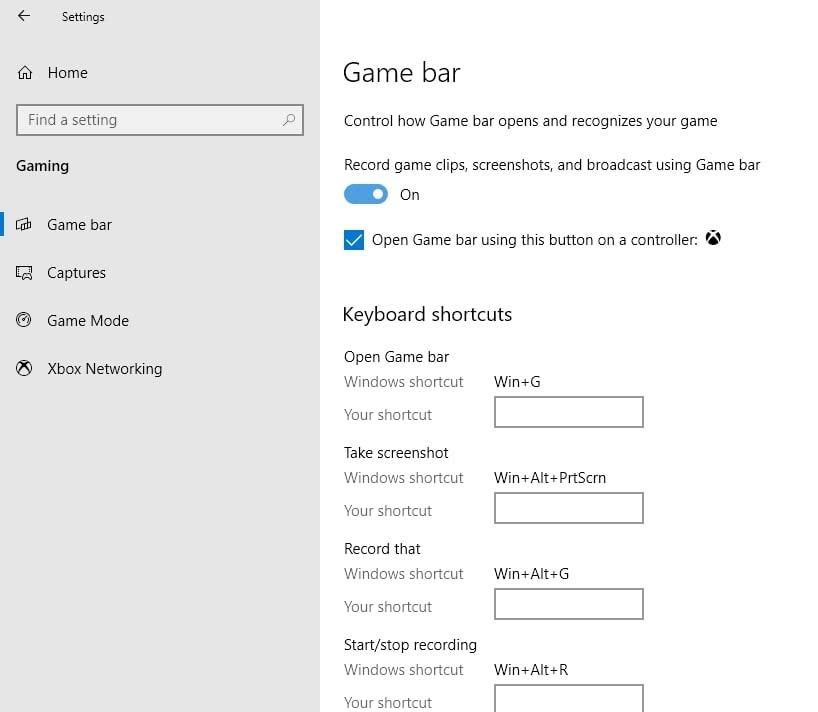
Once your system fully boots up, opt for launching “Settings app”.
Click on the Gaming tab and here, and you will be greeted by the Game Bar tab. Ensure the toggle, which says, “Record Game...” is enabled.
Close that Settings app and launch the app you want to record and once it’s up and running, you will need to press Win+G to open “Game Bar” control center.
If you don't get this control center on pressing the shortcut, there are high chances that you are accessing it for the first time and the operating system will ask for your permissions. Hit the ‘Yes, this is a game’ checkbox and you will get “Game Bar” on your desktop.
The bar will give you the Capture tool that you will use to record the particular app. As you will click on this tab, you will get a new dialog box where it will give you the options to record video or/and capture screenshot.

In the same dialog box, you will also get to turn on/off the microphone. The latest update of the Game Bar will allow you to also record the last 30 seconds of the footage.
While you are at it and before you start to record the video, make sure that you have enabled the audio recording. All you need to do is go to the Game Bar Settings page and go to Capturing.
Here, make sure that ‘All’ is checked so that it can record games or any other content with audio.
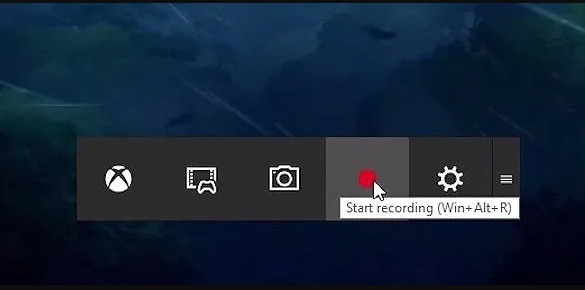
Once you are done, you will need to click the same record button to save the video. We hope that we can give you an alternative for the live stream recording software and you don't have to spend a single penny.
2. Record Streaming Videos on Mac
Everyone knows that Mac is the operating system that is just the best when it comes to having the basic feature set. Unlike Windows, Apple even offers a movie editing tool that will give you some necessary features that will help you in getting the basics done.
Many Mac users will use this tool just to play their media content and if you aren’t aware of its recording capabilities, you are just about to get it right. The screen recording tool will be needed by a lot of people, no matter whether they are a professional or a student. If you are a student, you will need to make some presentations and share study material with your friends.
QuickTime Player will offer quite an easy interface that everyone will be able to understand without going through any effort. The creators will also be able to create detailed guides for their online audience. The interface will also let you record the microphone and webcam along with system sounds.
How to record live streaming with QuickTime
There are multiple options that you will find on the internet where the users will be able to record the screens. A majority of the third-party applications are seen to be quite expensive and there is a majority of people who don't want to invest that much. To get their basic tasks done, the native apps of their respective operative systems will be more than enough.
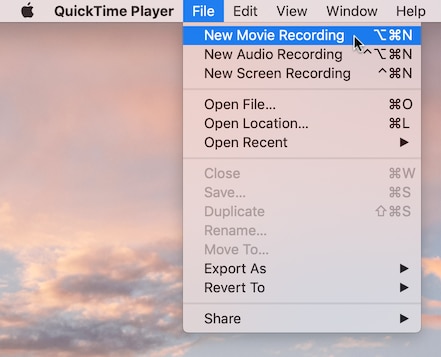
From the Menu Bar, users will need to launch the QuickTime app. If it's not there, you can always hit Cmd+Spacebar and enter the app name.
Once launched, you will need to click on the File tab and then click on the New Screen Recording. You can also trigger it by hitting the keyboard shortcut Cmd+N.
It will give you a control center and here, multiple options will be provided. The first three options will be related to the area of the screen that you want to capture as a screenshot. Moving on, you will be able to record the entire screen and/or a section of the screen.
Right next to it, you will get an expandable menu as Options. Here, you will be able to select the timer, the destination where you want to save, and the peripherals you want to use.
From this expandable option, you will get the option whether to record the mouse clicks and you can also check the option if you want QuickTime to remember the parameters you have used last time.
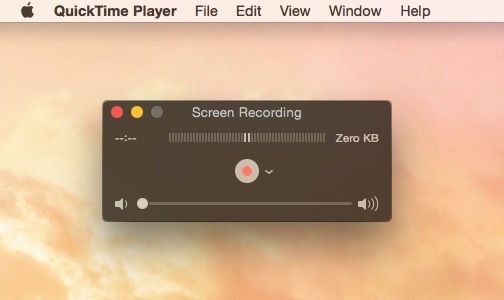
Once all done, you will get to click on the Record button. Once you are finished, you will need to press the Stop button present on the taskbar. It's one of the best alternatives of live streaming video recorder you can settle for.
3. Use Live Stream Video Recorder Software
The native screen recorders will be sufficient for basic users. These tools don't offer any kind of advanced features and if you are a professional, you will need to have a few applications ready for you.
A screen recording application is one of the most important ones and you will find it quite helpful in times you can’t even imagine. No matter how advanced the tool each operating system has to offer, you will not be able to use one on another. Well, if you want to use a single application on both operating systems, we are here to help.
Wondershare DemoCreator is the one that will help you in recording the screen in top-notch quality and also, give you a range of options/features to tweak the footage according to you.
It's a very easy tool that you will find while searching over the internet. The interface that you will get here is highly intuitive and user-friendly. The dashboard offered by Wondershare will also allow you to easily navigate through the options. The USP of the application is that it packs an inbuilt editor and the installation will also not take much larger space on your computer.
The editor that you will get here is also able to add multiple transition effects and annotations that will help in enhancing the overall quality and also establishing a better connection with the audience.
How to record stream video with DemoCreator
While you are searching for the right application to record your screen, there are not many options that you will find as helpful and easy-to-use as Wondershare DemoCreator. The steps that you need to follow are very straightforward and you will not seek any sort of professional help. Let's dive into the steps.
 Secure DownloadSecure Download
Download and install DemoCreator on your PC or Mac, click on “New Recording” from the screen.

Select the recording area of live stream, customize the webcam and audio settings and then hit on the red record button.
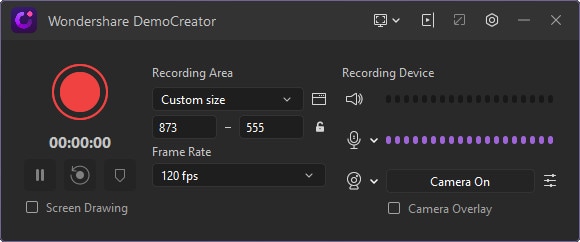
Now the program should start recording live streaming videos. You can stop it by pressing F10 anytime you want.
Conclusion
Through this article, I have tried to resolve the issue that you might be having related to picking up the right live stream video recorder software. The native tools that Windows and Mac have to offer are very limited in terms of features and functionality. You will need to use a separate application that can give you multiple customization options that you are going to need to get an overall better video. The pre-loaded transition effects that you will get on Wondershare DemoCreator will help in giving your video professional quality.


