How To Screenshot Netflix On Any Device
Do you like the show you're watching on Netflix? Maybe it's a new show, and you want to tell your friends about it. Or maybe it's an old show, and you want to share how far you are in the series with your followers or friends on social media.
But what if you wanted to capture a specific scene of the show you’re watching on Netflix? Ideally, you could pause the show, take a photo of your screen, and post it online. But when you try to take a screenshot on Netflix, you get nothing but an image with a blank screen in the gallery. The reason is most streaming services don't allow capturing screenshots.
There are several popular streaming services including Netflix, Hulu, and Amazon Video that don't support screenshots at all.
Why You Will Need to Take Screenshot on Netflix
There can be many reasons why you might want to capture a screenshot of your current program on Netflix. Some of the reasons include:
- You might want to use the image as a lock screen on your phone or tablet.
- You might want to capture a funny scene with subtitles and share it with friends.
- You might be working on an article describing scenes and need an image to accompany it.
- You might need to do a task and pause your show; taking a screenshot will let you know the exact scene from where you should resume.
Apart from the above reasons, you might have some other reason to take screenshot on Netflix.
Remember that Netflix itself doesn't allow you to take screenshots or record the screen, and for good reason. Screenshots might be harmless but screencasts are not. Services like Netflix have to ensure they aren't used to pirate anything, which makes the screencast ban necessary.
Whatever your reason is to take screenshot, keep reading to find out different ways to do so on your Windows or Mac computer.
 Secure Download
 Secure Download
How to Take a Screenshot of Netflix on Windows PC
When you’re watching your favorite shows on Netflix, you might want to capture a funny or inspiring moment – to save it in your gallery or share with others.
If you’re watching Netflix on your Windows computer, you can’t capture screenshot the usual way. The reason is Netflix can detect PrintScreen and Snipping Tool, resulting in an image with blank screen.
Now that you’re here, you’ll get to know some workarounds you can use to capture screenshot on Netflix running on your Windows computer.
1. The Sandbox method
Sandboxing is a security measure that isolates programs from the rest of the computer. It gives them the freedom to act in ways that normally wouldn’t be permitted, like trying to delete key system files or read passwords stored in your web browser.
Isolating programs and giving them only limited access to other parts of your system also prevents a program from spreading malware, either accidentally or intentionally. You can run a sandboxed program on your computer without worrying about it causing any damage if it gets infected.
In our case, we’ll run the browser in an isolated environment to bypass Netflix’s anti-screenshot technology.
There are many Sandbox applications available online but Sandboxie is the most common one.
Here’s how you can use it to capture screenshot on Netflix on your Windows computer:
● Download and install the Sandboxie app on your computer.
Firstly, you need to download and install Sandboxie on your computer. Once installed, run your browser in a sandbox by right-clicking on your browser icon and selecting Run Sandboxed.
When you do this, your browser will appear on the screen with a yellow border around it.
● Open Netflix and take screenshot
Now you can open Netflix on your browser and log in to your account. At this point, you should be able to capture screenshot by using both PrintScreen or snipping tool functions.
There’s no limit on the number of screenshots that you can take using this method. As long as your browser is in a sandbox, you can bypass Netflix’s anti-screenshot technology. Once you close the session and restart your browser, you can start using it in a normal mode – running in a sandbox doesn’t make any permanent changes to your browser or computer.
How To Screenshot Netflix On Any Device
Do you own a Mac computer and need to capture snapshot on Netflix? If so, then you are lucky because it’s relatively easier to screenshot Netflix on Mac.
Method 1: Mac’s Native Screen Capture
Unlike other operating systems, Apple’s native screenshot tool works for taking screenshot on Netflix. You need to use keyboard shortcuts only to use Apple’s native screenshot tool.
Here is how you can do it:
- Open your browser, go to Netflix, and sign in.
- Now play the show and head to the frame you’d like to screenshot.
- All you need is to hit the keyboard combination ’Command+Shift+3’ to capture the entire computer screen.
- Or, you can use the keyboard combination ’Command+Shift+4’ to cut only the desired part of the screen.
The screenshot will be on your desktop and in the Recent Folder.
If this method doesn’t work for you, record the scene using Wondershare DemoCreator and take a snapshot from there. You’ll learn about the recording screen with DemoCreator in the next sections.
How to Capture a Photo From Video in Wondershare DemoCreator
While you want to capture screenshot on Netflix, you can also screencast using a professional screen recorder like Wondershare DemoCreator. It’s an intuitive and professional screen recorder with lightweight video editing capabilities.
Whether or not you want to record Netflix, you can use Wondershare DemoCreator to capture screenshot or photo from a video.
Here’s how you can capture a photo from video in Wondershare DemoCreator:
Step 1: Download and install Wondershare DemoCreator
Firstly, you need Wondershare DemoCreator installed on your computer. You can go to the Wondershare DemoCreator official website to download the setup. After downloading, run the setup and install by following the on-screen guidelines.
It comes with certain limitations if you’re using it free of cost. To enjoy its full range of features, you can register for one of its paid plans.
Step 2: Select the Video Editor
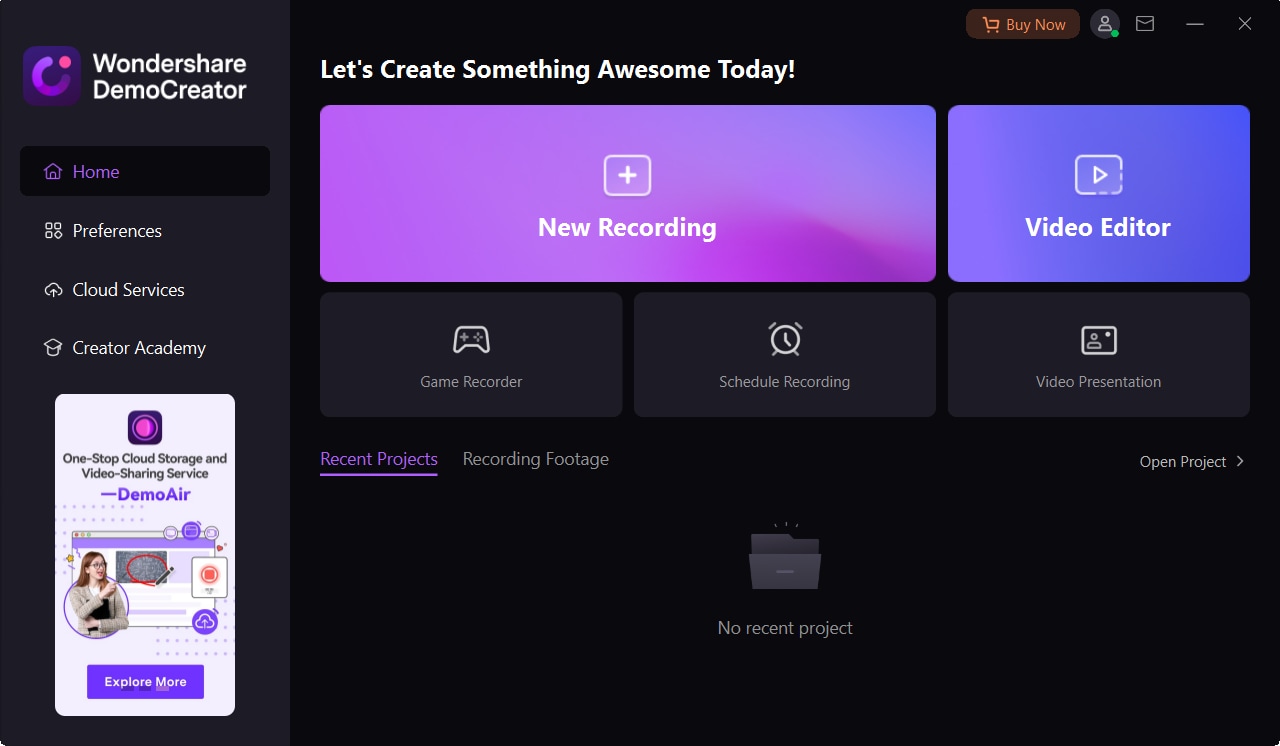
When you launch DemoCreator, it shows a variety of options including screen recording and video editor. Here, you need to select Video Editor. This allows for video editing and makes your videos more engaging and appealing.


Step 3: Import the desired video to the library and drag to the timeline
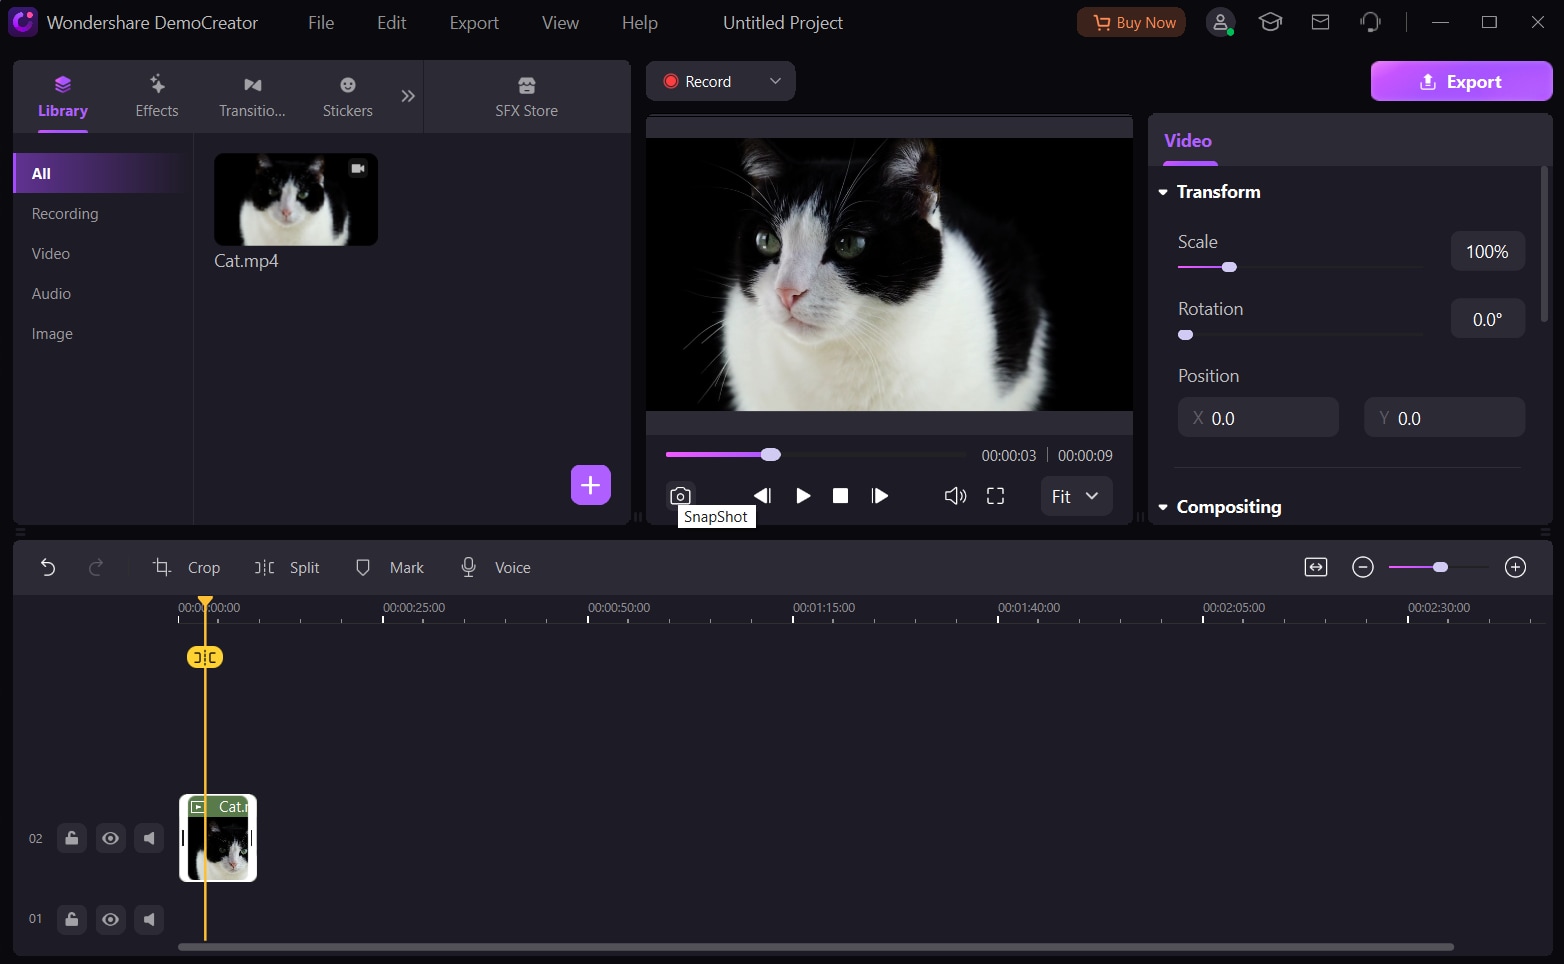
Now, you need to import the video to the library so it can be edited according to your needs. Once it’s in the Media Library, drag & drop it to the timeline at the bottom.
Step 4: Find the frame you want to capture
Here comes the part where you need to work a bit, but even the most challenging part is not challenging enough.
To find the frame you want to take screenshot of, you need to play the video and then stop at the exact frame you want to capture. It’s very easy and simple to take screenshot of a specific frame. All it takes is the click of a button and your screenshot will be ready.
Step 5: Click the "Screenshot" icon
Once you’ve paused the video at the right frame, find the Screenshot icon on the preview window and click it. The screenshot will be added to the Media Library from where you can save it to wherever you want on your computer.

How to Record Screen with DemoCreator
Wondershare DemoCreator is a powerhouse for its screen recording and video editing capabilities – ideal for beginners and professionals alike. It is a popular tool used by many professionals to record how-to videos, lectures, marketing videos, video gameplay, and so much more.
DemoCreator now features a screen recorder, animation video maker, and online screen recorder for your browser – 3-in-1 tool to meet your multiple needs.
If you also need to record your screen, you can use DemoCreator to do it with ease.
You can record your screen with Wondershare DemoCreator by following the below-mentioned four steps.
Step 1: Launch the software and select recording mode
Firstly, you need to visit the Wondershare DemoCreator website to download the setup for your Mac or Windows computer. Install the software after downloading it on your device.
Once installed, you need to launch the program. You can see a variety of options available in the interface.
When you choose Select a Record Project, you can adjust everything as per your requirements. Record Screen option has some predefined settings to capture the entire screen.
Record Game option can be used when you need to record your gameplay.
Step 2: Adjust the screen size
When you click Start a Record Project, a dropdown menu appears; select Capture Area.
Now, set dimensions of the screen record area according to your requirements – drag the frame inward or outward from its edges.
Step 3: Set up Audio and Camera Settings
DemoCreator records the system sounds and microphone sound by default. You can choose to disable them using the toggle switch – or select a microphone of your choice. Y
Also, you can enable WebCam recording to include your facecam video in the recording.
Step 4: Start recording
To start screen recording, click the REC button. The recording will begin after a countdown of three seconds. You can also press the F10 key on your keyboard to begin the recording.
If you want to pause/resume the recording, press the F9 key or use the pause button on the control panel. Click the Stop button or press F10 to stop/cancel the recording.
Once you stop the recording, it opens in the DemoCreator editor, where lightweight video editing can be performed.
Conclusion
There are plenty of reasons to screenshot something on Netflix. Whether you're sharing a scene that's too good not to share, or just want to remember something for later, the ability to save any moment from a show or movie always comes in handy.
However, while Netflix doesn’t allow you to take screenshot, the process of capturing an image is different than how you'd normally take screenshots – the methods are different for different devices.
So if you've been wondering how to screenshot Netflix, our guide could be everything you need to know.


