
Current-gen consoles pack a heavy punch. They’re capable of gaming at 4K resolution and 30 or 60 FPS, depending on the title you pick. However, their screen-capturing capabilities could benefit from a few improvements, as they make it challenging to record games without affecting the performance or ruining your gameplay experience.
Luckily, solutions are readily available in the form of third-party screen-capturing devices, and today, we’ll review one of these.
Stay with us to learn about AVerMedia’s Live Gamer Extreme 3, a dedicated console screen-capturing device with Plug&Play functionality, 4K recording capabilities, and a wealth of I/O ports.
In this article
Live Gamer Extreme 3 Overview

Developed with console gamers in mind, AVerMedia’s Live Gamer Extreme 3, also known as AVerMedia LGX 3, is a powerful plug-and-play external screen capture card. You might also see it named AVerMedia GC551G2 or see a device called GC551 and think it’s the same, but you’d be wrong.
The company’s confusing titles stem from the fact the AVerMedia LGX 3, coded GC551G2, is one of almost 20 screen-capturing devices made by the same company. The GC551 is the codename of AVerMedia’s LGX 2, a previous-gen external capture card.
Yet, having so many successful products bodes well for AVerMedia, showcasing their long experience in the industry. Their latest device, the GC551G2, is a step over both the GC551 and the LGX GC550, previous-gen capture cards from AVerMedia and devices that sold remarkably well.
Before AVerMedia’s awful naming scheme completely confuses you, let’s move on to what you’re here for – a review of AVerMedia Live Gamer Extreme 3 GC551G2. We’ll dig in right away.
Live Gamer Extreme 3 Key Features and Tech Specs

Putting the company’s confusing naming scheme on the side, AVerMedia’s LGX 3 is more than just an external plug-and-play capture card. It’s a tiny device with countless fantastic features and top-notch specs, making it an excellent choice for screen-capturing your console’s gameplay. Let’s dive into these features and specs right away.
Key Features:
- 4Kp30 uncompressed video capture capabilities;
- Support for variable refresh rate (VRR);
- Ultra-low latency gaming and streaming;
- Two HDMI video ports and audio line-in and line-out ports;
- Multistream abilities with the company’s RECentral 4 software (RECcentral Express on macOS).
Tech Specs:
- USB 3.2 (Gen1) Type-C plug-and-play interface;
- HDMI 2.0 video input;
- HDMI 2.0 video output (pass-through);
- 3.5mm jack or HDMI 2.0 audio input;
- 3.5mm jack or HDMI 2.0 audio output (pass-through);
- 1440p120 and 1080p120 max VRR pass-through resolutions;
- 2160p60, 1440p120, and 1080p240 max HDR pass-through resolutions;
- Input resolutions of 2160p, 1440p, 1080p, 1080i, 720p, 576p, and 480p;
- Recording resolutions of 2160p30, 1440p60, and 1080p60;
- The recording format is MPEG 4 (AAC audio and H.264 or H.265 video).
With a wealth of highly capable I/O ports and fantastic capturing and streaming features, AVerMedia’s Live Gamer Extreme 3 GC551G2 lets gamers hook up any console and level up their gaming experience.
Live Gamer Extreme 3 Design

Like most USB-based plug-and-play screen capture cards, AVerMedia LGX 3 is designed to pack a heavy punch in a tiny form factor. This small black box capture device is incredibly light, weighing less than 100g (85g, to be precise). It can easily fit in your pocket as its WxDxH dimensions are 112.5mm, 66.1mm, and 20.9mm.
That’s a weight of 3oz and WxDxH dimensions of 4.43x2.6x0.82 inches for those more used to Imperial units.
Out of the box, the GC551 comes with a Type C to Type A USB cable, a single HDMI 2.0 cable, and a quick start guide to help you navigate its effortless setup and the device’s I/O ports.
As the picture shows, the Gamer Extreme’s back side has two HDMI 2.0 ports (one for video input and one for output), a USB 3.2 Gen 1 port for power, and two 3.5mm jack ports for audio in and out, while the front and the sides are clean, without any ports on them.
Live Gamer Extreme 3 Recording Performance

Despite AVerMedia’s claims of effortless 4Kp30 screen capturing, the Live Gamer Extreme 3 GC551G2 in our possession didn’t perform the greatest. It was tested with a PC with a Ryzen 5 5600 CPU and an RX 6700 XT GPU, a system more than capable of playing the latest titles. It’s worth noting the capture card occasionally prevented Windows from booting when connected before the PC was turned on.
Even if you were to prescribe these issues to the system and not the AVerMedia LGX 3 device, the screen capture card’s recording performance didn’t fare well either. While it worked great with lower settings, like a 1080p signal and a Nintendo Switch, things went south quickly once the capture card was paired with an Xbox Series X.
In this case, the AVerMedia GC551G2 failed to capture 4Kp30 content with simultaneous pass-through. However, dropping the resolution to 1440p did the trick, and with these settings, the pass-through signal looked fantastic, with no noticeable latency in sight.
And while the Gamer Extreme card supports HDR pass-through, it only records SDR content, so we had to turn off HDR on the Xbox to prevent colors from washing out.
Live Gamer Extreme 3 Software

Plug-and-play is a feature that marks a device that doesn’t require the installation of drivers. However, you will need to use software to set up your AVerMedia Live Gamer Extreme 3 GC551G2 device, and that’s where RECentral comes in.
The GC551G2 capture card requires RECentral 4, the latest and greatest from AVerMedia, and a powerful software solution that’ll lead you through installation. This central hub of the external card’s capture capabilities lets users set custom recording profiles, codecs, formats, resolutions, FPS, keyframe, and audio/video bitrate settings.
AVerMedia’s RECentral 4’s intuitive and well-thought-out design makes it effortless to stream, record, and share with your Live Gamer Extreme 3 GC551G2 capture card, providing a beginner-friendly user interface that anyone can easily navigate.
Its built-in stream-sharing capabilities allow you to quickly connect your Twitch, YouTube, Facebook, or Niconico account and share your screen capture live, helping you connect with your audience. The RECentral 4 app is available for Windows 10 (64-bit) and 11, while macOS users should download RECentral Express, a similar app for Mac devices.

Comparing the Latest Live Gamer Extreme Devices
Now that we know more about AVerMedia’s Live Gamer Extreme 3 GC551G2 and its features, design, performance, and software, we can finally compare it with other AVerMedia capture cards. Below is a detailed table comparing the company’s latest and greatest screen capture devices.
| Device | Live Gamer Extreme 3 – GC551G2 | Live Gamer 4K 2.1 – GC575 | Live Gamer Extreme 2 – GC551 | Live Gamer HD 2 – GC570 | Live Gamer Portable 2 Plus – GC513 |
| Interface | USB 3.1 Gen1 Type-C | PCIe Gen 3 x4 | USB 3.1 Gen1 Type-C | PCIe Gen 2 x1 | USB 2.0 (micro USB) |
| Video Input | HDMI 2.0 | HDMI 2.1 | HDMI 2.0 | HDMI | HDMI 2.0 |
| Video Output (Pass-through) | HDMI 2.0 | HDMI 2.1 | HDMI 2.0 | HDMI | HDMI 2.0 |
| Audio Input | 3.5mm or HDMI 2.0 | / | HDMI 2.0 | 3.5mm or HDMI | 3.5mm or HDMI 2.0 |
| Audio Output (Pass-through) | 3.5mm or HDMI 2.0 | / | HDMI 2.0 | 3.5mm or HDMI | 3.5mm or HDMI 2.0 |
| Max Capture Resolution | 2160p30 | 2160p60 | 1080p60 | 1080p60 | 1080p60 |
| Max Pass-Through Resolutions | HDR: 2160p60, 1440p120, and 1080p240 VRR: 1440p120 and 1080p120 |
HDR and VRR: 2160p144, 1440p240, and 1080p360 | 4Kp60 or 1080p60 | 1080p60 | 4Kp60 or 1080p60 |
| Video Format | MPEG 4 (AAC + H.264 or H.265) | YUY2, NV12, RGB24, P010 (HDR) | MPEG 4 (AAC + H.264) | MPEG 4 (AAC + H.264) and MJPEG | MPEG 4 (AAC + H.264), MJPEG, and hardware encoding |
| Operating System | Windows 10 and 11; macOS 13 and 14. |
Windows 10 and 11 | Windows 10 | Windows 7, 8, 8.1, and 10 | Windows 7, 8, 8.1, 10, and 11; macOS |
| Price | $169 | $269 | $199 | $129 | $139 |
Live Gamer Extreme 3 Pros and Cons
As you can see from our detailed table comparison between AVerMedia’s screen capture cards, the new Live Gamer Extreme 3 bodes pretty well. Thanks to its improvements, the GC551G2 stands out from other AVerMedia offerings, which include AVerMedia LGX 2, a previous-gen GC551, a portable version, and a new PCIe capture card.
Yet, it’s not all rainbows and sunshine with the AVerMedia GC551G2. Despite its numerous advantages, it also has many drawbacks. Let’s dive into both of these so you can learn more about Live Gamer Extreme 3’s strengths and weaknesses.
Pros:
- Plug-and-play capture card (no drivers required);
- Effortless to plug in and set up;
- VRR support;
- It doesn’t require opening up your PC and installing it inside;
- Well-thought-out recording software with an intuitive design – RECentral;
- Tiny form factor and an aesthetically pleasing device with high portability;
- An affordable console screen capture solution at $169.99.
Cons:
- No HDR capture capabilities;
- No 4Kp60 recording support;
- The device gets very hot after a longer recording session;
- Struggles at high resolutions, sometimes refusing to capture at 4K;
- RECentral software sometimes crashes;
- The device sometimes prevents Windows from booting;
- Its plastic design and 85g of weight make it too easy for the device to move around a lot;
An Alternative Method for Recording Console Gameplay
Those unsatisfied with Live Gamer Extreme 3’s capabilities or turned away due to its many drawbacks will be pleased to learn the AVerMedia GC551G2 is only one of many screen capture cards capable of effortless console recording sessions.
Furthermore, you don’t need an external plug-and-play screen capture card to record your console’s gameplay. Software solutions are often far better for screen-capturing your console’s gaming session. They’ve also come a long way regarding console screen capture, allowing for high-resolution recording and a smooth experience that doesn’t involve a snakepit of cables.
Take Wondershare DemoCreator, for example. This software-based screen recording tool uses your PC’s more powerful CPU and GPU instead of adding additional strain to your console’s already-utilized and often weaker hardware. That helps your performance, ensures a smoother gaming session, and prevents screen capture from ruining your gameplay experience.
Best Recording Software - DemoCreator
Characterized by six recording modes, support for 4K resolution and up to 120FPS, and a wealth of customization options, Wondershare DemoCreatore is a perfect example of a fantastic screen recording software. Its intuitive user interface, support for Windows and macOS, and the ability to record the computer’s screen or the console make it an excellent alternative to an external screen capture card.
With Wondershare DemoCreator, ease of use is on another level. There are no cables to mess up your desk’s aesthetic, while the app’s installation and setup are a breeze. Using DemoCreator is also easy.
Here’s what you’ll need to do to record your console’s gaming sessions with the app:
Step 1: Connect your console and PC to the same home Wi-Fi network (you can also use ethernet cables) and then connect them with a USB cable.
Step 2: Depending on your console, connect it to the PC by using the appropriate software. For example, for the PS5 console, you’ll need to download Remote Play and follow the steps to set the app up. A Nintendo Switch or an Xbox Series X will require different connecting apps or methods.
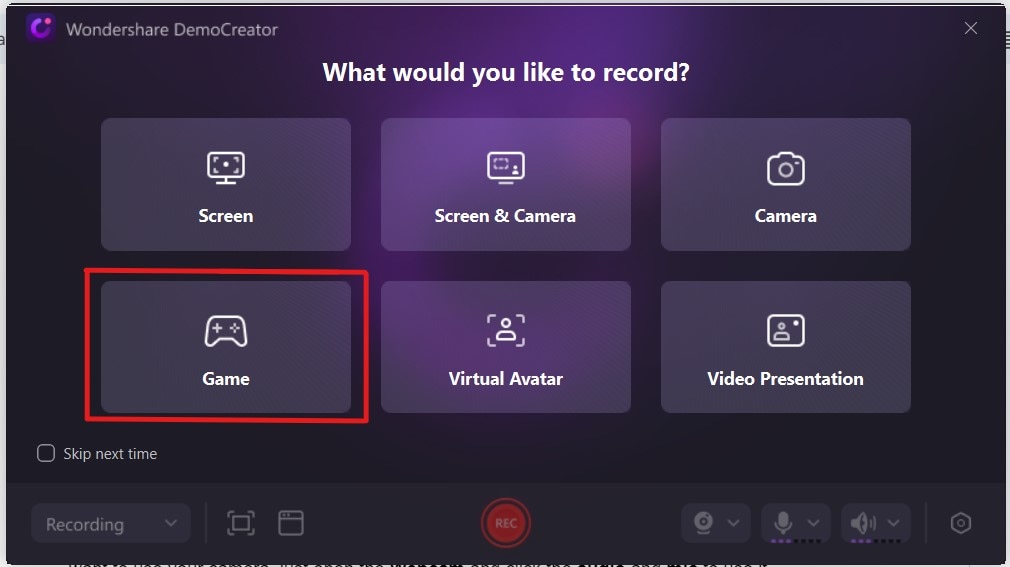
Step 3: Launch the DemoCreator app, select Video Recorder, and use the Game option.
Step 4: Adjust your recording settings by choosing your console, selecting a game, and setting up your microphone. You can also alter the webcam settings to record your face cam.

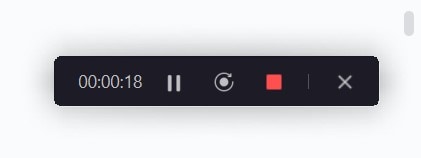
Step 5: Click DemoCreator’s red REC button to start recording when you’re ready and play for as long as you want to without worrying about an overheating device.
Step 6: After a gaming session, tap the F10 button (or click the End recording button) to stop recording your console’s screen. Alternatively, tap F9 to pause or resume the app’s recording.
Once you end a recording, the DemoCreator app will automatically launch its Video Editor, one of the most significant advantages of this screen recording software solution. The built-in Video Editor lets you quickly and efficiently edit your game’s recording, preparing it for sharing on various platforms.
Wondershare DemoCreator also includes effortless social media sharing features, allowing gamers to connect their accounts and automatically share their gaming clips on the connected platforms as they export them.
- Record customized screens with audio and edit them in different tracks.
- Capture gaming videos, tutorials, and presentations and then edit them in one tool.
- Built-in unlimited editing templates, special effects, and other sources.
- Supported export to MP4, MOV, MKV, GIF, and other formats.

Conclusion
AverMedia’s Live Gamer Extreme 3 GC551G2 is a fantastic plug-and-play screen capture card and an excellent choice for anyone new to streaming and console content creation. The device, often called AVerMedia LGX 3, supports various resolutions and will work great with current-gen consoles. It even works out of the box, making it a top choice for any beginner without a screen-capturing experience.
However, AVerMedia GC551G2’s build quality leaves a lot to be desired. While the tiny form factor device can easily fit in your pocket, its plastic body and weight of only 85g make it appear cheap. Even worse, it lets it slide around, as even cables can affect its placement.
On top of that, we won’t even mention how hot the device can get after an extended recording session or its refusal to capture at 4K in some conditions.
Fortunately, an external plug-and-play device like the Gamer Extreme 3 isn’t your only option for recording console gameplay, as software solutions like Wondershare DemoCreator also exist.
Thanks to its ease of use, an intuitive user interface that’s effortless to navigate, six recording modes, and none of the limitations of the AVerMedia Live Gamer Extreme 3 GC551G2, Wondershare DemoCreator is a far better option for recording current-gen consoles and PCs.
The app supports a resolution of up to 8K and up to 120FPS, and it won’t move around your desk or cause a potential burn.


